Warning – Rivers Edge RE750 Universal Treestand Canopy User Manual
Page 3
TREESTANDS
Page
HuntRiversEdge.com
Universal Treestand Canopy (RE750)
HuntRiversEdge.com
800-450-EDGE (4)
Rivers Edge Treestand Canopy’s are engineered with you the hunt-
er in mind. We appreciate your purchase of one of our world class
canopy’s. Follow these few simple instructions and your canopy will
provide you many years of trouble-free pleasure. Instructions should
be kept in a safe place and reviewed at least annually.
If for any reason you have a problem with your product,
DO NOT
return to the retailer, contact the Rivers Edge customer service
department at 800-450-EDGE (3343) for assistance.
ASSEMBLY INSTRUCTIONS
Tools needed – two 7/16" wrenches
IMPORTANT ASSEMBLY TIP: Do not tighten any nut and bolt
combinations completely until all parts are assembled together!
Finger tighten plus one turn of a wrench only! This will temporar-
ily hold the lock nut on the bolt while helping alignment of all
parts! After all parts are assembled together, all nut & bolt com-
binations must be completely tightened.
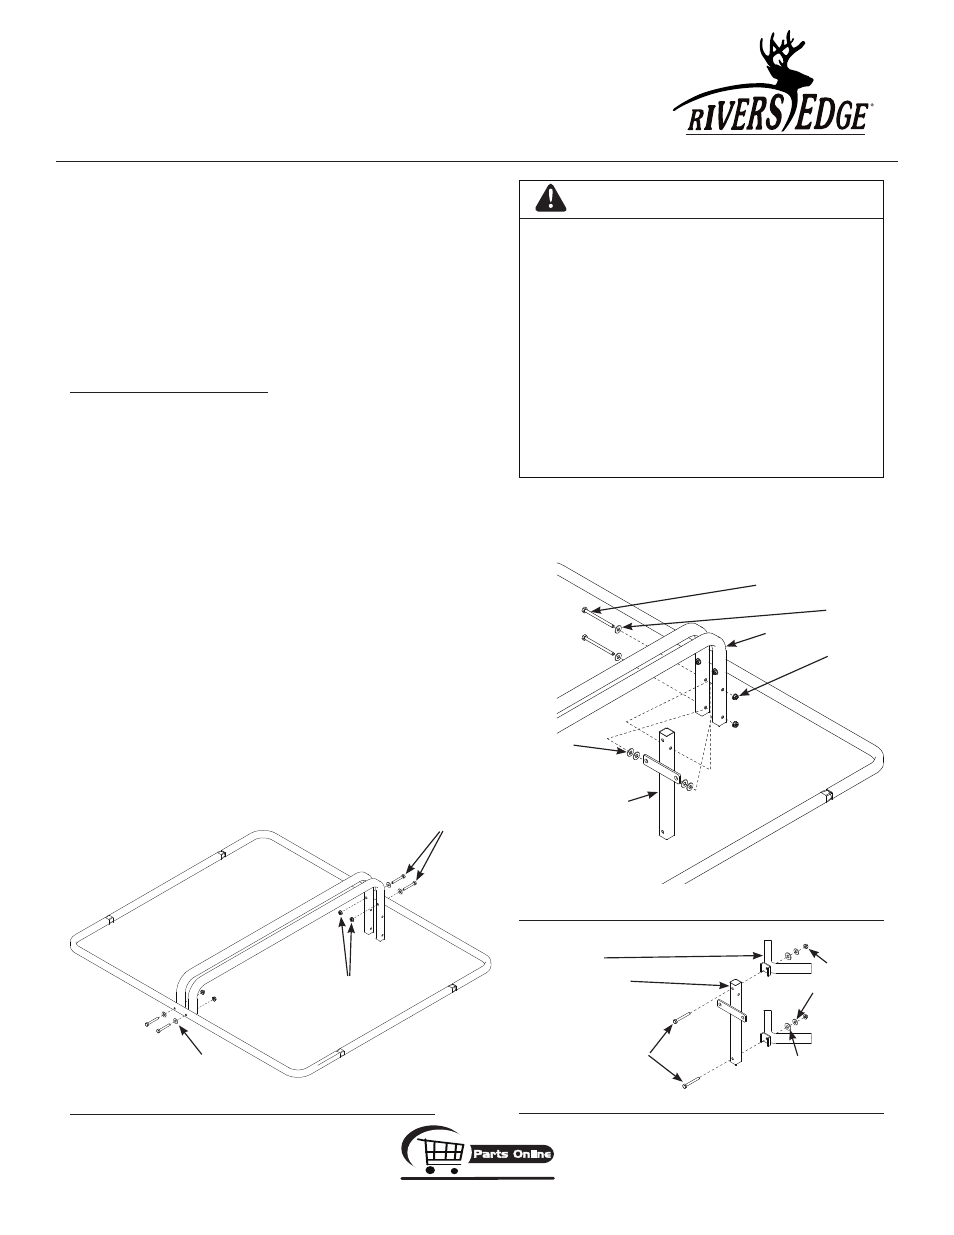
1. Insert the (2) rim spanners (A716) into the (2) roof rims (A715). This will
form the canopy rim.
SEE fIGURE 1.
2. Attach the center roof braces (A717) to the inside of assembled canopy
rim using (4) provided 1/4-20 x 2” bolts, locknuts and 1/4” washers.
SEE
fIGURE 1. DO NOT tighten all nut & bolt assemblies completely!
3. Attach the center tree brace (A718) in between the center roof braces
using (2) provided 1/4-20 x 3-1/2” bolts, locknuts and (6) 1/4”washers.
SEE fIGURE 2.
4. Attach the (2) tree huggers (SS12) to the center tree brace using (2)
provided 1/4-20 x 2-1/4” bolts, locknuts, 1/4” washers and 5/16” washers.
SEE fIGURE . You must now tighten all nut & bolt assemblies. Be
sure not to over tighten or crush tubing when tightening!
5. Attach the removable camo roof (48835) to the top of canopy frame by
stretching bungee cord around metal frame. Black side should be on top
and camo underneath facing the ground.
fIGURE 2
fIGURE 1
fIGURE
tree huggers
center tree brace
1/4-20 x 2-1/4" bolts
locknuts
1/4" washers
5/16" washers
washers
center tree brace
1/4-20 x 3-1/2" bolts
washers
center roof braces
locknuts
1/4-20 x 2" bolts
locknuts
washers
wARNING
READ, UNDERSTAND AND fOLLOw ALL ASSEMBLY, IN-
SPECTION, MAINTENANCE & USE INSTRUCTIONS PRO-
VIDED BEfORE EACH USE. fAILURE TO fOLLOw ALL
wARNINGS AND INSTRUCTIONS COULD RESULT IN SE-
RIOUS INJURY OR DEATH.
ALL ASSEMBLY MUST BE DONE IN THIS ORDER AT
GROUND LEVEL BEfORE USE.
DO NOT CRUSH TUBING wHEN TIGHTENING BOLT AS-
SEMBLIES! IDENTIfY AND fAMILIARIZE YOURSELf
wITH ALL PARTS BEfORE YOU START. A BOLT IDENTI-
fICATION CHART CAN BE fOUND IN THE BACk.
BE SURE SECTIONS ARE SEATED COMPLETELY TO-
GETHER ON SwEDGED ENDS Of PIPE.
DOUBLE CHECk ASSEMBLY STEPS TO BE CERTAIN
YOU HAVE CORRECTLY ASSEMBLED THIS PRODUCT.