Attach post caps, Fixing first rail, Extending the post – Keter Dallas 6 User Manual
Page 2
12”-20”
(30cm-50cm)
2”
This side up
2” (5cm)
(5cm)
PP GLUE
GROUND
2nd p
ost
GROUND
2nd p
ost
2”-6” (5cm-15cm)
2”-6” (5cm-15cm)
option 1
?
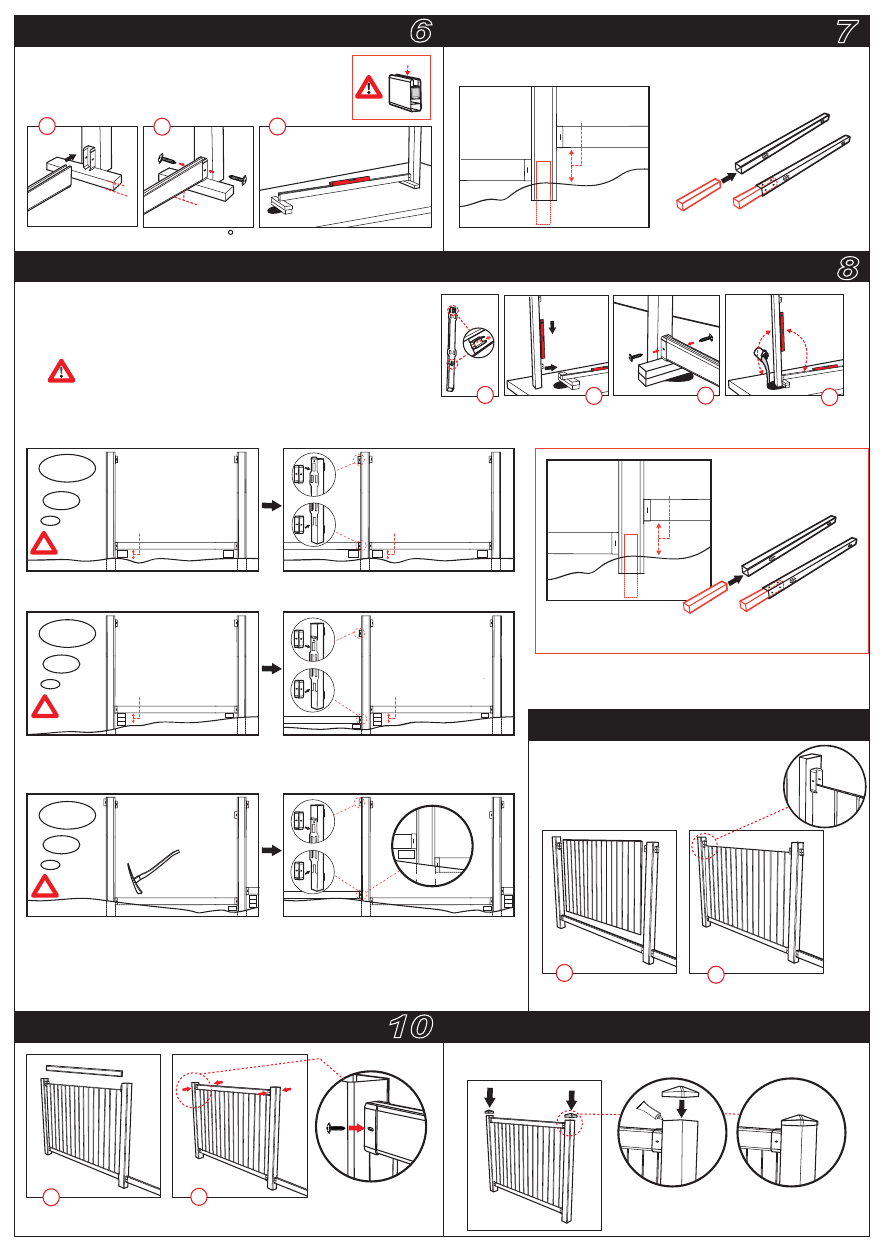
ATTACH POST CAPS.
1.
Press caps down on post top.
2. you can secure the caps with super glue
7
6
FIXING FIRST RAIL
1
2
3
Make sure the rail is leveled horizontly &90 to the second post
1. Place the lower rail in position.
2. Fix the rail to the post with 2 screws (SC35B), through the
bracket holes.
3. level the rail horizontely use a timber to support.
11
INSTALLING FENCE SECTION
Position the brackets on the empty side (In continuation direction) of the post considering the 3 following
options: folow
Level
Downward slope
Upward slope
2” -6”
(5cm-15cm)
place the positioning guide from top of the post & fix the brakets 3 screw (sc15) for each.
2nd p
ost
2nd p
ost
GROUND
GROUND
6”-12” (5cm-15cm)
6”-12” (5cm-15cm)
?
option 2
6”
(15cm)
And up, place the lower bracket 2”
(5cm)
from ground use positioning guide for the second
bracket.
If the distance is more then 12”
you must extend the post
8
FIXING NEXT POST (Take into account level, downward and upward slopes)
up
90
o
90
o
1
2
3
4
12”-20”
(30cm-50cm)
GROUND
EXTENDING THE POST
The post must be at least 12” In ground if you have a slope that is over 12” you
must extend
the post with timber as showen.
(use 4”/4”/24”,10cm/10cm/65cm timber 8 screw)
1. Attach two brackets to the post using the positioning guide.
2. place the post in the hole
3. Fix the post to the rail with 2 screws (SC35B) , through the bracket holes.
4. Add Concrete use dry or mix concrete. Allow concrete to set for 10-15 minutes.
Verify that rail is leveled and post is vertical on both direction !
X2
1
2
SCREW FROM
BOTH SIDES
Assemble the upper rail on
top of the panel.
Use two screws to fix the rail
to the bracket
INSTALLING FENCE SECTION
10
1
2
1. Assemble the first panel into
the bottom rail.
2. Make sure the panel goes into
the brackets.
?
option 3
GROUND
In the case of upward slope, connect the brackets 2”
(5cm)
up and/or position the new post
lower while digging a trench for the rail .
Make sure (using the positioning guide) that upper bracket on the left side is not out of the post top.
2nd p
ost
GROUND
3th p
ost
2nd p
ost
GROUND
3th p
ost
9