Operating & maintenance instructions, Uv lamp replacement, Quartz sleeve replacement and cleaning – Hydrotech PURA ABuv 6_8_12 User Manual
Page 8
8
OPERATION
• Always disconnect power before performing any work on the disinfection system.
• Regularly inspect your disinfection system to ensure that the power indicators are on and no alarms are present.
• Replace the UV lamp annually (or biannually if seasonal home use) to ensure maximum disinfection.
Operating & Maintenance Instructions
CAUTION
Prior to performing any work on the disinfection system, always disconnect the power supply first.
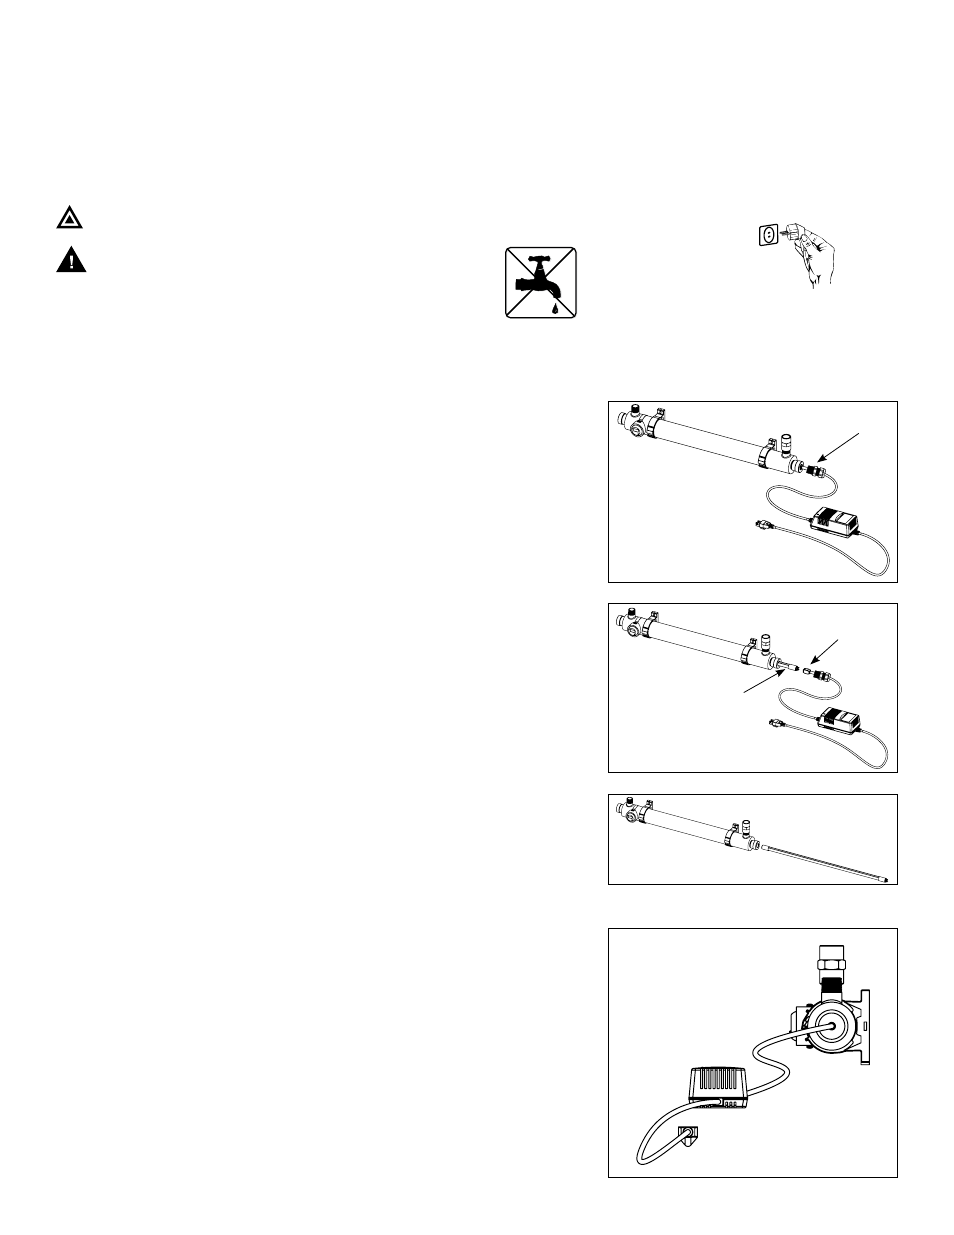
WARNING: DO NOT USE WATER DURING THIS PROCEDURE
UV Lamp Replacement
NOTE: RESET LAMP LIFE TIMER AFTER LAMP REPLACEMENT (see page 9) Refer to www.lamprecycle.org for lamp disposal
1. To replace the lamp, there is NO need to disconnect the system from the
water supply. DO NOT USE WATER DURING THIS PROCEDURE. Lamp replace-
ment is a quick and simple procedure requiring no special tools. The UV
lamp must be replaced after one year in order to ensure adequate disin-
fection.
2. Disconnect main power source and allow the unit to power down for 30
seconds.
3. Unscrew the strain relief from the unit as shown in picture A.
4. Pull the lamp cord slowly away from the chamber and disconnect the
lamp from the cord. Do not twist the lamp from the connector, simply slide
the two apart. Avoid touching the lamp on the glass portion. Handling the
lamp at the ceramic ends if acceptable, however if you must touch the
lamp glass, please use gloves or a soft cloth. See picture B.
5. Fully remove the lamp from the reactor chamber being careful not to
angle the lamp as it is removed from the chamber. If the lamp is removed
on an angle,pressure will be applied on the inside of the quartz sleeve,
causing the sleeve to fracture. See picture C.
6. To install a new lamp, first remove the lamp from its protective packaging,
again being careful not to touch the lamp glass itself. Carefully insert the
lamp into the reactor vessel (actually inside the quartz sleeve) . Insert the
lamp fully into the chamber leaving about two inches of the lamp protrud-
ing from the chamber. Next, attach the connector to the UV lamp. Ensure
the connector is fully seated onto the UV lamp.
7. Slide the lamp slowly through the aluminum nuts till it is seated inside the
chamber and screw the strain relief back in to place.
8. Plug the power supply to the control module.
Quartz Sleeve Replacement and Cleaning
NOTE: for first time installation of the UV system, it is recommended that quartz
sleeve is installed in the horizontal position to better sealing purposes.
Mineral deposits and sediment may accumulate on the quartz sleeve decreas-
ing the UV energy detected. Good maintenance of filtration equipment will
reduce the accumulation of residues. If necessary, remove the quartz sleeve
and clean with a commercially available scale remover (CLR, Lime-Away,
etc.) and a lint free cloth. Repeat the process as often as necessary to keep
the quartz sleeve clean. Be sure to remove all traces of cleaning fluid from the
sleeve before it is reinstalled in the reactor (be sure not to allow liquid inside the
sleeve).
A
B
C
D
Strain relief
Use 15/16” wrench
if strain relief fitting
is tight
UV lamp
Lamp
connector