Repair and assembly, Pump wet end removal, Tools needed – All-Flo A200-NAA-VVYV-000 2 Aluminum User Manual
Page 14
all-flo.com
14
REPAIR AND ASSEMBLY
PUMP WET END REMOVAL
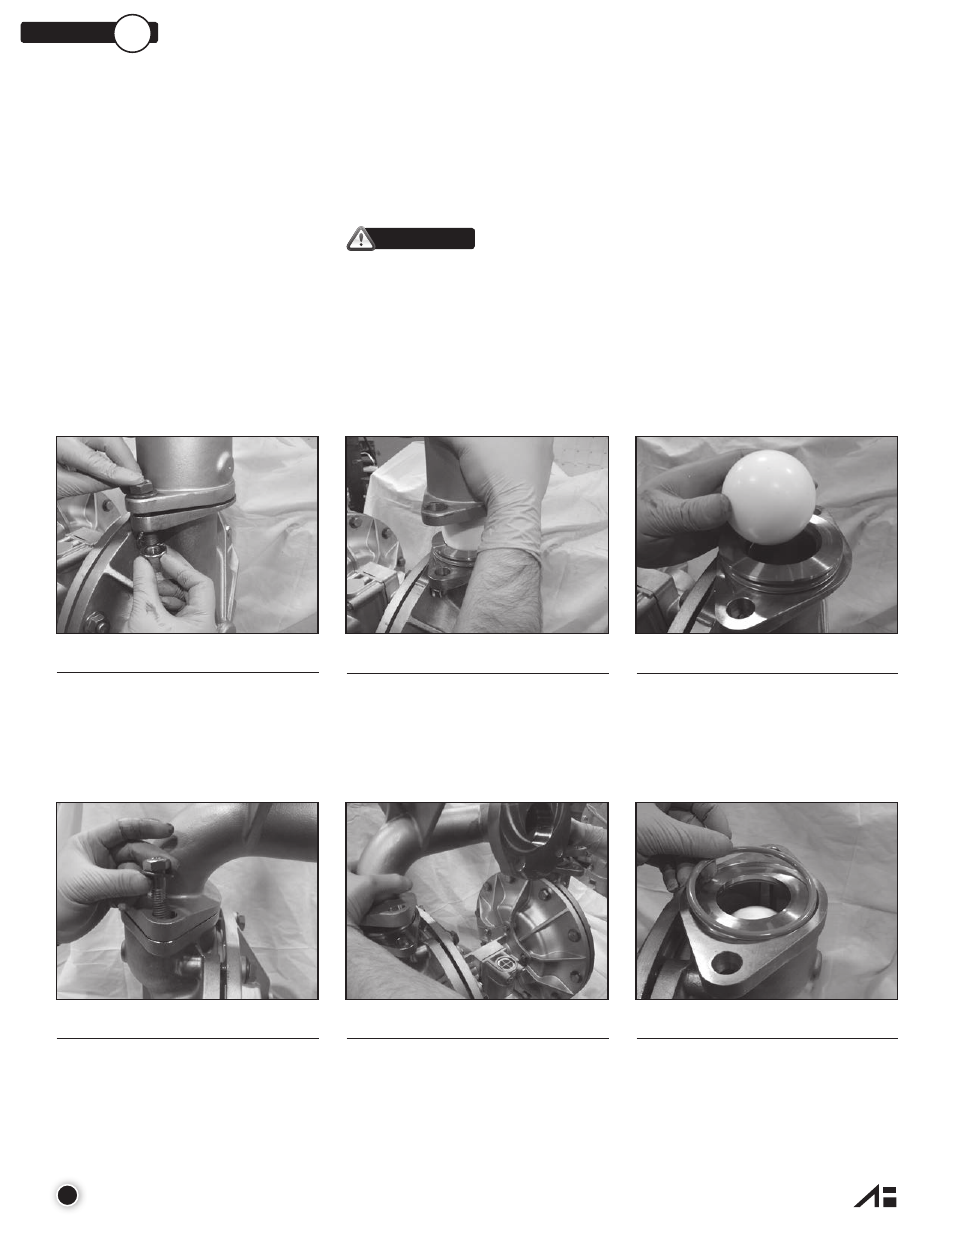
STEP 1
Using the 3/4 inch wrench remove
four “Hex-Head Cap Screws (1/2”-
13x2”)”, four “Flat Washers (1/2”)”
and four “Flanged Hex Nut (1/2”-
13)” from the “Discharge Manifold”.
STEP 2
Remove the “Discharge Manifold”.
STEP 3
Remove the “O-Ring”, “Valve Seat”
and “Ball”.
TOOLS NEEDED
1) One Wrench, 7/16 Inch
2) Two Wrenches, 1/2 Inch
3) Two Wrenches, 3/4 Inch
4) Two Wrenches, 1 Inch
5) One Socket Wrench, 1-1/16 Inch
6) One Spanner Wrench, 3/4 Inch
(May Be Required)
WARNING
Prior to servicing the pump, ensure that the air and
fluid lines are closed and disconnected. While wearing personal
protective equipment, flush, drain and process liquid from the pump
in a safe manner.
STEP 4
Using the 3/4 inch wrench remove
four “Hex-Head Cap Screws (1/2”-
13x2”)”, four “Flat Washers (1/2”)”
and four “Flanged Hex Nut (1/2”-
13)” from the “Suction Manifold”.
STEP 5
Remove the “Suction Manifold”.
STEP 6
Remove the “O-Ring”, “Valve
Seat” and “Ball”.
SECTION
7
- A200-NAA-TTYT-000 2 Aluminum A200-NAA-SSPE-000 2 Aluminum A200-NAA-NNPN-000 2 Aluminum A200-NAA-GTPN-000 2 Aluminum A200-NAA-GGPN-000 2 Aluminum A200-BAA-VVYV-000 2 Aluminum A200-BAA-TTYT-000 2 Aluminum A200-BAA-SSPE-000 2 Aluminum A200-BAA-NNPN-000 2 Aluminum A200-BAA-GTPN-000 2 Aluminum A200-BAA-GGPN-000 2 Aluminum A200-EA3-VV3V-000 2 316 Stainless Steel A200-EA3-TT3T-000 2 316 Stainless Steel A200-EA3-SS3E-000 2 316 Stainless Steel A200-EA3-GG3N-000 2 316 Stainless Steel A200-CA3-VV3V-000 2 316 Stainless Steel A200-CA3-TT3T-000 2 316 Stainless Steel A200-CA3-SS3E-000 2 316 Stainless Steel A200-CA3-GG3N-000 2 316 Stainless Steel