Aeromotive, inc – Aeromotive 18664 - 15G 340 STEALTH FUEL CELL User Manual
Page 4
Thanks for purchasing another quality product designed, engineered and manufactured in Kansas City,
USA!
AEROMOTIVE, INC.
7805 Barton St, Lenexa, KS 66214
913.647.7300 fax 913.647.7207
6. Connect the return port on the fuel pressure regulator to the AN-08 Port on the Aeromotive Stealth Fuel Cell.
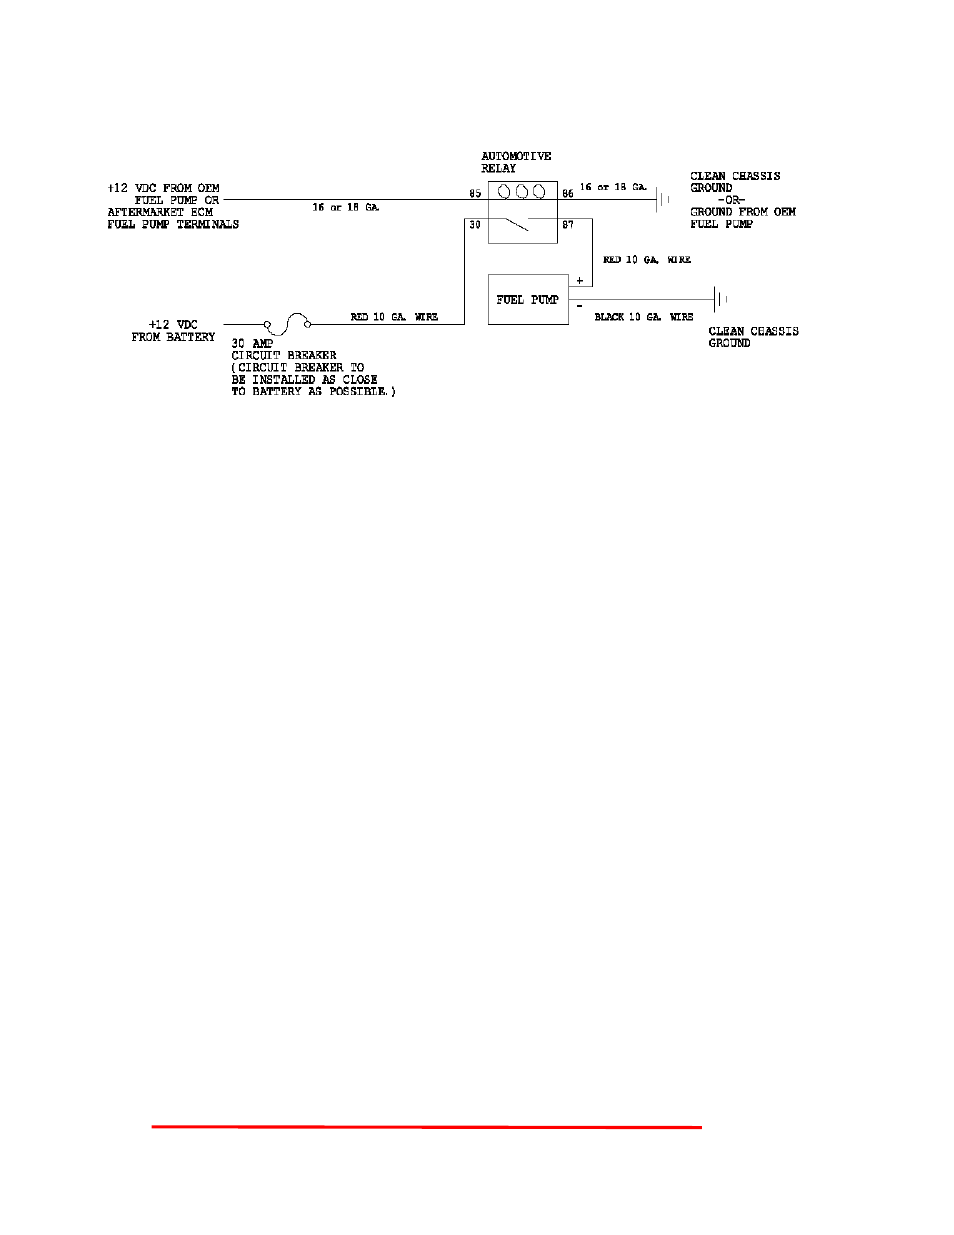
7. Connect the Aeromotive fuel pump using stranded, insulated copper wire, in the sizes shown, with matching crimp-
type connectors for all connections. A wiring kit is available from Aeromotive, p/n 16301
8. Connect the fuel sending unit output wire to a 0-90 ohm compatible fuel level gauge.
0 ohms reads empty, and 90 ohms reads full.
9. Attach a suitable fuel pressure gauge to the fuel system schrader valve, fuel rail or fuel pressure regulator.
P/N 15632 0-15 PSI (1 ½”) “Dry” Fuel Pressure Gauge
P/N 15633 0-100 PSI (1 ½”) “Dry” Fuel Pressure Gauge
Ensure that any spilled fuel and any fuel soaked shop towels are cleaned up and removed from the vicinity of
the vehicle.
CAUTION:
While performing the following steps, if any fuel leaks are detected, immediately turn the ignition to
OFF, remove any spilled fuel and repair the leak(s) before proceeding!
10. Turn the ignition to ON without starting the engine, allow the pump to run for several seconds and check the fuel
pressure. If there is no pressure, turn the ignition to OFF, wait one minute, then turn the ignition to ON and recheck the
pressure. Repeat this ignition OFF and ON procedure until the gauge registers pressure or you detect a fuel leak. If no
pressure is registered on the gauge after running the pump for several seconds and you have found no leaks, check
all fuel and electrical connections to determine the cause.
11. Once the fuel pressure gauge registers pressure, start the engine. If you have installed an adjustable fuel pressure
regulator, adjust it to the desired setting.
12. Shut the engine off. Using suitable clips and other mounting hardware, secure the newly installed fuel lines and
electrical wires by attaching them to the vehicle chassis.
13. Test-drive the vehicle to insure proper operation and re-check the fuel system for leaks. If any leaks are found,
immediately discontinue use of the vehicle and repair the leak(s)!