Gorman-Rupp Pumps 04B52-B 1346496 and up User Manual
Page 26
OM-01232
0 SERIES
MAINTENANCE & REPAIR
PAGE E - 7
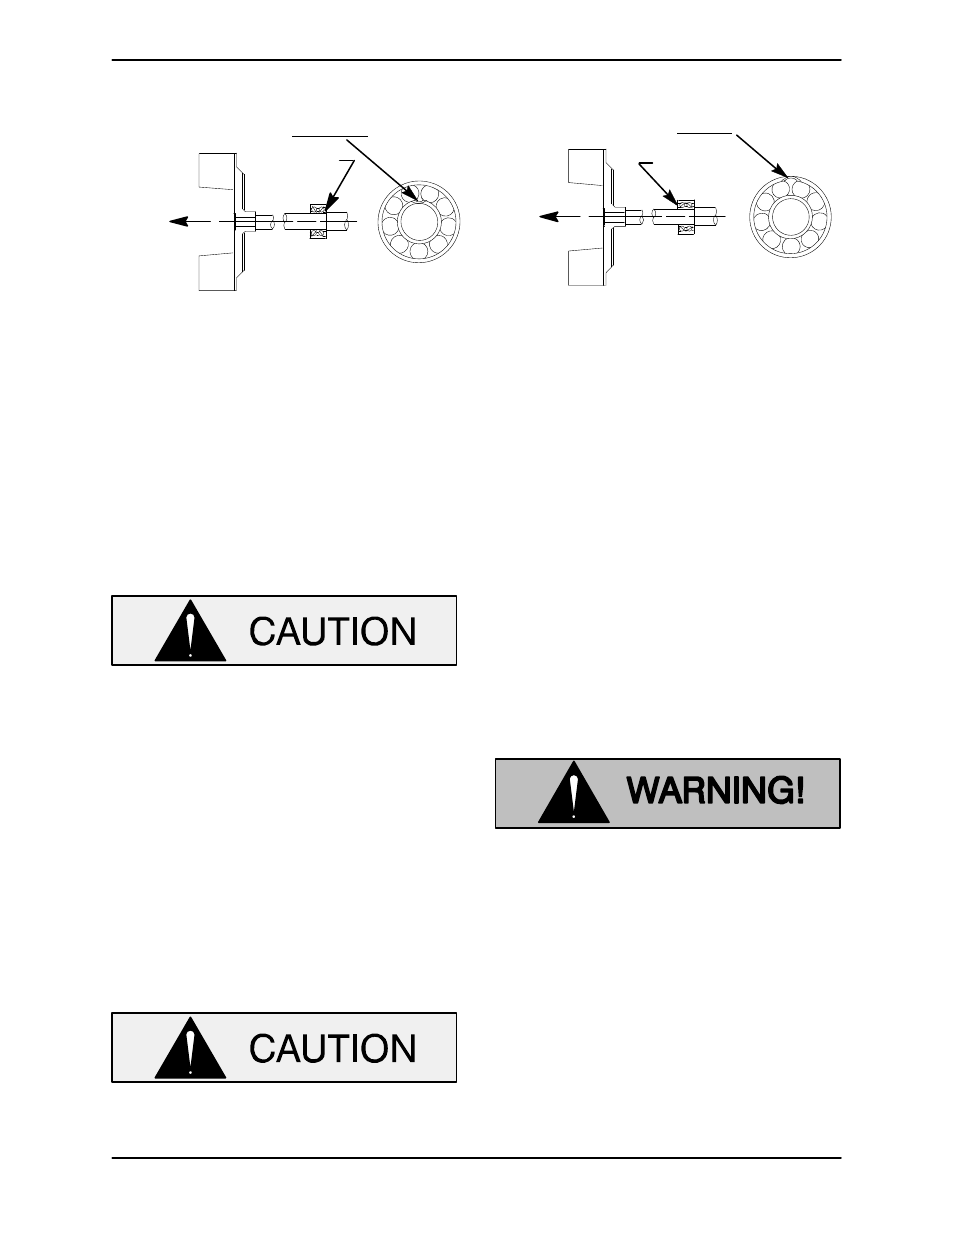
INSTALLATION OF NEW DEPARTURE OR
BCA/FEDERAL MOGAL 5300W SERIES BEARINGS
(OPEN OR ENCLOSED IMPELLERS)
INSTALLATION OF MRC/SKF 5300M OR
FAFNIR 5300W SERIES BEARINGS
(OPEN OR ENCLOSED IMPELLERS)
LOADING
DIRECTION OF
THRUST
BALL LOADING
GROOVE POSITIONED
AWAY FROM IMPELLER
GROOVE
DIRECTION OF
THRUST
LOADING
BALL LOADING
GROOVE POSITIONED
TOWARD IMPELLER
GROOVE
Figure 2. Bearing Positioning
After the bearings have been installed and allowed
to cool, check to ensure that they have not moved
in shrinking. If movement has occurred, use a suit
ably sized sleeve and a press to reposition the
bearings.
If heating the bearings is not practical, use a suit
ably sized sleeve and an arbor (or hydraulic) press
to install the bearings on the shaft.
When installing the bearings on the shaft,
never press or hit against the outer race,
balls, or ball cage. Press only on the inner
race.
Press the oil seals (14 and 24) into the bearing caps
(22 and 35) with the lips positioned as shown in
Figure 1. Install the gasket (34) and secure the in
board bearing cap (35) to the pedestal with the
capscrews (13).
Slide the shaft and assembled bearings into the
pedestal bore from the drive end until the inboard
bearing seats squarely against the inboard bear
ing cap. Use caution not to roll or cut the lip of the
oil seal (14) when installing the shaft.
When installing the shaft and bearings into
the bearing bore, push against the outer
race. Never hit the balls or ball cage.
Install the same thickness of bearing shims (29) as
previously removed, and secure the outboard
bearing cap and gasket (21) to the pedestal with
the capscrews (23).
Check the shaft endplay. Shaft endplay should be
between .002 and .010 inch (0, 05 mm to 0,25 mm).
Add or remove bearing shims (29) to establish the
correct endplay.
Install the shaft key (25) in the shaft keyway.
Seal Reassembly and Installation
(Figures 2 and 5)
Clean the seal cavity and shaft with a cloth soaked
in fresh cleaning solvent.
Most cleaning solvents are toxic and
flammable. Use them only in a well‐ven
tilated area free from excessive heat,
sparks, and flame. Read and follow all
precautions printed on solvent contain
ers.
The seal is not normally reused because wear pat
terns on the finished faces cannot be realigned
during reassembly. This could result in premature
failure. If necessary to reuse an old seal in an emer
gency, carefully wash all metallic parts in fresh
cleaning solvent and allow to dry thoroughly.
Handle the seal parts with extreme care to prevent
damage. Be careful not to contaminate precision