Gorman-Rupp Pumps 13D1-L70EE 1258889 and up User Manual
Page 25
10 SERIES
OM-05462
MAINTENANCE & REPAIR
PAGE E - 8
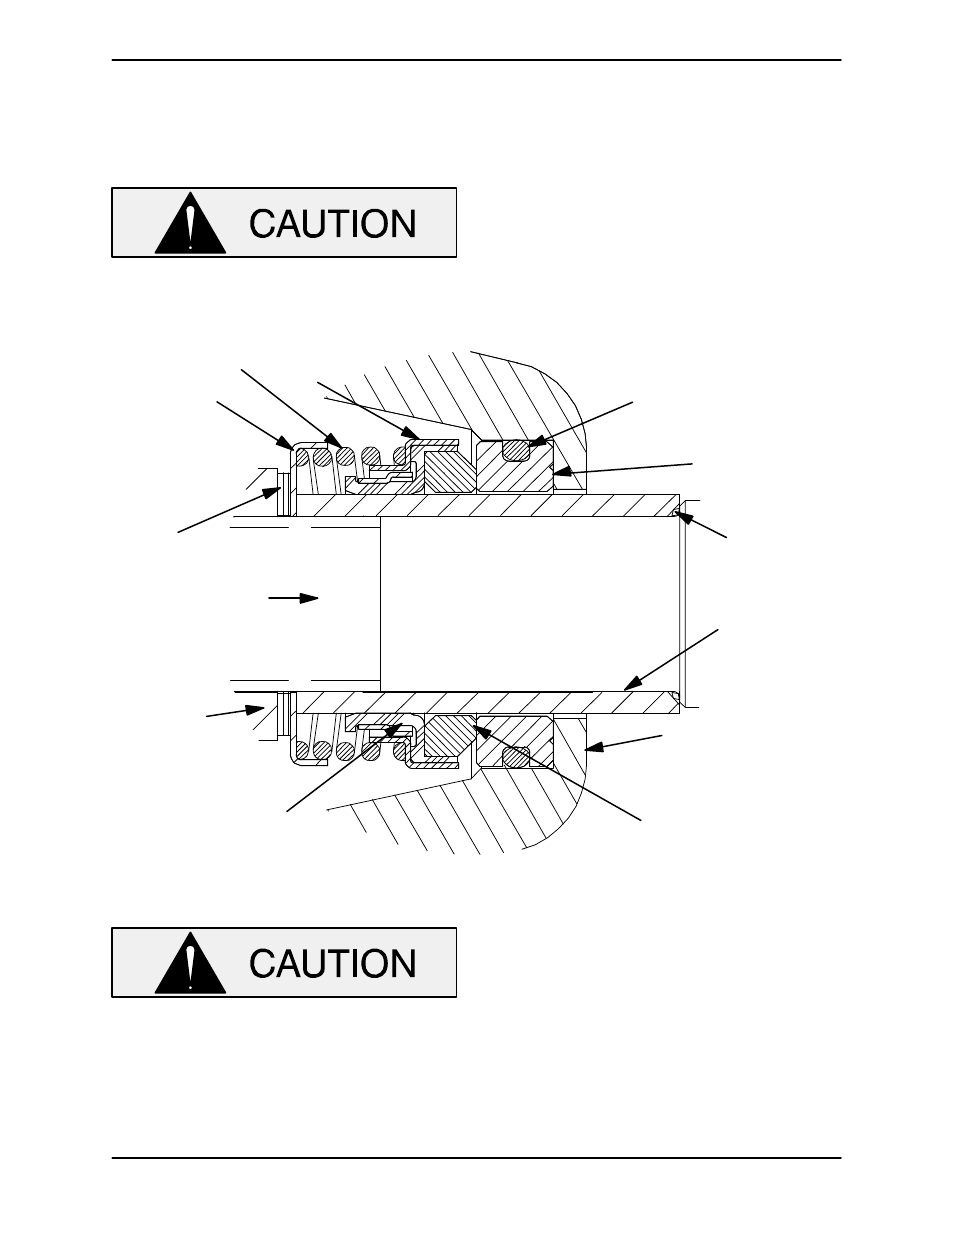
If a replacement seal is being used, remove it from
the container and inspect the precision finished
faces to ensure that they are free of any foreign
matter.
Replacement seals are shipped with a
spring centering washer. The washer sup
plied with a new seal will not work for this
application. Discard the spring centering
washer supplied with the seal and use the
washer supplied with the pump (item 5,
Figure 1) or replace it with a new one.
To ease installation of the seal, lubricate the O‐
rings, sleeve and bellows with water or a very small
amount of oil, and apply a drop of light lubricating
oil on the finished faces. Assemble the seal as fol
lows (see Figure 3).
SPRING
CENTERING
WASHER
SPRING
RETAINER
O‐RING
STATIONARY
SEAT
SHAFT
SLEEVE
INTERMEDIATE
ROTATING
ELEMENT
BELLOWS
IMPELLER
ENGINE STUB
SHAFT
IMPELLER
SHIMS
SHAFT
SLEEVE
O‐RING
Figure 3. Seal Assembly
This seal is not designed for operation at
temperatures above 160
_F (71_C). Do not
use at higher operating temperatures.
Inspect the engine stub shaft for damage. Small
scratches or nicks may be removed with a fine file
or emery cloth. If the stub shaft is bent of excessive
ly worn, replace the shaft (see the engine service
manual).
To prevent damaging the shaft sleeve O‐ring (40)
on the shaft threads, cover the threads with electri
cal or duct tape. Slide the O‐ring over the shaft until
it seats against the shaft shoulder. Remove the
tape covering the threads. Check to ensure that
the shaft threads are free of any tape residue and
clean as required before proceeding with seal
installation.