Operating the tailvac, Uso de la aspiradora a la tailvac, Utilisation de l’aspirateur à tailvac – ProTeam TailVac User Manual
Page 6: Port de l’aspirateur à tailvac
OPERATING THE TAILVAC
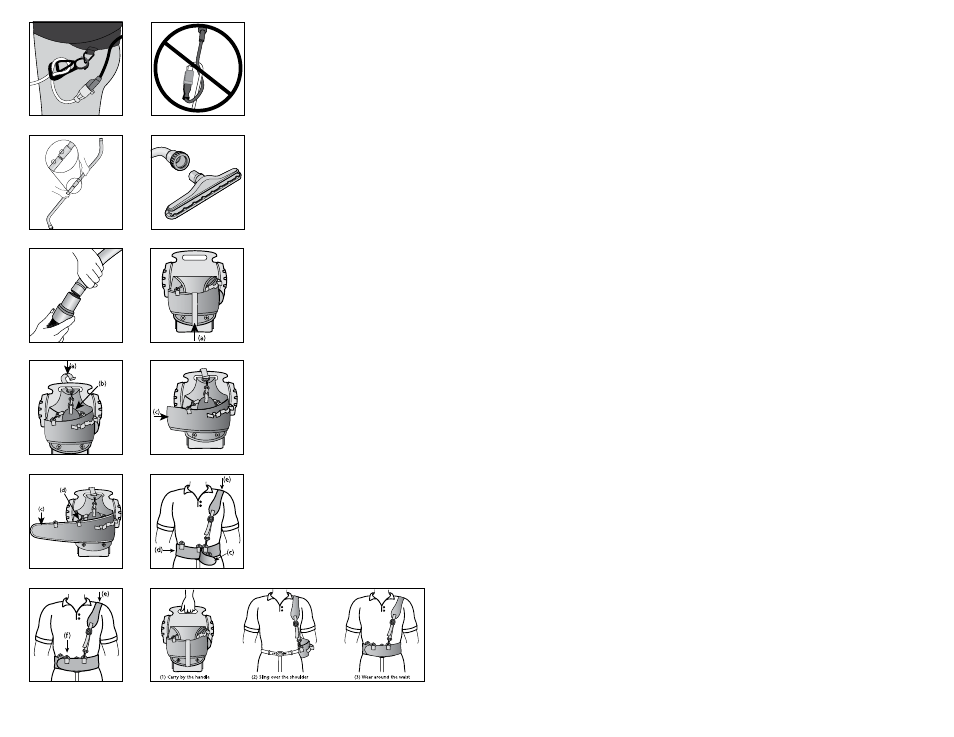
1. Thread the extension cord through the Cord Holder
on the waist belt (Figure G).
2. Do not tie extension cord and power cord together.
Doing so will result in damage to both cords and will
not be covered under warranty (Figure H).
3. Fasten the ends of the wands together, snapping
them into place (Figure I).
4. Attach the floor tool to end of wand. Align the brass
ring with the groove on the floor tool to ensure a
secure fit (Figure J).
5. Twist the wand into the end of the hose (Figure K).
6. Turn the unit on, and proceed with vacuuming. The
on/off switch is conveniently located on the side of
the vacuum body.
Figure G
Figure I
Figure K
Figure J
Figure H
WEARING THE TAILVAC
1. Choose one of the following ways to wear the TailVac:
(1) Wrap the waist belt up in the envelope-style packet,
and carry the TailVac by the molded
top handle.
(2) Connect the monostrap and sling it over
the shoulder.
(3) Wear the TailVac around the waist with or without
the monostrap for support.
2. Detach the Velcro® strap (Figure L (a)) from the base of
the waist belt and lift the strap (Figure L).
3. Slide the Velcro strap (Figure M (a)) under the molded
plastic handle of the vacuum and back over the top of
the handle. Attach the end of the strap to the Velcro tab
(Figure M (b)).
4. With the waist belt facing you, use your right hand to
separate the exposed Velcro between the end of flap
and the back of the belt (Figure N (c)).
5. Continue to slide your right hand all the way to the left
to separate the remaining Velcro (Figure O). With your
left hand, pull the flap (Figure O (c)) out from behind the
waist belt and toward you to expose flap (Figure O (d)).
NOTE: If monostrap is not attached, attach it now. At-
tach the hook on the short end of the monostrap to the
ring up on the end of the Velcro strap (Figure M (a)).
Attach the hook on the other end of the monostrap to
any of the four rings on (Figure Q (f)) the waist belt.
Attach to rings on flap (Figure O (d)) if right-handed, or
flap (Figure O (c)) if left-handed.
6. Slide the monostrap (Figure P (e)) up over your pre-
ferred shoulder. Fasten the belt by bringing the right
flap (Figure P (d)) across the front. Then bring the left
flap (Figure P (c)) over on top of it.
7. Adjust the comfort of the shoulder strap (Figure Q (e))
by adjusting the length of the strap and/or attaching
the front snap hook to any of the other rings on the
front of the waist belt (Figure Q (f)).
NOTE:
For maximum comfort, alternate the shoulder
strap to the right or left shoulder every two hours.
Figure L
Figure N
Figure O
Figure M
Figure P
Figure Q
FUNCIONAMIENTO DE LA
ASPIRADORA A LA TAILVAC
1. Sujete el portacable (que tiene el cable de extensión
enrollado) al lazo triangular en la correa de la cintura
(Figure G).
2. No amarre el cable de extensión junto con el de
alimentación. Esto puede dañar ambos cables y no
contará con la cobertura de la garantía (Figure H).
3. Apriete los extremos de los tubos, ajustándolos en su
lugar (Figure I).
4. Conecte la herramienta de piso al extremo del tubo.
Alinee el aro de bronce con la muesca en la herramienta
de piso para garantizar un ajuste seguro (Figure J).
5. Gire el tubo en el extremo de la manguera (Figure K).
6. Encienda la unidad y comience a aspirar. El interruptor
de encendido/apagado está ubicado.
USO DE LA ASPIRADORA A LA TAILVAC
1. Elija una de las siguientes formas de transportar la TailVac:
(1) Enrolle la correa de la cintura en el paquete tipo
sobre y transporte la TailVac utilizando la manilla
superior moldeada.
(2) Conecte la monocorrea y pásela sobre el hombro.
(3) Use la TailVac alrededor de la cintura con o sin la
monocorrea de apoyo.
2. Desprenda la correa de Velcro (Figure L (a)) de la base
de la correa de la cintura y levántela (Figure L).
3. Pase la correa de Velcro (Figure M (a)) por debajo de
la manilla plástica moldeada de la aspiradora y regrese
por la parte superior de la manilla. Fije el extremo de
la correa a la lengüeta de Velcro (Figure M (b)).
4. Con la correa de la cintura orientada hacia usted,
use la mano derecha para separar el Velcro expuesto
entre el extremo de la solapa y la parte posterior de la
correa (Figure N (c)).
5. Siga pasando su mano derecha por completo hacia la
izquierda para separar el Velcro restante (Figure O).
Con la mano izquierda, tire de la solapa (Figure O (c))
desde detrás de la correa de la cintura hacia la solapa
expuesta (Figure O (d)).
NOTA: Si la monocorrea no está sujeta, hágalo ahora.
Sujete el gancho del extremo corto de la monocorrea
al anillo en el extremo de la correa de Velcro (Figure
M (a)). Sujete el gancho en el otro extremo de la
monocorrea a cualquier parte de los cuatro anillos
(Figure Q (f)) de la correa de la cintura. Sujete los
anillos a la solapa si es diestro (Figure O (d)) o a la
solapa (Figure O (c)) si es zurdo.
6. Coloque la monocorrea (Figure P (e)) sobre el hombro
que prefiera. Apriete la correa pasando la solapa
derecha (Figure P (d)) por delante, luego pase la
correa izquierda (Figure P (c)) por sobre ésta.
7. Acomode la correa de hombro (Figure Q (e)) ajustando
el largo de ésta o sujetando el gancho a presión
delantero a cualquiera de los anillos de la parte
delantera de la correa de la cintura (Figure Q (f)).
NOTA: Para obtener el máximo de comodidad,
cambie de hombro la correa cada dos horas.
UTILISATION DE L’ASPIRATEUR à
TAILVAC
1. Passez le cordon prolongateur dans le support de
cordon sur le ceinturon (Figure G).
2. Ne pas attacher ensemble le cordon prolongateur et le
cordon d’alimentation car cela pourrait endommager
les deux cordons et ne serait pas couvert par la garantie
(Figure H).
3. Emboîtez les extrémités des deux tubes (Figure I).
4. Attachez l’accessoire de plancher à l’extrémité du tube.
Alignez l’anneau en laiton sur cannelure de l’accessoire
afin d’obtenir une bonne fixation (Figure J).
5. Avec un mouvement de torsion, fixez le tube à
l’extrémité du tuyau (Figure K).
6. Mettez l’aspirateur en marche et effectuez le travail.
Le commutateur marche/arrêt se situe sur le côté de
l’aspirateur.
PORT DE L’ASPIRATEUR à TAILVAC
1. Vous pouvez porter le TailVac des manières suivantes :
(1) Insérez le ceinturon dans l’enveloppe, et portez le
TailVac en le tenant par sa poignée moulée supérieure.
(2) Connectez la mono-sangle et placez-la sur votre
épaule.
(3) Portez le Tailvac autour de la taille, avec ou sans la
mono-sangle comme support.
2. Détachez la sangle (Figure L (a)) en velcro de la base du
ceinturon, puis levez la sangle (Figure L).
3. Glissez la sangle en velcro (Figure M (a)) sous la poignée
en plastique moulé de l’aspirateur, puis à nouveau sur le
dessus de la poignée. Attachez l’extrémité de la sangle
sur la languette en velcro (Figure M (b)).
4. Le ceinturon vous faisant face, séparez avec votre main
droite la bande de velcro exposée entre l’extrémité du
rabat et le revers de la sangle (Figure N (c)).
5. Continuez de glisser votre main droite jusqu’à
l’extrémité gauche afin de séparer le reste de la bande
velcro (Figure O). Avec votre main gauche, tirez le rabat
(Figure O (c)) du revers du ceinturon et tirez-le vers vous
pour exposer le rabat (Figure O (d)).
REMARQUE : Si la mono-sangle n’est pas attachée,
attachez-la maintenant. Fixez le crochet situé à
l’extrémité courte de la mono-sangle sur l’anneau, à
l’extrémité supérieure de la sangle en velcro (Figure
M (a)). Fixez le crochet situé à l’autre extrémité de la
mono-sangle sur l’un des quatre anneaux (Figure Q (f))
du ceinturon. Fixez-le sur les anneaux du rabat (Figure
O (d)) si vous êtes droitier, ou sur le rabat (Figure O (c))
si vous êtes gaucher.
6. Glissez la mono-sangle (Figure P (e)) sur l’épaule que
vous préférez. Attachez la sangle en amenant le rabat
droit (Figure P (d)) sur le devant, puis placez le rabat
gauche dessus (Figure P (c)).
7. Pour ajuster le confort de la bandoulière (Figure Q (e)),
réglez la longueur de la sangle et/ou attachez le crochet
avant à un autre anneau sur le devant du ceinturon (f)
(Figure Q (f)).
REMARQUE : Pour un confort optimal, placez la
bandoulière sur l’autre épaule à toutes les deux heures.
ProTeam Owner's Manual / Manual del propietario de ProTeam /
Mode d’emploi ProTeam – 21