6 maintenance – Analytical Industries Palm O2 IW Oxygen Analyzer User Manual
Page 9
14
15
6 Maintenance
Review Section 3 Safety Warnings and Section 7 Troubleshooting for
guidelines on servicing the devices.
6.1 Serviceability
Do not open the main compartment of the analyzer, as it contains no service-
able parts inside. Never attempt to repair the analyzer or sensor by yourself as
you may damage the analyzer which could void the warranty.
6.1.2 Cleaning / Reuse Instructions
Clean the device, oxygen sensor and accessories with a soft cloth dampened
with either water or mild isopropyl alcohol solution (70% isopropyl alcohol
solution in water), if necessary, before re-use. Allow the components to air-dry
after cleaning.
6.2 Battery Replacement
The Palm O2 Oxygen Analyzer is powered by two 1.5V AA alkaline batteries
with an approximate life of 13,000 hours.
A low battery indicator circuit monitors the battery supply
voltage and sends a signal directly to the LCD when the bat-
tery voltage reaches a preset level that activates the battery
symbol in the LCD.
The batteries are located the top section or front of the ana-
lyzer and secured by terminals mounted directly on the PCB
Assembly.
Procedure:
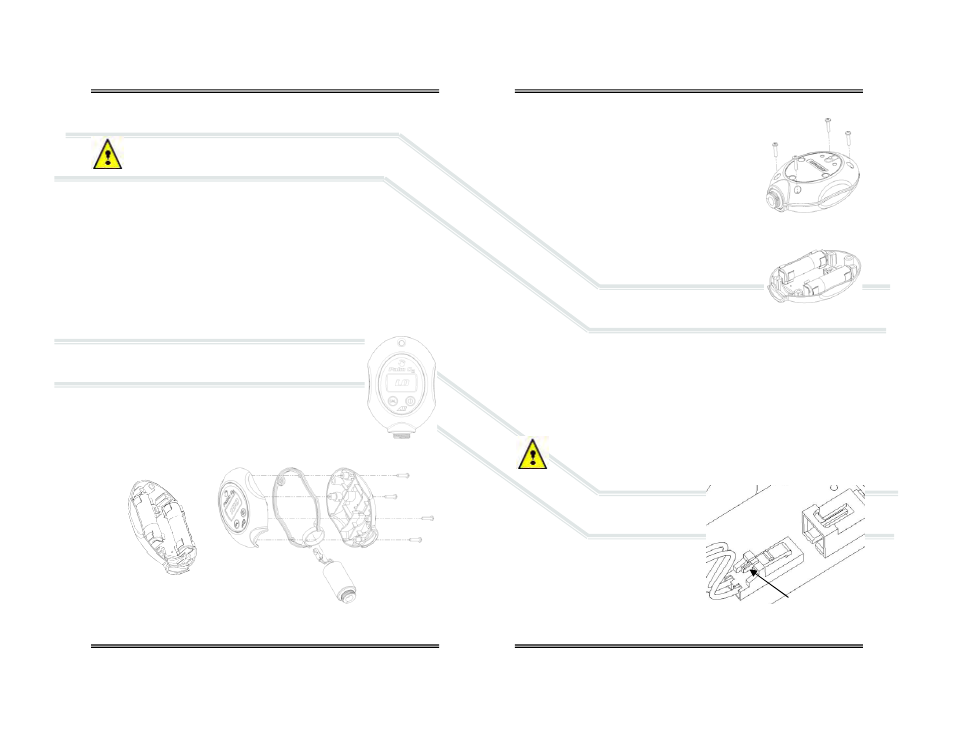
1. Open the enclosure: Remove the four (4) Phillips
screws from the rear of the enclosure, FIG 1.
2. Separate the enclosure and an place it on a flat
surface, FIG 2.
3. Remove the battery: Grasp the middle of a battery
and gently pull straight up.
4. Locate the positive (+) and negative (-) terminals
on the battery.
5. Assure the battery contacts are clean.
6. Align the battery’s positive (+) terminal with the
corresponding (+) battery symbol printed on the
PCB Assembly.
7. Install the battery: Align the battery over the termi-
nal clip mounted on the PCB Assembly and press
down until the battery snaps into place, FIG 2.
8. Repeat steps 3-7 with the remaining battery.
9. Reassemble the device as shown in section 6.4
10. Calibrate, see section 4.4, the device after replacing the batteries.
6.3 Oxygen Sensor Replacement - Standard Integral Sensor
The design of the electronics is intended for only the Analytical Industries Inc.
AII-11-75-PO2 or AII-11-75-PO2R Oxygen Sensors. Use of a different oxygen
sensor may result in an erroneous oxygen reading.
NEVER - Open the oxygen sensor or probe the sensing surface, refer
to Section 10 in the event the sensor should leak and someone comes
in contact with the electrolyte from inside the sensor.
Procedure - Standard Integral Sensor
1. See 6.2 step 1 above.
2. See 6.2 step 2 above.
3. Disconnect the oxygen sensor: Press
down on the latch arm, see arrow,
and pull back on the male connector
attached to the sensor from the fe-
male connector attached to the PCB
Assembly, FIG 3.
FIG 1
FIG 2
FIG 3