Other features, Wiring diagrams troubleshooting – Comfort Stat CP1820 User Manual
Page 2
H OLD
CLEAR
HOLD
CLEAR
DAY
HOUR
HO LD
CLEAR
HO LD
CLEAR
FOR WINTER
NUMBER
PROGRAM
1
PROGRAM
2
PROGRAM
3
PROGRAM
4
MONDAY
TIME
TEMP
TIME
TEMP
TIME
TEMP
TIME
TEMP
TUESDAY
TIME
TEMP
TIME
TEMP
TIME
TEMP
TIME
TEMP
WEDNESD
AY
TIME
TEMP
TIME
TEMP
TIME
TEMP
TIME
TEMP
THURSDAY
TIME
TEMP
TIME
TEMP
TIME
TEMP
TIME
TEMP
FRIDAY
TIME
TEMP
TIME
TEMP
TIME
TEMP
TIME
TEMP
SATURDAY
TIME
TEMP
TIME
TEMP
TIME
TEMP
TIME
TEMP
SUNDAY
TIME
TEMP
TIME
TEMP
TIME
TEMP
TIME
TEMP
FOR SUMMER
NUMBER
PROGRAM
1
PROGRAM
2
PROGRAM
3
PROGRAM
4
MONDAY
TIME
TEMP
TIME
TEMP
TIME
TEMP
TIME
TEMP
TUESDAY
TIME
TEMP
TIME
TEMP
TIME
TEMP
TIME
TEMP
WEDNESD
AY
TIME
TEMP
TIME
TEMP
TIME
TEMP
TIME
TEMP
THURSDAY
TIME
TEMP
TIME
TEMP
TIME
TEMP
TIME
TEMP
FRIDAY
TIME
TEMP
TIME
TEMP
TIME
TEMP
TIME
TEMP
SATURDAY
TIME
TEMP
TIME
TEMP
TIME
TEMP
TIME
TEMP
SUNDAY
TIME
TEMP
TIME
TEMP
TIME
TEMP
TIME
TEMP
Programming Your Thermostat
Your thermostat can be programmed in two different ways.
1. Autoprogram method 2. Manual method
Before programming, position the HEAT/OFF/COOL selector to be programmed.
Auto Programming
Our thermostat is preprogrammed guidelines for energy efficiency. Note that it is easier
to modify these programs than to programs than to program the thermostat manually.
■ Press once. During Auto Programming, the display
will change as shown.
■ The thermostat will be programmed for all 7 days of
the week as shown below.
Temperature in ˚F/℃
Program Number
Time
Heat
Standard
1
6:00am
68 ˚F (20℃)
78 ˚F (26℃)
2
8:00am
60 ˚F (16℃)
85 ˚F (29℃)
3
4:00am
68 ˚F (20℃)
78 ˚F (26℃)
4
10:00am
60 ˚F (16℃)
85 ˚F (29℃)
■ Refer to Manual Programming entering or changing the programs.
Manual method
In this method, each program is inserted according to your personal programming
schedule.
Familiarize yourself with manual programming. The following example demonstrates the
manual programming method. You can program or change the program of weekdays,
weekends, or individual days.
NOTE:1) The program time is set in increments of 15 minutes.
2) The program temperature is set in increments of 1℉.
3) When setting PM time, make sure the “PM” indicator appears on the display.
Weekday Programs
Press Display Reads
■ Normal display of time, temperature,
and day of the week.
Step 1
■ Selects days Mon to Fir for same set of 4
programs each day.
Step 2
■ Program indicator(1) is displayed.
■ 68℉ is displayed.
■ Mon to Fir is displayed.
Step 3
■ Press and hold until 6:00 is displayed.
■ Note AM/PM
Step 4
■ Press once to change temperature to 69℉.
■ Weekday program 1 is complete.
■ Press PROG to move to program 2,3, and 4
and follow the same steps.
Use to insert or change time and temperature
of other programs.
■ Selects weekend days Sat, Sun for same
set of 4 programs each weekend day.
■ Follow steps 24 to enter programs.
Similar to weekday programming.
to insert weekend programs.
Individual Day Programming
To program for each individual day separately by a different set of programs, first select
day by displaying the day of program, then insert the desired times and temperatures.
Press Display Reads
■ Mon to Fir are selected. Mon to Fir will have
Same programs.
■ Sat to Sun will have
Same programs.
■ Mon is selected, program for Mon only.
Use to enter programs for Monday.
Similarly Tue to Sun can be selected.
Display the day to be programmed and use
to enter programs.
NOTE: Another approach to programming is to first program all weekdays Mon
through Fir and Sat and Sun as same programs. Then, display and change the
programs of only those days which will have different programs.
Reviewing Programs
You may want to review the programs to see that the settings are compatible with your
lifestyle.
■ Normal display of current time, day of week
temperature, and day of week.
.
■ 1st weekday program is displayed.
■ Program indicator(1) appears.
■ Mon to Fri indication appears.
■Continue pressing
to view each day.
■Continue pressing
to view each period.
If you are armchair programming the thermostat, before you mount the face of the
thermostat, turn the system selector to the OFF position.
Temporary Manual Override
To temporarily change the current set temperature without affecting your program:
Press
and to change to your desired new
temperature.
■Press to RUN to normal mode, or wait 15 seconds for it
to return automatically.
■The current program number will flash to signify the Temporary Override. At
the next program change, the Temporary Override, and the next program
temperature becomes the set point temperature.
To end the Temporary Manual Override:
■Press and wait for HOLD to display on the lcd.
■Press HOLD key. This will return the set temperature to the current program
set temperature.
Permanent Override or a Designated Day Override
To hold your Manual Override for vacation or Until a Designated
Day
■ Press to make the current program temperature
the HOLD temperature. HOLD will be displayed on
the LCD, and the Program number will disappear.
■ Follow the Temporary Manual Override instructions above to change the
Permanent Manual Override temperature.
■ You can confirm the held set temperature by pressing for less than 1
second.
■ Press again. Hold day will be displayed on the lcd
and the clock will disappear
■Press Day key to add override days.
Press Hour key to reduce override days
■ Follow the Temporary a Designated Day
Override instructions above to change the Permanent Manual
Override
temperature.
To end Override:
Under Permanent Override Press hold/return key twice. Under a Designated Day
Override press the hold once. The thermostat will return to the current program, and the
HOLD display will be canceled.
Other Features
12Hr. / 24 Hr. Time Format
Your thermostat is set from the factory in normal 12 (AM/PM) time format. To change to
24 hour (military) time, press during time and day setting mode to toggle
between the 12 hour and 24 hour formats. The AM / PM indicator will not be displayed
in 24 hour mode. Both the current time and all programs will automatically change to
the selected format.
Backlighting
Your thermostat has an electroluminescent lamp that backlights the display for easy
viewing in the dark.
When any key is pressed the display is illuminated.
The display will remain illuminated for 8 seconds after the last key is pressed. This
allows the light to stay on if you need to operate several keys.
Note: If the thermostat is in Low Battery warning condition, the backlight will not operate.
Replace with 2 new AA alkaline batteries to restore the Backlight function.
Filter Monitor
Your thermostat also keeps a record of the number of hours your
filter has been in use. To maximize your system’s performance and
energy efficiency, change or clear your filter regularly.
When the total system run time for heat and cool reaches 400 hours,
you need clean or change your system’s filter, “FILT” will continue to
flash until the counter is set back to zero.
■ Press to review total filter usage. The display will blink “FILT”
Then show the filter Monitor counter. After 15 seconds, the display
will return to normal mode, or you can hit RUN to exit immediately.
The Filter Monitor will display up to 999 hours and 59 minutes of usage. In this example,
the counter is at 410 Hours, 26 minutes.
■ To reset the Filter Monitor counter, depress FILTER for 3 seconds. The display will
blink, and The counter will be reset to zero.
Auto Recovery
Auto Recovery calculates how early to turn you system back on, so that the room
temperature is already comfortable by the start of the comfort
temperature program period. Auto Recovery work’s in both Heat
and Cool modes.
■When the thermostat is in Auto Recovery mode, the display will
alternate “RECO” with time, and the program indicator will flash.
■Auto Recovery can be disabled by sliding the Recovery switch on the circuit board to
disable.
■Auto Recovery will not operate if Permanent hold or Temporary hold is in operation.
■Auto Recovery can be canceled manually if HOLD is pressed during the recovery
process.
■Auto Recovery will be canceled and change to next period.
Details of Auto Recovery Operation:
■ Auto Recovery can be disabled by sliding the Recovery switch on the circuit board to
this position.
■ Auto Recovery will not operate if Permanent hold or Temporary hold is in operation.
■ Auto Recovery can be canceled manually if HOLD is pressed during the recovery
process. If a recovery process is canceled manually then the recovery process will not
start again until the next program period starts (an exception is that if time or program is
changed then the thermostat will check Auto Recovery conditions immediately).
Error Mode
If the thermostat is unable to control your system due to an
unexpected battery problem, the thermostat will enter Error Mode.
In this condition, the thermostat flashes “E1”or “E2”on the LCD
display, and shuts off your system. To correct this problem,
replace the batteries with 2 new AA alkaline batteries, even if you
have recently replaced them. Move the battery out hold any key
then place the battery again. You will need to reprogram your
thermostat and confirm normal operation.
Lcd display
information
Lcd display
information
E1
Sensor Error
E2
System switch
Low Battery Warning
Your thermostat has a twostage lower battery warning system. When the batteries are
first detected to be weak, the first stage low battery warning is indicated
by “BATT” flashing on the LCD display. At your earliest
convenience, you need to replace the batteries with 2 new AA
alkaline batteries.
When the batteries become too weak for normal operation, the
thermostat enters the second stage low battery warning which
shuts down the thermostat. In this condition, “BATT” flashes alone
on the display, and the thermostat will turn your system Off. Your
system will remain shutoff until the batteries are replaced.
NOTE: The thermostat will still keep the current Set Temperature and Filter run time in
memory until new batteries are installed. After confirming that new batteries have been
inserted, the thermostat will return to normal operation.
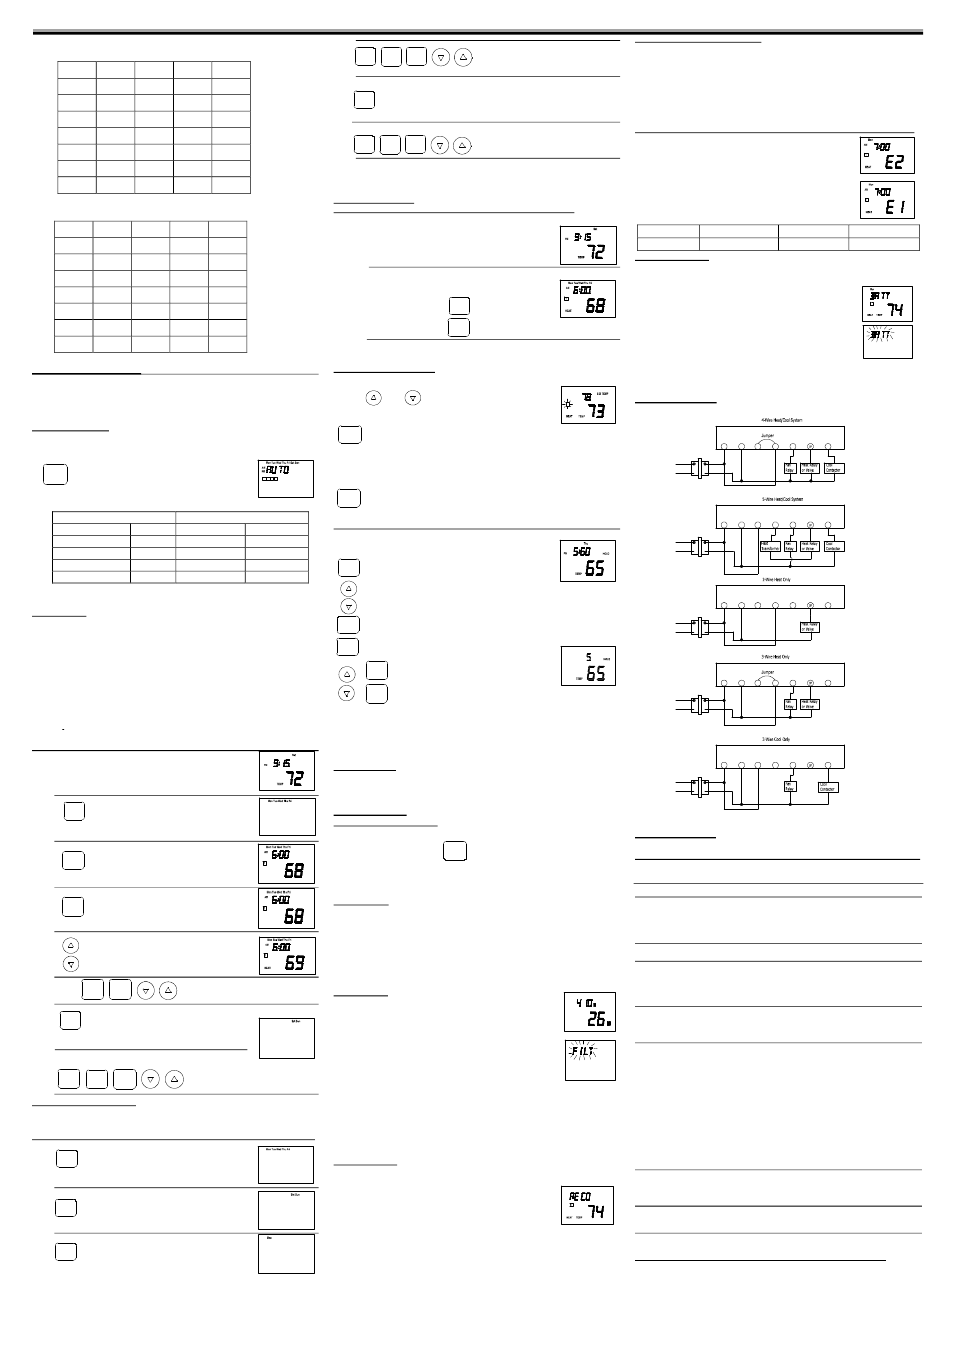
Wiring Diagrams
Troubleshooting
Problem
Solution
SCRAMBLED OR DOUBLE DISPLAY 1. Remove clear mylar sticker.
(numbers over numbers)
NO DISPLAY
1.Check battery connections and batteries.
2.Move the battery out, and then hold any key to
release the rest energy. Then place the battery
again.
ENTIRE DISPLAY DIMS
1.Replace batteries.
PROGRAM DOES NOT CHANGE
AT YOUR
1.Check that time is set properly to “AM” or “PM”
DESIRED SETTING
2.Check that thermostat is not in “HOLD” mode.
3.Check for correct day setting.
AUTO/FAN DOES NOT COME ON
1.Move HG/HE system selector to opposite
Position.
HEATING OR COOLING DOES NOT GO ON OR OFF
1.Check that function switch is in correct
position (“HEAT” or “COOL”).
2.There may be as much as 20 seconds delay
before the system turns on – wait and check .
3.Check your circuit breaks and switches to ensure
there is power to the system.
4.Replace batteries.
5.Make sure your furnace blower door is closed
properly.
6.If your system only uses 4wires, be sure the
jumper wire is installed between the RC and RH
terminals.
ERRATIC DISPLAY
1.Move the battery out, and then hold any key to
release the rest energy. Then place the battery
again.
IF UNIT CONTINUES TO OPERATE 1.Replace unit.
IN OFF POSITION
THERMOSTAT PERMANENTLY
1.Replace unit.
READS “HI”, “LO”, OR “E1”,“E2”..
If you experience any other problems, call us for technical assistance.
The service number is 18665919898
HOUR
DAY
PROG
PROG
DAY
PROG
HOUR
MIN
DAY
PROG
DAY
PROG
DAY
PROG
AUTO
PROG
DAY
PROG
HOUR
MIN
DAY
PROG
HOUR
MIN
DAY
PROG
R U N
12/24
HO URS
HOUR
MIN
PROG
DAY
PROG
PROG
RC
RH
G
Y
THERMOSTAT
RC
RH
G
Y
RC
RH
G
Y
THERMOSTAT
THERMOSTAT
RC
RH
G
Y
THERMOSTAT
RC
RH
G
Y
THERMOSTAT
120V
AC
120V
AC
120V
AC
120V
AC
120V
AC
N
L
AC24V
N
L
AC24V
N
L
AC24V
N
L
AC24V
N
L
AC24V