Start-up and use, Practical advice on using the burners, Practical advice on using the electric hotplates – Hotpoint Ariston TD 640 S (ICE) IX-HA User Manual
Page 18
GB
18
The position of the corresponding gas burner or electric
hotplate* is shown on every knob.
Gas burners
Each burner can be adjusted to one of the following
settings using the corresponding control knob:
Off
Maximum
Minimum
To turn on one of the burners, place a lighted match or
lighter near the burner, press the knob all the way in and
turn it anti-clockwise to the "High" setting.
On those models fitted with a safety device (F), the knob
must be pressed in for about 6 seconds until the device
that keeps the flame lit warms up.
On those models fitted with an ignitor, the ignition button,
identified by the
symbol, must first be pressed and
then the corresponding knob pushed all the way in and
turned anti-clockwise to the "High" setting.
Some models are equipped with an ignition button
incorporated into the control knob. If this is the case, the
ignitor is present, but not the button.
To light a burner, simply press the corresponding knob all
the way in and then turn it anti-clockwise to the "High"
setting, keeping it pressed in until the burner lights.
If a flame is accidentally extinguished, turn off the control
knob and wait for at least 1 minute before trying to relight
it.
To switch off the burner, turn the knob in a clockwise
direction until it stops (when reaches the position).
Practical advice on using the burners
To ensure the burners operate efficiently:
Use appropriate cookware for each burner (see table)
so that the flames do not extend beyond the bottom of
the cookware.
Always use cookware with a flat base and a cover.
When the contents of the pan reach boiling point, turn
the knob to minimum.
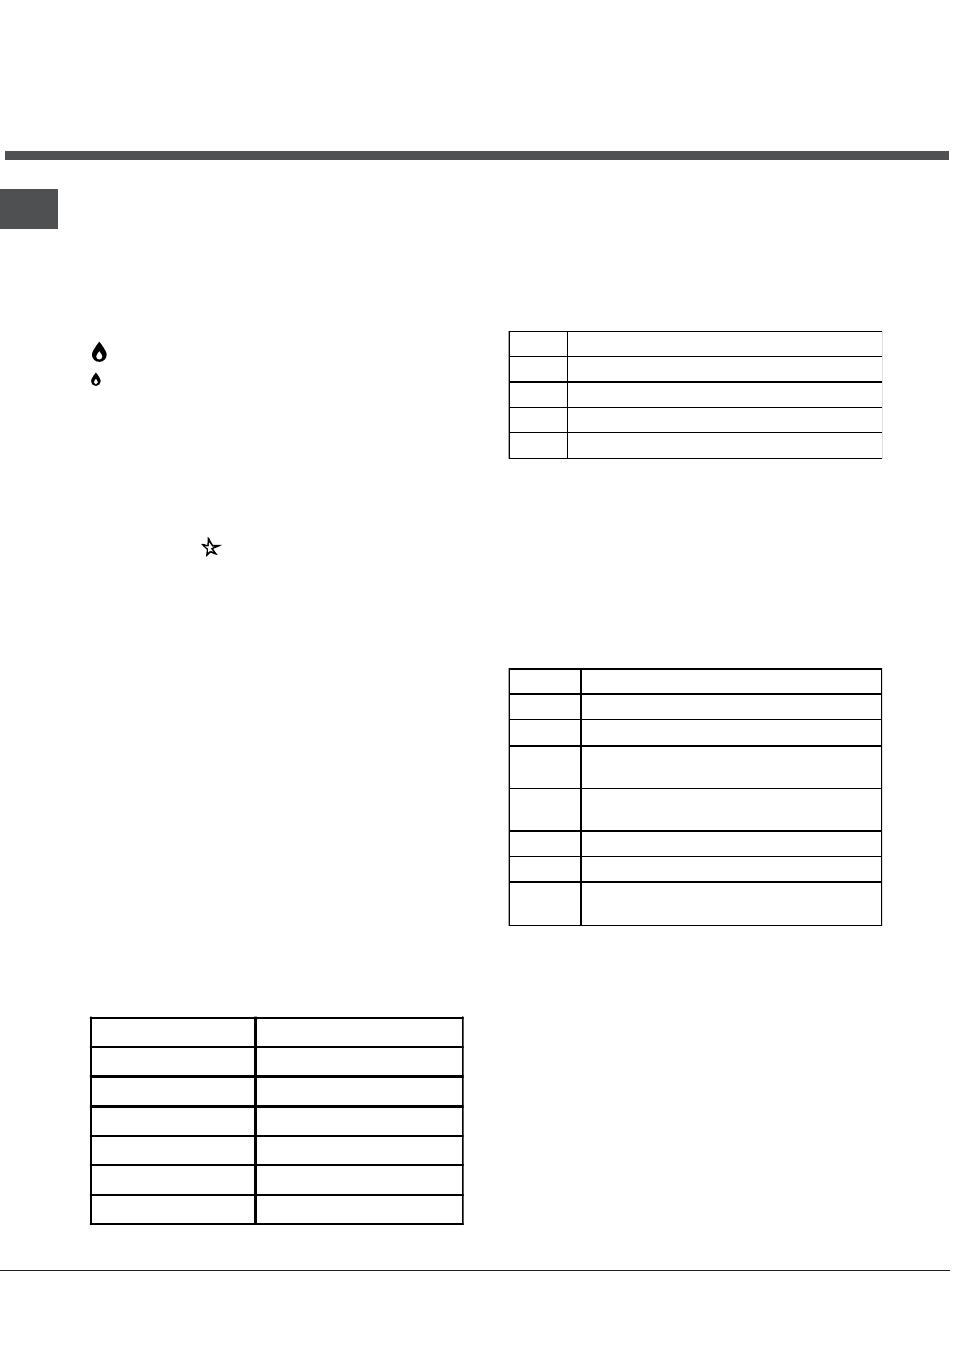
Burner
ø Cookware diameter (cm)
Rapid (R)
24 – 26
Reduced Rapid (RR)
24 – 26
Ultrarapid (UR)
24 – 26
Semi-Rapid (S)
16 – 20
Auxilliary (A)
10 – 14
Mini WOK (MW)
24 – 26
Start-up and use
*
Only available on certain models.
To identify the type of burner, refer to the designs in the
section entitled, "Burner and Nozzle Specifications".
Electric hotplates*
The corresponding knob may be turned clockwise or anti-
clockwise and set to six different positions:
Setting Normal or Fast Plate
0
Off
1
Low
2 - 5
Medium
6
High
When the selector knob is in any position other than the
off position, the on light comes on.
Practical advice on using the electric
hotplates*
To avoid heat loss and damage to the hotplates, use
pans with a flat base, whose diameter is no less than that
of the hotplate itself.
Setting
Normal or Fast Plate
0
Off
1
Cooking vegetables, fish
2
Cooking potatoes (using steam) soups,
chickpeas, beans.
3
Continuing the cooking of large quantities of
food, minestrone
4
For roasting (average)
5
For roasting (above average)
6
For browning and reaching a boil in a short
time.
Before using the hotplates for the first time, you should
heat them at maximum temperature for approximately 4
minutes, without placing any pans on them. During this
initial stage, their protective coating hardens and reaches
its maximum resistance.