Installation method, Connect the flush valve terminals 3, Attach the top unit to the bowl – Factory Direct Hardware Toto MS980CMG Neorest 550 User Manual
Page 2: Place the top unit on the toilet bowl 1, Connect the hose with the water diverter 2
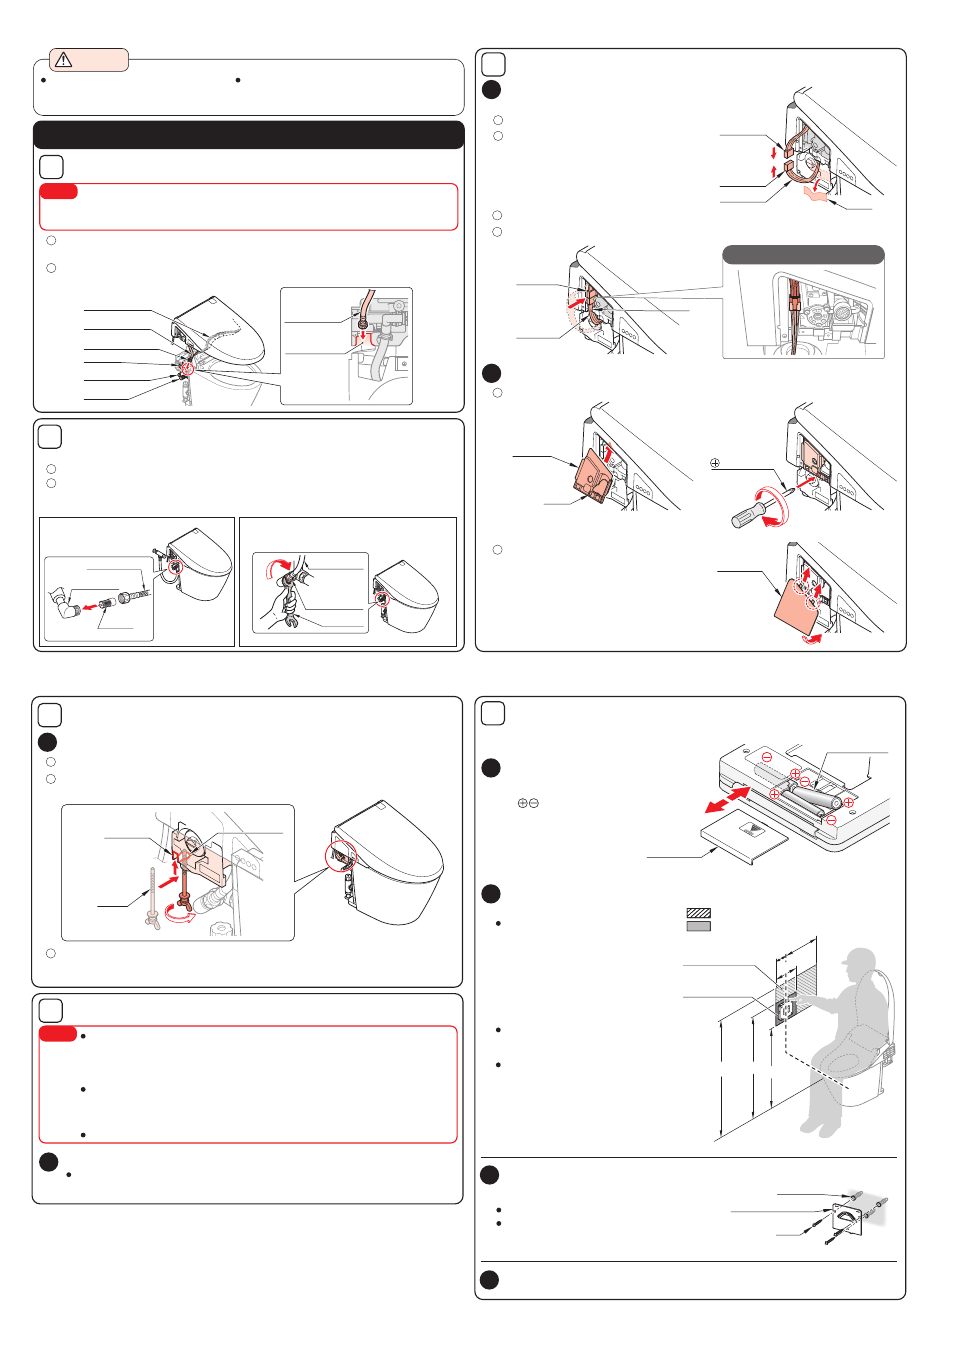
* Notice the polarity symbols
Install the remote control
6
4
Check the power plug
5
2
Install the face cover
1
1
1
1
2
2
1
2
3
2
1
2
3
4
Attach the top unit to the bowl
When the power plug is initially inserted and the lid is stopped by an obstacle in an in-between
position while openning, it will return to that in-between position the next 3 times it opens.
Remove the obstacle, detach the plug and re-insert it. Then push the
“Lid open” switch on the remote control.
Soft light flashes for 10 seconds to a minute after the power plug is inserted.
During this time the seat sensor A is calibrating. Only after this calibrating period
will the lid open automatically when a person approaches to the NEOREST.
1
Insert the power plug into a 120V (60Hz) outlet
Confirm the wand is initialized by extending and retracting it. The dryer
outlet will always open and close before the wand extends.
Open the seat and lid to prevent damage and facilitate installation.
Insert the dust cover from the bottom at an oblique angle and fix it in place
with a screw
Install the face cover
Fasten the bolt and confirm it is firmly and stably situated on the toilet bowl.
Connect the flush valve terminals
3
1
Connect the flush valve terminals
Push the terminal A’s lead wire into the notch
Push the terminals into the top unit
Remove the tape from terminal A
Connect terminal B to terminal A
Do not use excessive force.
* Confirm that the terminals are firmly connected.
* Do not pull on the terminal with excessive force.
Attach the top unit to the bowl
Deodorizing function starts working as soon as the power plug is inserted.
1
Open the battery cover and insert
batteries
Insert the bolt through the notch into the installation hole
(2 bolts, left and right)
2
Determine the remote control mounting position
Place the remote control on remote control hanger
Push the wand cleaning ON/OFF button
to test wand’s extending/retracting
functionality.
If the wand does not respond, try other
positions within the rough installation
position shown in the diagram to the left
or try the opposite wall.
Set down and try using the remote
from a mounting position.
The performance of the remote control
signal receiver depends on the room
space, walls and material.
…Rough installation position
…Rough using position
Rough using position
Determine a postion that allows easy user operation
Test the reception of remote control signal
Rough installation position
Install the remote control hanger with
screws
Screw
Remote control hanger
Anchor hook
Drill 3 holes on the wall for installation.
If the wall is made plaster or tile, drill 6,1-1/4in. (33mm)
deep holes and install the remote control with
anchor hooks.
4
*
Be sure the remote is at least 2-3/4in.
(70mm) from the floor so that the remote
covercan be freely opened.
*
open
Close
Close
Close
Water supply on the floor
Bolt
Installation hole
Notch
Terminal B
Terminal B
Terminal A
Terminal A
Lead wire
Screw driver
Notch
Face cover
Insert into
the slot
Dust cover
Screw
Battery cover
3 AA batteries
Flush valve terminal wiring diagram
6”(150
mm)
18”
(450
mm)
30”(
770
mm)
37”(
95
0mm
)
48”(
12
20
mm)
12”(300
mm)
*
*
Caution
Caution
Place the top unit on the toilet bowl
1
Caution
Connect the hose before completely placing the top unit on the
bowl. Otherwise it will be difficult to connect the hose.
During installation, be careful not drop the seat and lid while holding the product.
Insert the connection hose through the hole in the plate
The top unit shall be parellel to the toilet bowl and installed vertically
* Confirm that the flush valve terminal is not connected
* This is to prevent the gasket from swelling.
Do not turn the manual flush knob
before the hose is connected.
Otherwise, water will spray
.
When inserting the connection hose through
the hole in the plate, be careful to not
fold it. Otherwise, leakage will occur.
Connect the hose with the water diverter
2
Installation method
Connection hose
Water diverter
Flush valve terminal
Gasket
Tape
Connection hose
Hole in the plate
Cap nut
Water supply on the floor
* Confirm that the gasket is installed properly. Otherwise water leakage will occur.
* Confirm that the hose is connected firmly and stably.
Insert the strainer in the water diverter. Use a wrench to fasten the cap nut
Remove the strainer from it’s packaging
Attach the hose to the water diverter with the
strainer inside.
Wrench
Connecting hose
Cap nut (with gasket)
Strainer
Turn
right
Connection hose
Water diverter
Insert the strainer into
the water diverter
Insert the studed end first
* When connecting the hose, please install the strainer.
Tape
3