Specifications, Sweat solder adapter installation instructions, Troubleshooting guide – Factory Direct Hardware Toto TMU1LN12#CP 0.5 GPF User Manual
Page 4
C
Specifications
Flush volume: TMT1NNC - 6.0LPF (1.6GPF) TMW1NNC - 13.3LPF (3.5GPF) TMU1NNC - 3.8LPF (1.0GPF)
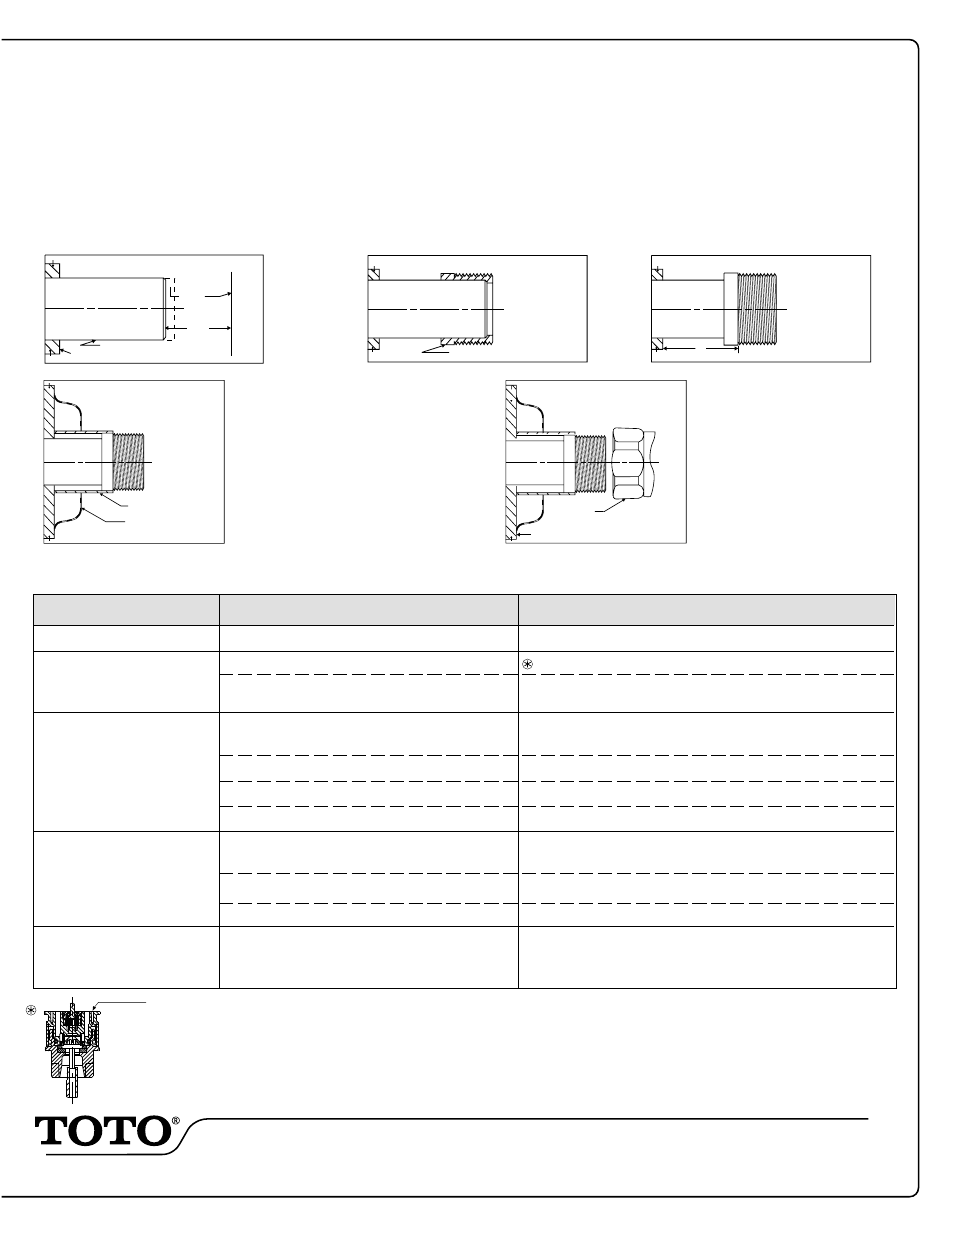
Sweat Solder Adapter Installation Instructions
Step No. 1
Measure distance from finished wall to center line of
fixture spud; cut water supply pipe 1-1/4" shorter
than this measurement. Chamfer O.D. and I.D.
FINISHED WALL
WATER SUPPLY PIPE
OF FIXTURE
SPUD
11/4"
SWEAT ADAPTER
Step No. 2
Slide threaded adapter onto supply pipe
until shoulder stops on end of pipe. Then
sweat-solder the adapter to water supply pipe.
Valve will not operate.
Valve does not shut off.
Not enough water to fixture.
Water supply is shut off.
Dirt in Piston bypass hole.
Dirt or debris at valve seat or sealing-area.
Wrong flushometer valve unit
installed.
Control stop improperly adjusted.
Piston is damaged.
Piston Stroke is too short.
Wrong flushometer valve unit
installed.
Control stop improperly adjusted.
Piston Stroke is too long.
Turn on water supply and open control stop.
Clean bypass groove by flushing awat debris.
Check fixture requirements.
Install proper flushometer valve unit.
Adjust control stop .
Replace Piston.
Turn Piston Adjustment Screw counter-clockwise.
Check fixture requirements.
Install proper flushometer valve unit.
Adjust control stop by turning the screw clockwise.
Turn Piston Adjustment Screw clockwise.
U.S, Subsidiary: TOTO U.S.A., Inc. 1155 Southern Road, Morrow, GA 30260
Tel. (800) 877-1541 Fax (770) 961-9646 Printed in the U.S.A. by TOTO LTD. 04/04
0GU3001 04/04
Protect the Chrome or Special finish of the flushometer. DO NOT USE TOOTHED TOOLS TO INSTALL OR SERVICE THE VALVE.
A non-hold open feature is standard on these valves.
Step No. 5
Screw control stop onto water
supply pipe adapter.
Step No. 4
Slide wall escutcheon over chrome
tube and slide both chrome tube and
wall escutcheon over supply pipe
pushing the wall escutcheon all the
way to the wall.
CHROME TUBE
WALL ESCUTCHEON
CONTROL
STOP
FINISHED WALL
Troubleshooting Guide
'x'
Step No. 3
Measure from finished wall to first thread
of adapter for length of chrome tube. Cut
chrome tube at this length "x"".
PROBLEM
CAUSE
SOLUTION
Too much water for fixture;
noisy flush.
Clean valve seat and clean piston.
replace seat seal if needed.
Lever assembly leaks.
bypass groove
Lever nut is loose.
Fiber washer is damaged.
U-packing is dirty.
Tighten nut.
Replace washer.
Disassemble lever & clean U-packing.