Sunpak PZ42X User Manual
Page 7
16
The PX42X is capable of manual mode shooting in 7 steps from Full power to 1/64
power (in 1 EV steps). In the following cases, press the MODE button until “M” is
displayed to make full use of the effects of the Manual mode.
When daylight sync flashing (in outdoor shooting under sunlight, the strobe
light can be used as an auxiliary light to minimize shadows on the subject) or
shooting against backlight is required.
This indicates the shooting range displayed on the LCD panel. “
” is displayed
when the maximum distance (105 ft, or 32 m) is exceeded.
Shooting in Manual Mode
Shooting in TTL Mode
Mount the PZ42X on the camera and press the MODE button to enter the TTL
mode, in which the built-in microcomputer instantaneously calculates exposure
based on the camera’s aperture (F-value), ISO speed and other information. The
effective TTL range is also calculated and optimum light emission is set according
to the TTL information.
The TTL effective range is displayed only when the shutter button of the camera is
halfway depressed or the Ready light comes on. A bar graph shows the range from
1.5 ft to 105 ft (0.5m to 32m). “
” will be displayed if this distance is exceeded.
The TTL mode of this unit adjusts automatically according to the mode of the
camera .
The shutter speed is set by X second below the shutter speed set on the
camera.
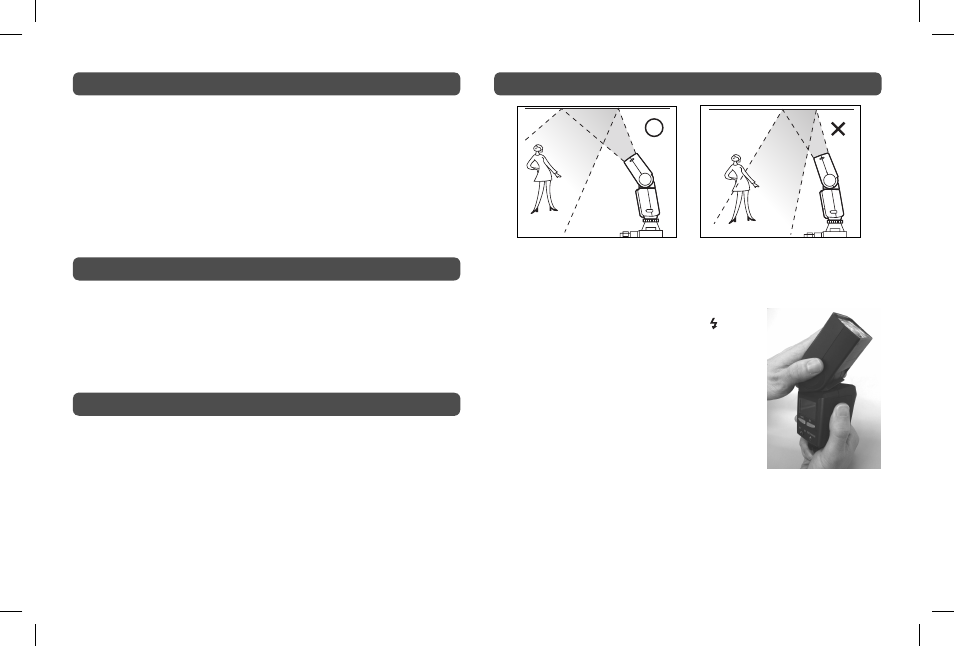
The PX42X can bounce light off a ceiling (wall) even when it is used in Auto mode.
When the light emitting section is pointed directly at the subject, a very dark
shadow may be produced behind the subject under certain conditions. However,
when the light emitting section is pointed at the ceiling (or a wall), a softer, more
natural image can be obtained.
Place the AF frame on the subject in the viewfinder and
press the shutter button halfway. Check that the “ ” marking
lights up and the shutter speed and aperture values are
displayed in the viewfinder before completely pressing the
shutter button.
To prevent damage, be careful not to bend the light
emitting section excessively or beyond the indicated
angle.
Aside from the fact that the light emitting section is
pointed at the ceiling (or wall), the bounce lighting
procedure is identical to ordinary shooting. However,
note that the light intensity may drop by up to about
25%, though this depends on the color and material
of the bouncing surface. Therefore, it is recommended
to open the aperture as large as possible when shooting in TTL mode and to
select a bouncing surface with high reflectance, or that is as white as possible. If
a colored surface is used for bounce lighting, the surface color will be reflected
on the subject.
Bounce Lighting
The wide panel is located above the strobe light emission section. When the
wide panel is drawn out to cover the light emission section, the unit can cover the
superwide-angle range with a focal distance of 20 mm or more. When using the
wide panel in the manual zoom mode, move the zoom to 24 mm (35 mm film size
equivalent value). Also note that the light intensity drops slightly when the wide
panel is used.
Using the Wide Panel