Danze D500457T - Installation Manual User Manual
Page 2
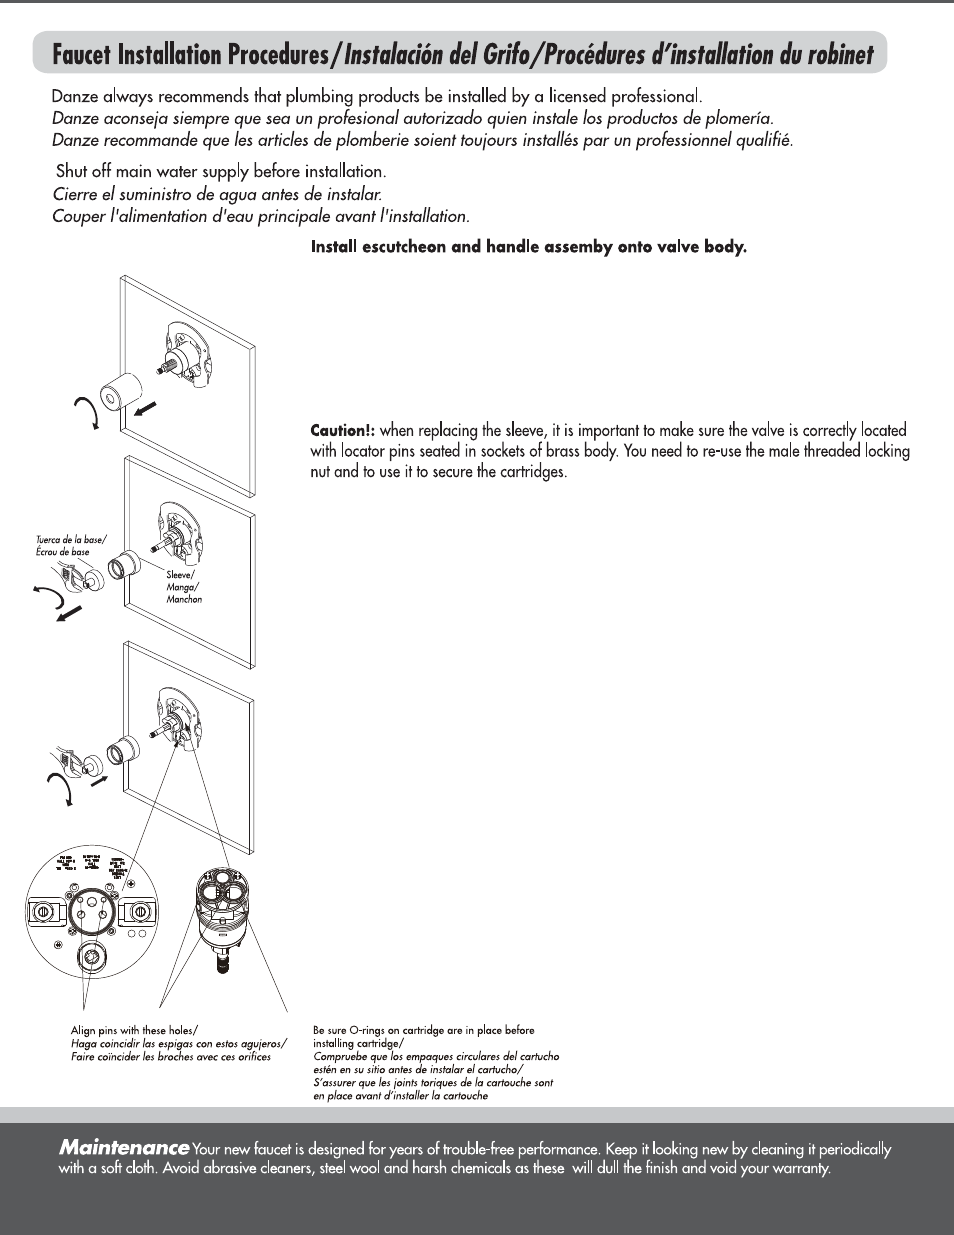
Instale el escudo y la llave en la válvula.
1: Antes de instalar el escudo, remueva la tapa de plástico de la protección para pared,
girándola en sentido de las agujas del reloj.
2: Las válvulas vienen con una cubierta y tuerca tapa con acabado de cromo. Para las
colecciones Melrose, Antioch y Sheridan Bannockburn, en las que la cubierta y la
tuerca tapa se ven debajo de la llave, estas piezas vienen con conjuntos de piezas
exteriores que hacen juego. Para instalar una pieza exterior, quite la cubierta o la
tuerca tapa de la válvula y sustitúyala por otra cubierta o tuerca tapa. Para mayor
información, consulte el procedimiento de instalación del cartucho (para el manual
de la válvula).
1: Before installing escutcheon, remove the plastic cap from plaster guard by twisting
cap clockwise.
2: Valves are supplied with chrome finished valve sleeve and bonnet nut. Special finish
trim sets for Melrose, Antioch and Sheridan Bannockburn, Aerial and Eastham
collections (where the sleeve or bonnet are visible under the handle) are supplied
with matching sleeve and bonnet nut. To install matching trim, remove sleeve/bonnet
nut from the valve body, and replace with the sleeve/bonnet. Please refer to
cartridge installation procedure (for valve manual) for more details.
3: Attach the escutcheon to the valve body using screws provided.
4: When installing handle assembly, rotate stem clockwise to close the valve. Lever
handles should be in vertical position when the valve is closed.
Different trim designs require different assembly techniques for valve handles.
See illustrations on last page.
Type 1: Install handle assembly to valve stem; tighten set screw located on the bottom of
the handle. Install hole cover after tightening set screw to the stem.
Type 2: Install the base ring and handle assembly over the stem, rotate handle to tighten
to the valve body.
Type 3: Install handle to the stem; tighten screw on and install trim buttons.
Type 4:Install canopy to threaded end of bonnet nut, Align handle and tighten screw from
top of handle, reinstall trim buttons.
1
2
Bonnet nut/