Figure 5 – Banks Power GM Motorhomes: (Gas ’96 - 00 7.4L Vortec) PowerPack system (EFI Vortec, P30 chassis) User Manual
Page 6
Holding the muffler square and level to the vehicle
frame, tighten the clamps on the intermediate
extension pipes and the muffler inlets.
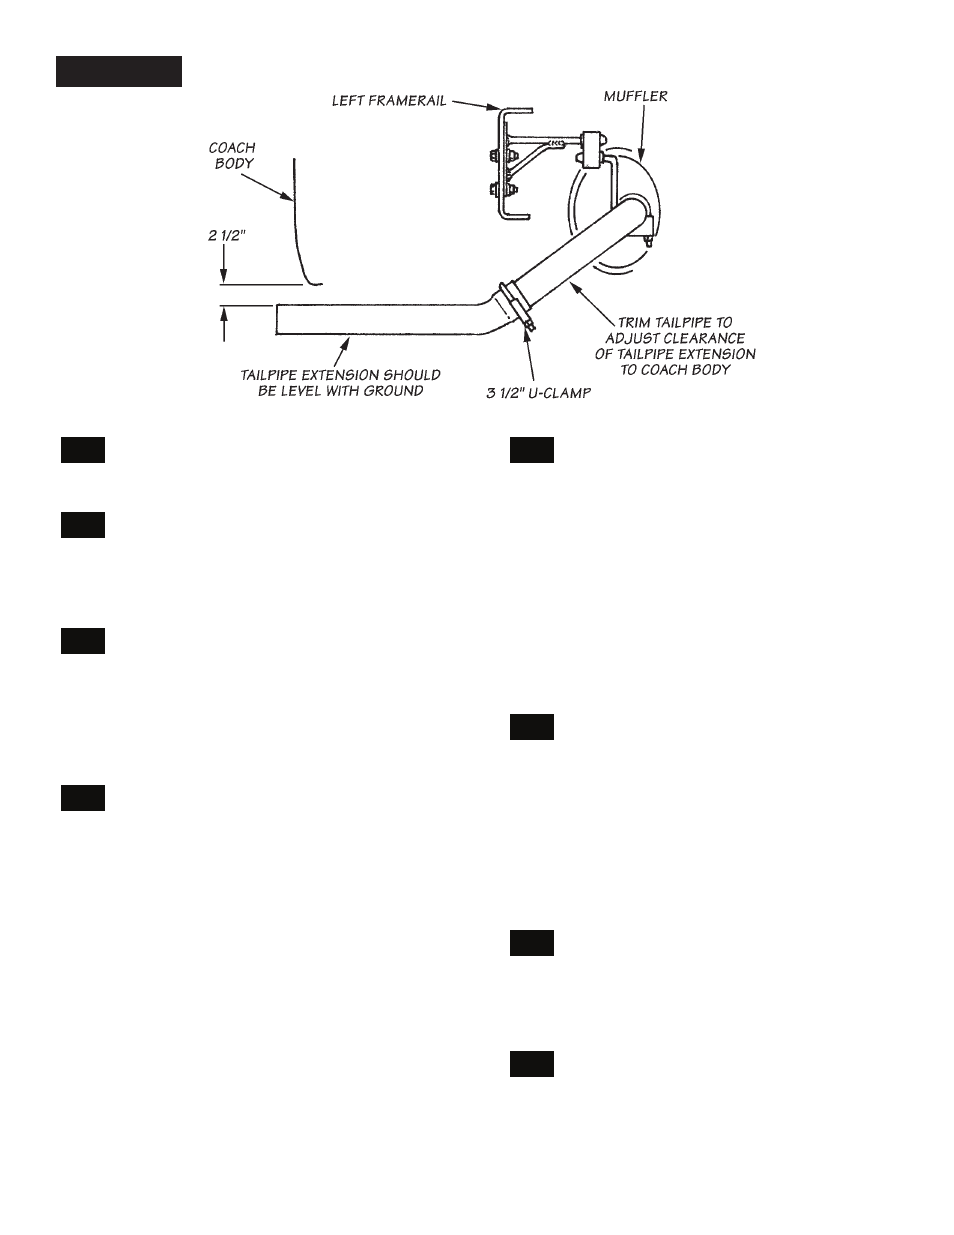
two tailpipe options are available to provide either
a right-exit or left-exit tailpipe. for a left-exit tailpipe:
insert the shorter leg of the tailpipe into the outlet of the
muffler. right-exit tailpipe: place the tailpipe up and over the
driveshaft and slide it into the outlet of the muffler.
slide the tailpipe extension onto the tailpipe, without
installing clamps yet. level the tailpipe extension to
the vehicle. adjust the tailpipe extension height to 2
1
⁄
4
to
2
1
⁄
2
-inches below the bottom of the vehicle body. this will
place the heatshield about 1
1
⁄
2
-inches below the body after
it is installed. if the pipe is more than 2
1
⁄
2
-inches below the
body, trim the tailpipe at the slip joint. (figure
5
)
With the proper height established, slide the polished
tip over the end of the tailpipe extension. in most
cases the tailpipe extension will have to be shortened when
the polished tip is positioned for best appearance in relation
to the coach bodywork. Once a position is determined,
mark the tailpipe extension to locate the inside edge of the
polished tip. remove the tip, then measure and make a
second mark 10
1
⁄
2
” inches out from the first mark. This will
allow for 1
1
⁄
2
” inset from the end of the tailpipe extension to
the end of the polished tip. remove the tailpipe extension
and cut it at the second mark. reinstall the tailpipe extension
and clamp it into place. Make sure the pipe is square with the
vehicle or pointing slightly to the rear. slide the tip on and
secure it with a 3
1
⁄
2
”-inch clamp. (figure
6a
)
level the pipe with the vehicle and place the universal
clamp onto the pipe with a 3
1
⁄
2
”-inch clamp. for
proper alignment with the tailpipe, some minor adjustment
to the angle of the hanger head may be necessary. (figure
6b
) secure the hanger to the vehicle frame with the
3
⁄
8
-16x1
bolt thru the oblong hole in the bottom of the framerail. use
the segment of flat strap as a washer on the upper side of the
frame-rail. this will allow the pipe to remain level when the
clamp is tightened. place the heatshield over the clamp that
is holding the tip in place and secure it with the clamp-nuts.
place another clamp at the opposite end of the heatshield
and secure it to the pipe. On some narrow-body vehicles it
may be necessary to trim the heatshield.
lower the vehicle and reconnect the battery cables.
start the engine and listen for any exhaust leaks.
Tighten bolts or clamps to correct any leaks or improper
adjustments. Whenever possible, tack-welding slip
connections to prevent disengagement is recommended.
Note: It is normal for the vehicle exhaust to smoke upon initial
start-up. This indicates the lubricant applied during the tube-
bending process is burning off the pipes.
BAnKS RAM-AiR™ inTAKE:
locate the factory air filter housing and access it
from inside the right-side wheel-well. replace the
factory air filter element with banks ram air element. place
the “sTOp!” decal on the air filter housing so that it is clearly
visible to service personnel.
Open the front engine cover. locate and remove the
air silencer assembly attached to the front of the air
filter housing. remove the two bolts retaining the silencer
bracket, remove the bracket, then replace the two bolts.
(figure
7
)
6
p.n. 96373 v.3.0
FIGURE 5
34.
35.
36.
37.
38.
39.
40.
41.