Usb pci – Manhattan 525510 Range+ 150N Wireless Adapter - Quick Install (Multi) User Manual
Page 2
1
3
• For USB Adapters: With the computer on, gently
insert the adapter into a USB 2.0 port.
• For PCI Cards: Turn off the PC and unplug the power
cord from the AC outlet. Remove the cover and insert
the card into an empty PCI slot. Replace the cover
and attach any included antenna to the card.
Place the included setup CD in your CD/DVD-ROM drive and
run the “Autorun.exe” program. Click
Install Driver. When the
License Agreement displays, select “I accept the terms of the
license agreement”and click
Next to continue.
2
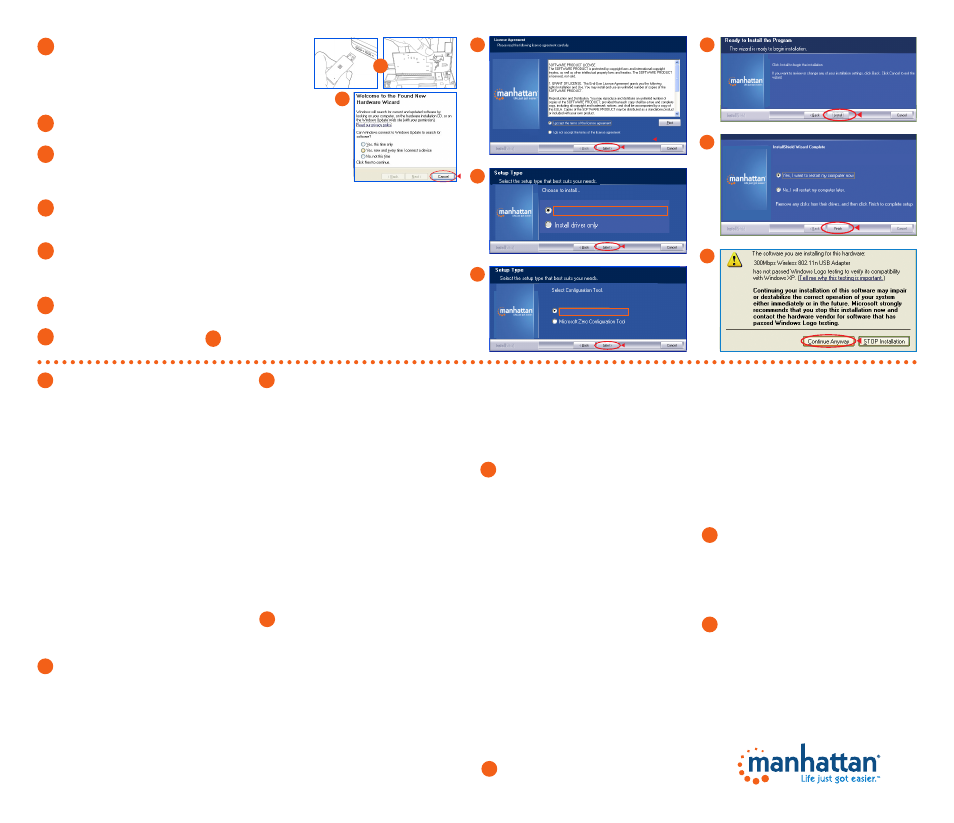
The Welcome to the Found New Hardware Wizard
screen will display automatically. Click
Cancel to continue.
6
When the Ready to Install the Program screen displays, click
Install. To change previous
selections/settings, click
Back; to exit the wizard, click Cancel.
7
5
6
2
3
7
8
5
4
The first of two Setup Type screens will display. If the adapter is being installed for the first
time, it’s recommended that you select “Install driver and Manhattan WLAN Utility.” To
simply update the driver, select “Install driver only.” Click
Next to continue.
If you encounter a warning about the software, click
Continue Anyway. This is safe. Don’t be concerned.
When the Wizard Complete
screen displays, click
Finish.
The second screen presents two options for configuring the adapter. “Manhattan
Configuration Tool” is recommended, as it provides full access to all of the adapter’s
functions. If you prefer to use the wireless configuration tool provided by Windows, select
that option. Click
Next.
Deutsch
Für USB-Adapter: Nach dem Einschalten des Computers,
stecken Sie den Adapter in einen USB 2.0 Port. Für PCI-Karten:
Schalten Sie Ihren Computer aus und trennen Sie den Netzstecker.
Entfernen Sie die Abdeckung und stecken Sie die Karte in einen
verfügbaren PCI-Slot. Setzen Sie die Abdeckung wieder auf und
befestigen Sie beiliegende Antennen an der Karte.
Español
Para los adaptadores USB: Con la PC encendida, inserte el Adaptador
suavemente en el puerto USB 2.0. Para las tarjetas PCI: Apague el
ordenador y desconecte el cable de alimentación de la toma de CA.
Retire la tapa e inserte la tarjeta en una ranura PCI disponible. Coloque
de nuevo la tapa e inserte las antenas incluidas con la tarjeta.
Français
Pour les adaptateurs USB: Après avoir démarré l’ordinateur,
connectez l’adaptateur à un port USB. Pour les cartes PCI: Éteignez
votre ordinateur et débranchez le cordon d’alimentation. Enlevez le
couvercle et insérez la carte dans un emplacement PCI disponible.
Replacez le couvercle et attachez chaque antenne incluse à la carte.
Polski
Dla adapterów USB: Gdy komputer jest włączony, delikatnie włóż
adapter do portu USB 2.0. Dla Kart PCI: Wyłącz komputer i odłącz kabel
zasilający z gniazdka elektrycznego. Zdejmij pokrywę i włóż kartę do
wolnego slotu PCI. Załóż pokrywę i podłącz do karty wszelkie anteny.
Italiano
Per gli adattatori USB: Con il computer acceso, inserire delicatamente
l’adattatore all’interno della porta USB 2.0. Per le schede PCI: Spegnere
il computer e scollegare il cavo di alimentazione dalla presa di corrente.
Rimuovere il coperchio e inserire la scheda in uno slot PCI vuoto.
Riposizionare il coperchio e collegare alla scheda l’antenna se inclusa.
Português
Para Transformadores USB: Como computador ligado, insira
suavemente o transformador numa porta USB 2.0. Para Placas PCI:
desligue o computador e desligue o cabo de alimentação da tomada de
corrente. Remova a tampa e insira o cartão numa slot PCI vazia. Volte a
colocar a tampa e, se houver antenas incluídas, ligue-as ao cartão.
Deutsch
Der Assistent zur Hardwareinstallation wird automatisch
geöffnet. Klicken Sie auf Cancel.
Español
Se mostrara la pantalla de bienvenida del asistente para agregar
nuevo hardware, haga clic en Cancel.
Français
L’assistant de matériel apparaît automatiquement. Cliquez Cancel
afin de continuer.
Polski
Automatycznie wyświetlony zostanie Kreator znajdowania nowego
sprzętu. W oknie Kreatora wciśnij Anuluj.
Italiano
Il messaggio di benvenuto della procedura di installazione guidata
del nuovo hardware rilevato apparirà automaticamente sullo schermo.
Cliccare
Cancel (Cancella) per continuare.
Português
O ecrã Bem-vindo ao ‘Assistente de novo hardware encontrado’
é apresentado automaticamente. Clique em Cancelar para continuar.
Deutsch
Legen Sie die beiliegende Installations-CD in Ihr Laufwerk
und starten das “Autorun.exe”-Programm. Klicken Sie auf Install
Driver. Wenn das Lizenzabkommen erscheint, wählen Sie “I accept the
terms of the license agreement” und klicken Sie auf Next.
Español
Coloque el CD de intalación incluido en su unidad de CD/DVD-ROM
y ejecute el “Autorun.exe”. Clic en Install Driver. Cuando se muestre el
contrato de licencia seleccione “I accept the terms of the license
agreement” y haga clic en Siguiente.
Français
Insérez le CD d’installation et démarrez le programme “Autorun.exe”.
Cliquez Install Driver. Dés que le contrat de license licence apparaît,
choissisez “I accept the terms of the license agreement” et cliquez
Next afin de continuer.
Polski
Umieść dołączoną płytę CD w napędzie CD/DVD komputera. Otwórz
zawartość płyty oraz uruchom program Autorun.exe. Kliknij Install
Driver. Kiedy pojawi się okno z umową licencyjną, wybierz „Akceptuję
warunki umowy licencyjnej” i kliknij Dalej, aby kontynuować instalację.
Italiano
Inserire il CD di settaggio incluso nel lettore CD/DVD-ROM e avviare
il programma “Autorun.exe.” Cliccare Install Driver (Installa driver).
Quando appare la Richiesta di accettazione della Licenza, selezionare
“I accept the terms of the license agreement (accetto i termini del
contratto di licenza)” e cliccare Next (Successivo) per continuare.
Português
Coloque o CD de configuração incluído na unidade de CD/DVD-
ROM e execute o programa “Autorun.exe”. Clique em Instalar
Controlador. Quando o Contrato de Licença aparecer, seleccione “Aceito
os termos do contrato de licença” e clique em Seguinte para continuar.
Deutsch
Es folgen zwei Installationsoptionen. Wird der Adapter
zum ersten Mal installiert, empfehlen wir die Auswahl “Install driver
and Manhattan WLAN Utility.” Um lediglich den Treiber zu aktualisieren,
wählen Sie “Install driver only.” Klicken Sie dann auf Next.
Español
La primera de las dos pantallas de la instalación se mostrara y si es
la primera vez que se instala el adaptador seleccione “Install driver and
Manhattan WLAN Utility.” Para actualizar solo el driver, seleccione
“Install driver only.” Haga clic en Siguiente para continuar.
Français
Les deux premières options d’installation apparaissent. Si
l’adaptateur est installé la première fois, nous recommandons que vous
choissisez “Install driver and Manhattan WLAN Utility.” Afin de
seulement mettre à jour le pilote, choissisez “Install driver only.” Cliquez
Next afin de continuer.
Polski
Na pierwszym z dwóch obrazów wyświetlone zostanę dwa typy
instalacji. Jeśli karta instalowana jest po raz pierwszy, zaleca się wybranie
opcji „Instaluj sterownik oraz Manhattan WLAN Utility”. Aby jedynie
zaktualizować sterownik, wybierz opcję „Instaluj tylko sterownik”i
kliknij
Dalej, aby kontynuować
Italiano
Comparirà il primo dei due schermi di settaggio. Se l’adattatore
viene installato per la prima volta, si raccomanda di selezionare “Install
driver and Manhattan WLAN Utility (installa driver e Manhattan WLAN
Utility).” Per semplicemente aggiornare il driver, selezionare “Install
driver only (Installa solo il driver).” Cliccare Next per continuare.
Português
É apresentado o primeiro dos dois ecrãs Tipo de Configuração. Se
o transformador está a ser instalado pela primeira vez, é aconselhável
marcar a opção “Instalar controlador e Utilitário Manhattan WLAN”.
Para actualizar apenas o controlador, seleccione “Instalar apenas
controlador.” Clique em Seguinte para continuar.
Deutsch
Der nächste Schritt bietet zwei Optionen zur Konfiguration
des Adapters. Wir empfehlen “Manhattan Configuration Tool”, da
dieses vollen Zugriff auf alle Adapterfunktionen ermöglicht. Möchten
Sie lieber die entsprech ende Software von Windows verwenden,
wählen Sie diese Option. Klicken Sie dann auf Next.
Español
La segunda pantalla de instalacion presenta dos opciones para
configurar el adaptador, es recomendable elije “Manhattan
Configuration Tool”, ya que proporciona el acceso a todas las funciones
del adaptador. Si prefiere utilizar la herramienta proporcionada por
Windows, seleccione esa opción. Haga clic en Siguient.
Français
La deuxième étape présente deux options pour configurer
l’adaptateur. Nous recommandons “Manhattan Configuration Tool” qui
permet l’accès complet à toutes les fonctions de l’adaptateur. Si vous
préférez utiliser le logiciel de configuration correspondant de
Windows, choissisez cette option. Puis cliquez Next.
Polski
Na drugim z obrazów wyświetlone zostaną dwie opcje konfiguracyjne
adaptera. Zaleca się wybranie opcji „Manhattan Configuration Tool”,
ponieważ zapewnia ona pełny dostęp do wszystkich funkcji karty. Jeśli
wolisz skorzystać z narzędzia do konfiguracji sieci bezprzewodowej
dostarczonego wraz z systemem Windows, wybierz tę opcję. Wciśnij
przycisk
Dalej.
Italiano
La seconda schermata per il settaggio presenta due possibilità di
configurazione dell’adattatore. “Manhattan Configuration Tool” è
consigliato, poiché fornisce un completo accesso a tutte le funzioni
dell’adattatore. Se preferite usare lo strumento di configurazione
wireless fornito da Windows, selezionare l’opzione. Cliccare Next.
Português
O segundo ecrã apresenta duas opções para configurar o
adaptador. É recomendada a “Ferramenta de Configuração Manhattan”,
dado que esta proporciona acesso total a todas as funções do
transformador. Se preferir utilizar a ferramenta de configuração wireless
fornecida pelo Windows, seleccione essa opção. Clique em Seguinte.
Deutsch
Sobald der “Ready to Install” Bildschirm erscheint, klicken
Sie auf Install. Um Einstellungen zu ändern, klicken Sie auf Back; um
den Assistenten zu verlassen, klicken sie auf Cancel.
Español
Cuando este preparado para instalar el programa, haga clic e
Install. Para cambiar la seleccion previa, haga clic en Back; para salir
del asistente, haga clic en Cancel.
Français
Dès que le programme “Ready to Install” apparaît, cliquez “Install.”
Afin de changer des paramètres préalables, cliquez Back; afin de
quitter l’assistant, cliquez Cancel.
Polski
W kolejnym oknie wybierz przycisk Instaluj. Aby dokonać zmian we
wcześniejszych opcjach konfiguracyjnych, wciśnij Wstecz. Aby
przerwać instalację, wciśnij Anuluj.
Italiano
Quando compare sullo schermo che il programma è pronto per
l’installazione, cliccare Install (Installa). Per cambiare qualsiasi
precedente selezione o settaggio, cliccare Back (Indietro); per uscire
dall’applicazione di installazione guidata, cliccare Cancel.
Português
Quando aparecer o ecrã Pronto para Instalar o Programa, clique
em
Instalar. Para alterar as selecções/definições anteriores, clique em
Anterior; para sair do assistente, clique em Cancelar.
Deutsch
Auf dem “Installation complete”-Bildschirm, klicken Sie auf
Finish.
Español
Cuando se muestre la pantalla Instalación completa, haga clic en
Finish.
Français
Sur l’affichage-écran “Installation complete”, cliquez Finish.
Polski
Aby zakończyć instalację, w kolejnym oknie wciśnij Zakończ.
Italiano
Quando appare sullo schermo che l’installazione della procedura
guidata è completa, cliccare su Finish (Finito).
Português
Quando aparecer o ecrã Assistente, clique em Terminar.
Deutsch
Sollten ein Software-Warnung erscheint, klicken Sie auf
Trotzdem fortsetzen. Sie müssen hierbei keine Gerätekonflikte
befürchten.
Español
Si se encuentra con una advertencia sobre el software, haga clic en
Continuar. La instalación es segura, no debe preocuparse.
Français
Si un avertissement sur le logiciel affiche, cliquez sur Continuer
néanmoins. Cela est sans danger. Ne vous inquiétez pas.
Polski
W przypadku ostrzeżeń o oprogramowanie, kliknij Mimo to
kontynuuj. Nie martw się, jest to całkowicie bezpieczne.
Italiano
Se dovesse comparire un avviso sul software, cliccare Continua
comunque. Questo è solo per sicurezza. Non preoccupatevi.
Português
Se encontrar um aviso sobre do software, clique em Continuar
Mesmo Assim. Isto é seguro. Não se preocupe.
7
1
2
3
4
5
6
The InstallShield Wizard has successfully installed the Manhattan Wireless N Adapter. Before you
can use the program, you must restart your computer.
8
4
Install driver and Manhattan WLAN Utility
USB
PCI
1
8
Manhattan Configuration Tool