Creating a route, Adding via points to your route, Marking a waypoint – Garmin GPSMAP 376C User Manual
Page 2: Using xm wx weather and xm radio
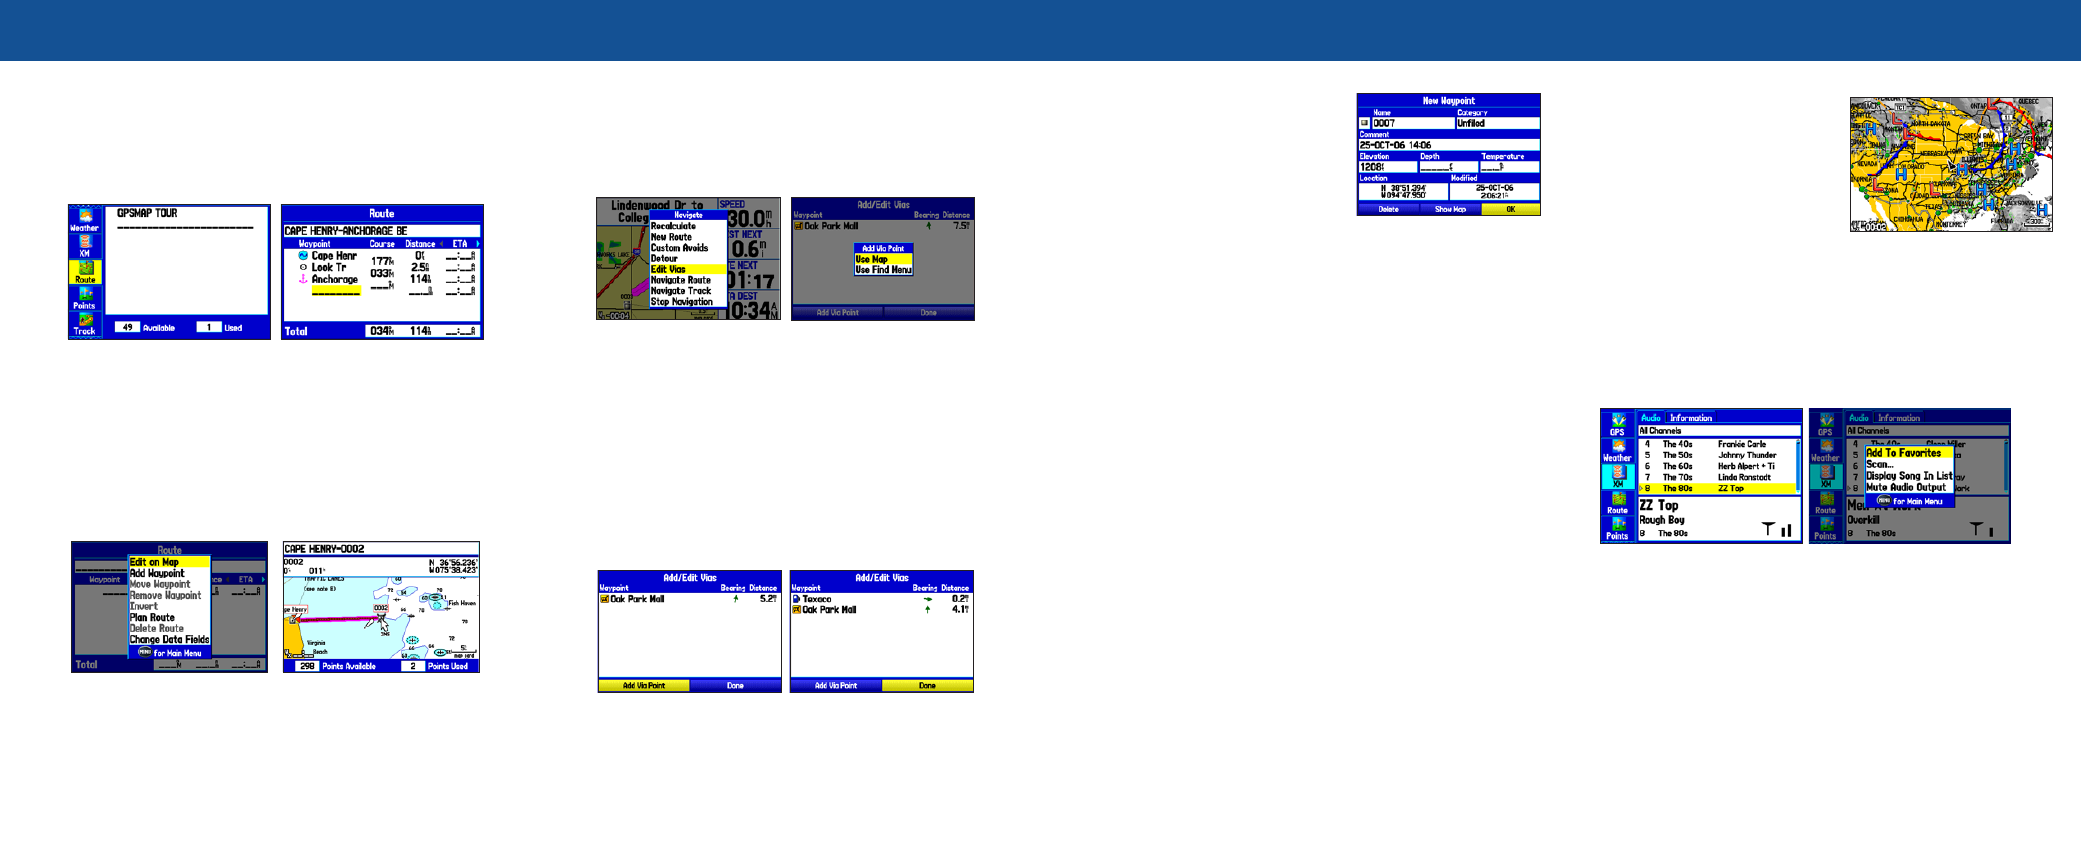
Creating a Route
To create a route using the Find Menu:
1. Press
MENU twice to open the Main Menu.
2. Highlight the
Route tab.
3. Highlight the first available blank route slot, and press
ENTER.
4. Press
ENTER again to find items to add to the route.
Route Tab
Adding points to the route
To create a route graphically:
1. From the
Route tab, highlight the first blank slot, and press ENTER.
2. On the Route Review Page, press
MENU to open the options menu.
3. Highlight
Edit on Map, and press ENTER.
4. Highlight a map item, and press
ENTER.
5. When finished press
QUIT
twice to return to the Route Review Page.
Route Review Page
Options Menu
Creating a new route on the map
Adding Via Points to Your Route
To add Via Points to your route in Automotive Mode:
1. While navigating your route, press
NAV/MOB.
2. Use the
ROCKER to select Edit Vias, and press ENTER. The
Add/Edit Vias Page appears.
3. With the
Add Via Point button highlighted, press ENTER.
Navigate Options
Add Via Point
4. Highlight either
Use Map or Use Find Menu, and press ENTER.
5. If you selected
Use Map, use the ROCKER to select an item on the
map, and press
ENTER.
If you selected
Use Find Menu, select an item from the Find Menu.
Remember you can press
MENU while the Find Menu is open to find
an item near another location, such as the destination.
6. Highlight
Done, and press ENTER to apply the new Via Points to the
route.
Add/Edit Vias Page
New Via Point added before
the destination
Before a Via Point is added
Marking a Waypoint
To mark your current location:
1. Press and hold
ENTER/MARK until
the New Waypoint Page appears.
2. To accept the waypoint with the default
name and symbol, highlight
OK, and
press
ENTER/MARK.
3. To change the any information on
the New Waypoint Page, highlight
the appropriate field, and press
ENTER/MARK. After entering and
confirming your changes, highlight
OK, and press ENTER/MARK.
To create a new waypoint using the Map Page:
1. Press
PAGE
until the Map Page appears.
2. Move the pointer to a map location or map feature.
3. Press and quickly release
ENTER/MARK to capture the pointer
location.
If you have highlighted a map feature, an information page appears
after you press
ENTER/MARK. Use the
ROCKER to highlight Save
and press
ENTER/MARK to save the item as a waypoint. The New
Map Waypoint Page appears.
4. To accept the waypoint with the default name and symbol, highlight
OK, and press ENTER/MARK.
To change any information on the New Map Waypoint Page, highlight
the appropriate field and press
ENTER/MARK. After entering and
confirming your changes, highlight
OK, and press ENTER/MARK.
Using XM WX Weather and XM Radio
To turn off XM WX Weather on the Map Page:
1. Press
PAGE/MODE until the Map
Page appears.
2. Press and hold
MENU/Wx. On
the Map Page, XM WX Weather is
turned off.
3. Press and hold
MENU/Wx to turn
XM WX Weather on again.
To select an XM Radio channel:
1. Press
MENU twice to open the Main Menu.
2. Use the
ROCKER to highlight the XM tab.
3. Press right on the
ROCKER to highlight the Audio sub tab.
4. Press up or down on the
ROCKER to scroll through the list of
channels, highlight the channel you want, and then press
ENTER.
Selecting an XM Radio channel
Adding a channel to Favorites
To add a channel to the Favorites category:
1. Use the
ROCKER to select a channel, or use the IN and OUT keys
to select a category, and then highlight a channel.
2. Press
MENU, highlight Add To Favorites, and press ENTER.
3. With
Yes highlighted, press ENTER again to add the channel to the
Favorites category.
4. To view Favorites, use the
IN and OUT keys to change the category
to
Favorites.
New Waypoint Page
XM WX Weather
*XM
®
Radio and XM WX
®
Weather Data each require a monthly subscription, which is sold separately.
All programming fees and weather data are subject to change.