Candy EVOW 4964L-S User Manual
Page 9
16
17
IT
CAPITOLO 5
MESSA IN OPERA
INSTALLAZIONE
Porti la macchina vicino al
luogo di utilizzo senza il
basamento dell’imballo.
Tagliare le fascette
fermatubo, prestando
attenzione di non
danneggiare il tubo e il
cavo elettrico
Svitare le 3 viti (A) sul lato
posteriore e rimuovere i 3
distanziali (B).
Svitare la vite (C).
Così facendo cadrà all’
interno della macchina un
distanziale.
Inclinare in avanti la
macchina e togliere il
distanziale sopraccitato.
Richiudere i 4 fori utilizzando
i tappi contenuti nella busta
istruzione.
ATTENZIONE:
NON LASCI ALLA
PORTATA DI BAMBINI
GLI ELEMENTI
DELL’IMBALLAGGIO IN
QUANTO POTENZIALI
FONTI DI PERICOLO.
EN
CHAPTER 5
SETTING UP
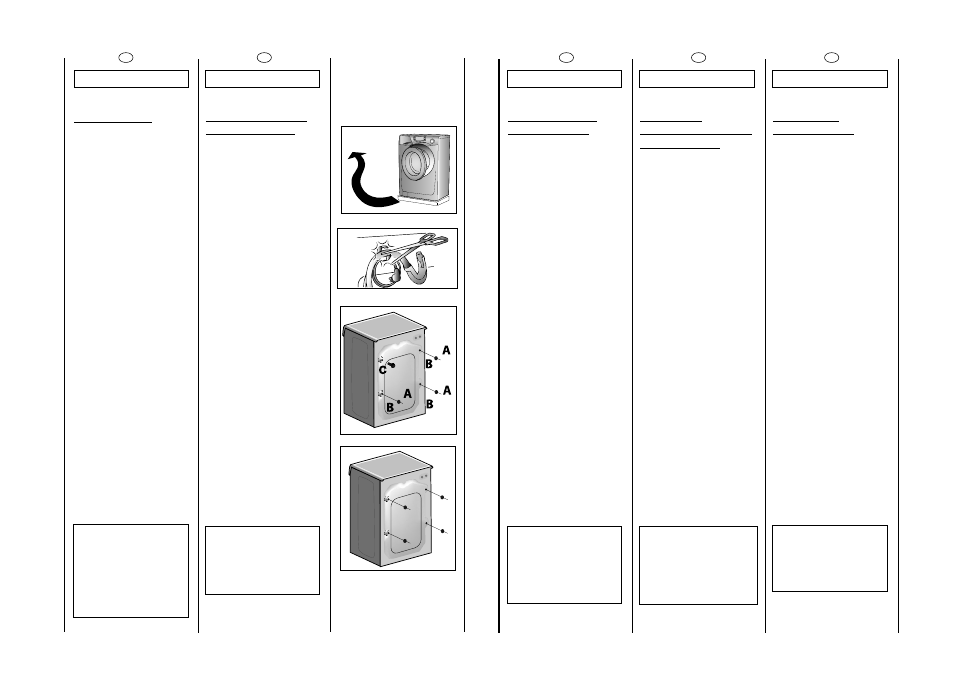
INSTALLATION
Move the machine near its
permanent position without
the packaging base.
Carefully cut the securing
strap that holds the main
cord and the drain hose.
Remove the 3 fixing screws
marked (A) and remove the
3 spacers marked (B)
Remove the screw (C).
A spacer will fall inside the
machine.
By tilting the machine,
remove the above
mentioned spacer.
Cover the 4 holes using the
caps provided in the
instruction booklet pack.
WARNING:
DO NOT LEAVE THE
PACKAGING IN THE
REACH OF CHILDREN
AS IT IS A POTENTIAL
SOURCE OF DANGER.
PT
CAPÍTULO 5
INSTALAÇÃO
Coloque a máquina, sem a
base da embalagem, perto
do local onde vai ficar
permanentemente
instalada.
Corte cuidadosamente a
correia de segurança que
segura o fio principal e o
tubo da mangueira.
Remova os 3 parafusos
fixadores assinalados e as 3
porcas assinaladas.
Retire o parafuso (C).
Um espaço cairá dentro da
máquina.
Ao inclinar a máquina, retire
o espaço em cima
mencionado.
Tape os 4 buracos utilizando
as tampas que vêm no
pack do manual de
instruções.
ATENÇÃO:
NÃO DEIXE A
EMBALAGEM DA
MÁQUINA OU OS SEUS
COMPONENTES AO
ALCANCE DE
CRIANÇAS: ELA É UMA
POTENCIAL FONTE DE
PERIGO.
ES
CAPÍTULO 5
PUESTA EN
FUNCIONAMIENTO
INSTALACIÓN
Ponga la máquina cerca
del lugar de uso sin la base
del embalaje.
Cortar las cintas que rodean
el tubo, prestando atención
de no dañar el mismo ni el
cable electrico.
Destornille los 3 tornillos (A)
del lado posterior y extraer
los 3 distanciales (B)
Desenrroscar el tornillo (C).
De esta manera caerá en el
interior de la máquina un
distancial.
Inclinar hacia delante la
máquina y extraer el
distancial arriba descrito.
Tapar los 4 orificios utilizando
los tapones contenidos en
la bolsa de instrucciones.
ATENCIÓN:
NO DEJE AL ALCANCE
DE LOS NIÑOS LOS
ELEMENTOS DE
EMBALAJE YA QUE
PUEDEN SER
PELIGROSOS.
FR
CHAPITRE 5
MISE EN PLACE
INSTALLATION
Placer la machine près du
lieu d’utilisation sans la base
d’emballage.
Couper avec précaution le
cordon qui maintient le
tuyeau d’évacuation et le
cable d’alimentation
Enlever les 3 vis de fixation
indiquées en (A) et enlever
les espaces indiqués en (B)
Dévisser la vis (C).
Un élément en plastique
tombera à l’intérieur de la
machine à laver.
Incliner la machine vers
l’avant et enlever l’élément
plastique ci-dessus.
Couvrir les quatre trous en
utilisant les capuchons
prévus à cet effet dans le
sachet où se trouve la
notice
ATTENTION:
NE PAS LAISSER À LA
PORTÉE DES ENFANTS
DES ELEMENTS
D’EMBALLAGE QUI
PEUVENT CAUSER DES
RISQUES.