Operating instructions, P2 p 2 s 1 s 1, Factory settings – STIEBEL ELTRON RTF Z 20.12.2004 - 12.05.2006 User Manual
Page 5: Displays, 1 first start-up, 2 setting the time and day of the week
5
Deutsch
English
M
+
–
OK
6
9
3
15
21
S1
Mo - Fr
Sa - Su
S1
E1
E1
S2
S3
E2
E3
E1
E2
S1
S2
P1
P2
P3
12
18
24
time
comfort temperature
otherwise
Off-peak temperature
pr
ograms
6
00
6
00
12
00
9
00
9
00
14
00
16
00
17
00
23
00
23
00
23
00
7
00
1 2 3 4 5
6
6
12
18
24
0
7
P
2
P
2
S
1
S
1
P
2.5
1. Operating instructions
for the user and the qualified installer
The RTF-Z digital controller enables individu-
al control of the heating mats. There are four
operating programmes.
When connected to the mains electrical supply
the controller switches on and regulates the
floor heating to a preset temperature. The
„heating operating symbol “ is displayed.
After setting the time the controller automa-
tically switches to the timer programme.
By means of the self learning function of the
RTF-Z, the start-time will be set directly into
the timer-program, from which the comfort
temperature will be achieved. Due to this, the
start of the heating-time will be before the
adjusted starting time.
The self-learning-function is activated by the
factory, if wished it can be deactivated within
the adjustment mode.
Switching ON & OFF
To switch off, press the M button and hold
for 3 seconds, the display will then show OFF.
To switch on again press and hold the M
button for 3 seconds. The controller will
switch on again to its most recent setting.
In the off position frost protection is
not provided.
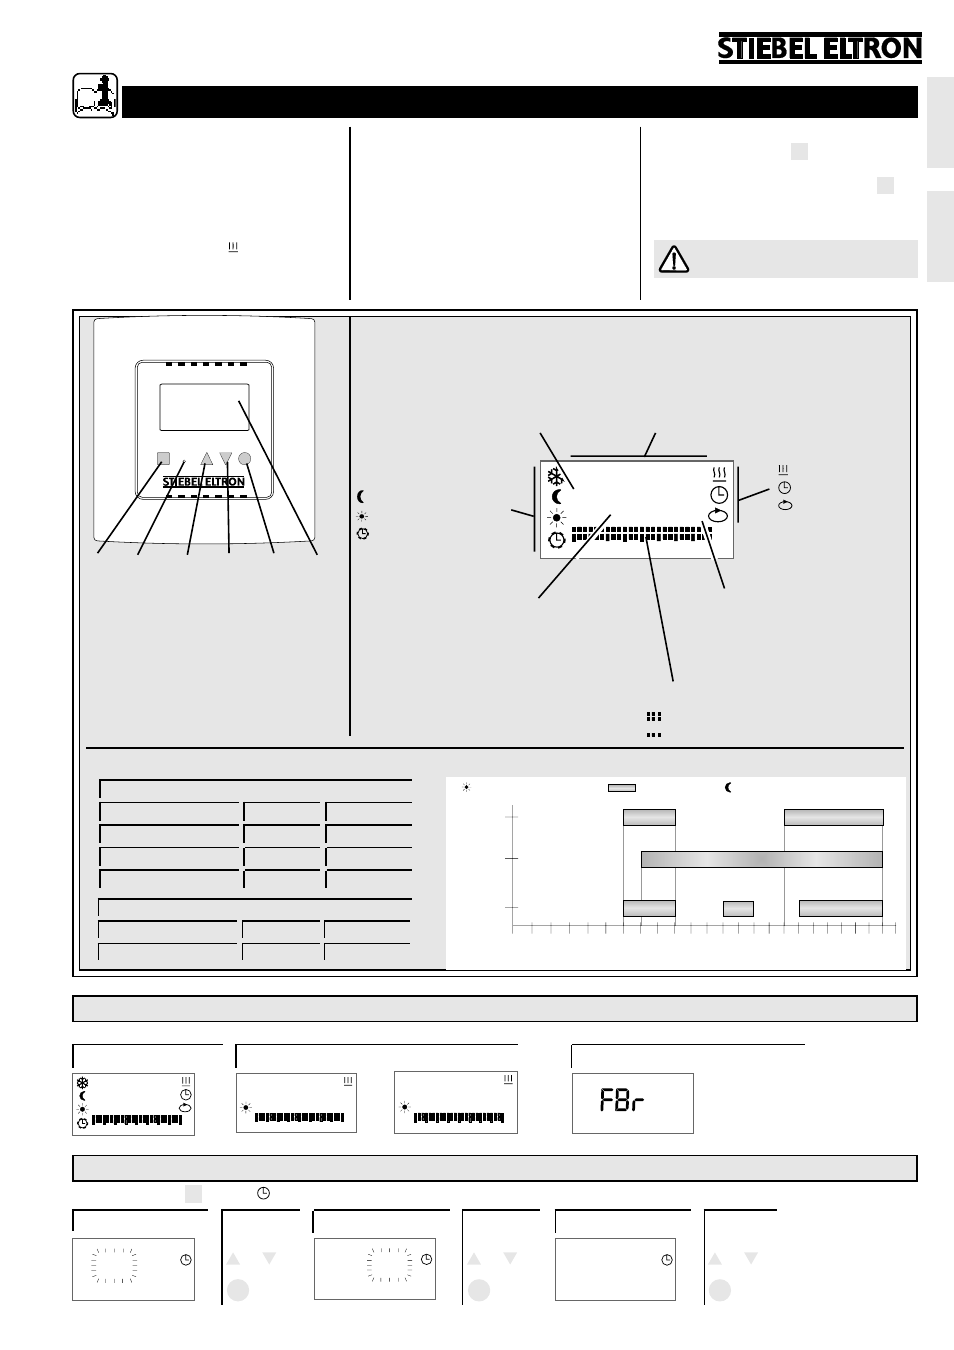
1 Mode - select an operating mode or
function by repeated pressing
2 Reset - restore the factory setting.
Briefly depress the flush-fitting push-
button with a non-conductive blunt object.
3 Increase the set value
4 Decrease the set value
5 Confirm the set value
6 Display
1
2
3
4
5
6
8966.02
8967.01
Functions
Heating operating
Time
P
Program selection
Timer programs
P1 = Program 1
P2 = Program 2
P3 = Program 3
Operating modes
7
Frost protection
Off-peak temperature
Comfort temperaure
Timer program
Days of the week
1-5 = Monday - Friday
6+7 = Saturday + Sunday
Start / end time in the timer program
S1 = 1st start time
E1 = 1st end time
S2 = 2nd start time
E2 = 2nd end time
S3 = 3rd star t time
E3 = 3rd end time
Value indicator
Setpoint floor temperature
(Guide figure, e.g. 2.5 = approx.
25 °C) or time
Time segments of timer
Comfort temperature
Off-peak temperature
Factory settings
Timer program switching times
Floor temperatures of operating modes
Frost protection
1.0
=
^ approx. 10
Guide figure
°C
Off-peak temperature
1.8
=
^ approx. 18
Comfort temperature
2.5
=
^ approx. 25
Temperature setting limits
Max. Floor temperature
4.0
=^ approx. 40
Min. Floor temperature
1.0
=^ approx. 10
Displays
or
1.1 First start-up
After connecting to the mains supply, the following displays appear:
for approx. 5 seconds . . .
. . . then alternately
probe defective or not connected
1.2 Setting the time and day of the week
Press push-buttom M until the function symbol is displayed.
Hour
Push-
button
+
or
–
Minutes
Push-
button
Day of the week
+
or
–
Push-
button
OK
OK
OK
+
or
–
6
12
18
24
0
2.5
6
12
18
24
0
6
12
18
24
0
6
12
18
24
0
00:00
1 2 3 4 5
6
6
12
18
24
0
7
8
8
8
8
8
8
8
8
P
88:88
00
:00
00
:00
1