Connections, Audio output connection, Control jack connections – Pioneer CDJ-500II User Manual
Page 6: Power cord connections
6
En
÷ Before making or changing the connections,
switch off the power switch and disconnect the
power cord from the AC outlet.
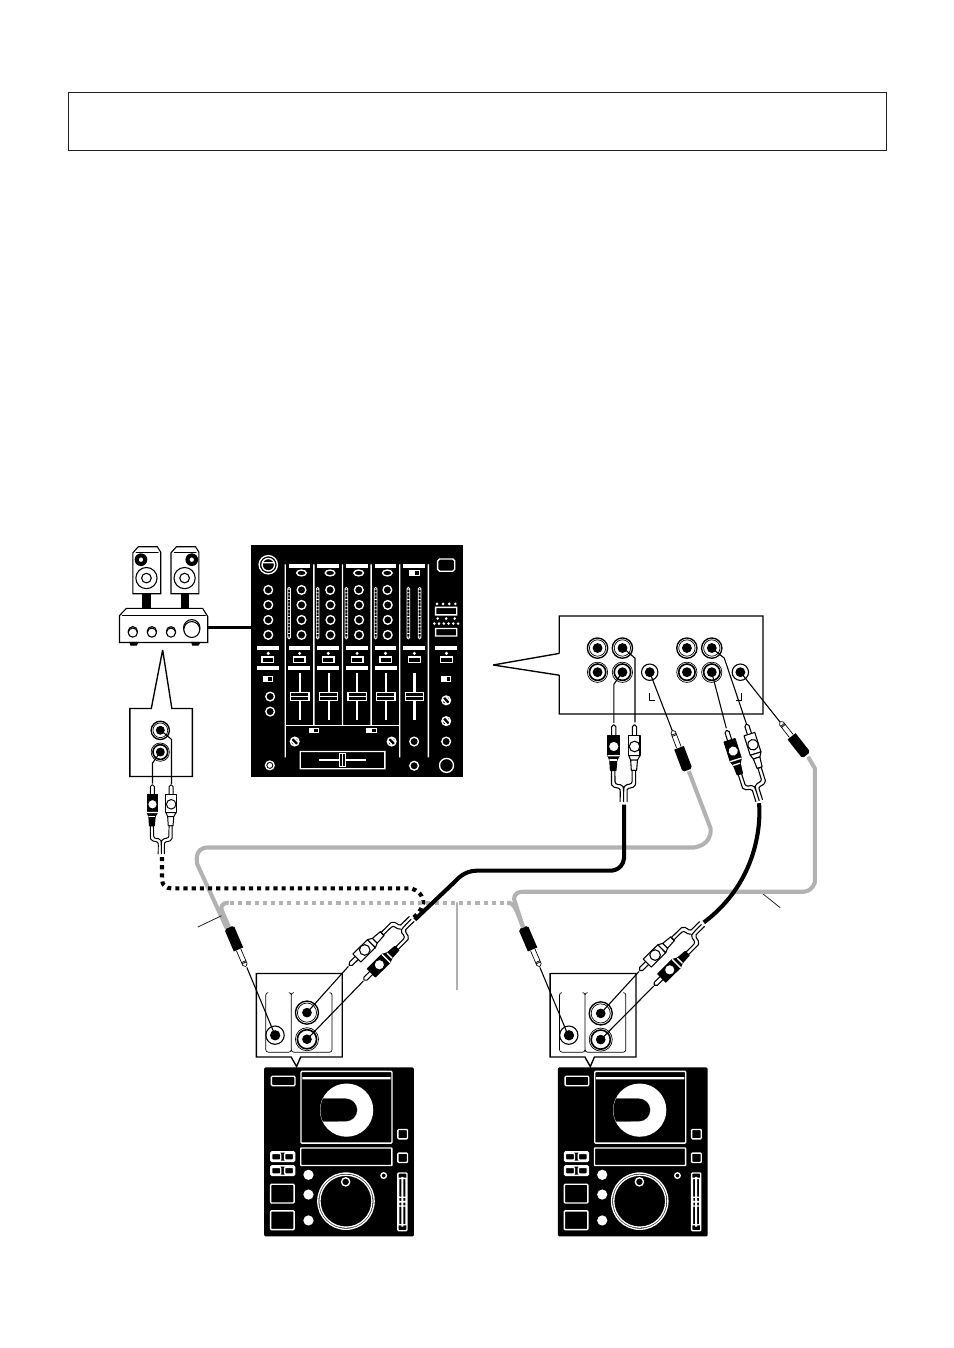
AUDIO OUTPUT CONNECTION
Connect the AUDIO OUT jacks of this player to the
input jacks (LINE INPUT) of the DJ mixer (or the stereo
amplifier). Make sure that the white plugs are
connected to the left (L) jacks and the red plugs to the
right (R) jacks.
÷ Be sure not to connect this player to the DJ mixer's
MIC jacks, as the sound will be distorted and will
not be reproduced properly.
CONNECTIONS
CONTROL JACK CONNECTIONS
Connect both CONTROL jacks of two players with a
provided control cable. By connecting two players,
continuous playback on both players can be carried
out alternately. (see p.13)
By connecting the optional DJM-500 or DJM-300 DJ
mixer to the CONTROL jack of this unit, the fader
starting or back cuing of this unit can be controlled
from the audio mixer. For the connection and operation,
read the operating instructions of the DJM-500 or
DJM-300 DJ mixer.
POWER CORD CONNECTIONS
Connect the power cord to a household AC wall outlet
or an AC outlet on your amplifier.
÷ Make sure plugs are inserted fully into the jacks
and wall outlet.
Note
If you do the following things when the disc is spinning
in the unit, the unit may malfunction.
1) Set the power switch to off, then on.
2) Disconnect the power cord, then connect again.
At that time, press the eject button to stop the disc
and operate the unit again.
Stereo amplifier
Audio cable
Audio
cable
Control cable
(provided)
When other than
DJM-500 or DJM-
300 DJ mixer used.
CDJ-500II
CDJ-500II
R
L
R
L
L
R
L
R
LINE INPUT
L
R
L
R
L
R
PHONO1 CD2/LINE
LINE CD1
CH2
CH1
PLAYER CONTROL
L
R
CON-
TROL
AUDIO
OUT
L
R
CON-
TROL
AUDIO
OUT
L
R
Control cable
(provided)
PIONEER DJM-500 or DJM-300 DJ mixer