Zanussi ZCM 1031 X User Manual
Page 9
CARE AND MAINTENANCE
Before cleaning the appliance, switch off the electrical supply
at the control switch.
Do not clean the appliance surfaces when still hot.
ENAMELLED SURFACES
Clean with a damp sponge using water and mild washing-up
liquid.
Grease can be easily removed using hot water or a specific
cleansing agent for enamelled surfaces. Do not use abrasive
cleansers. ALWAYS CHECK SUITABILITY ON THE PACKAGING.
Do not leave any acid or alkaline substances (lemon juice, vinegar,
salt, etc.) on the enamel. AGENTS CONTAINING BLEACH MUST
NOT BE USED.
Clean the parts in stainless steel with specific cleansers for
stainless steel surfaces. PERFORM A SPOT TEST ON AN
INCONSPICUOUS
ARREAR.
These detergents must be applied using a soft cloth.
min. 20mm
min.100 mm
min. 50 mm
min. 50 mm
min. 700 mm
min. 400 mm
min. 20mm
PANSTANDS AND BURNERS
To clean the burners, remove them by pulling upwards
and soak them for about 10 minutes in hot water with a little
detergent. After having cleaned and washed them, wipe them
carefully.
Make sure that gas jets are
not blocked.
Clean the burners once a week or more frequently if necessary.
MAKE SURE YOU HAVE ASSEMBLED THE BURNERS IN A
RIGHT WAY.
BE CAREFUL NOT TO DAMAGE THE SPARK ELECTRODE
(see fig. 14 A) .
Fig. 10
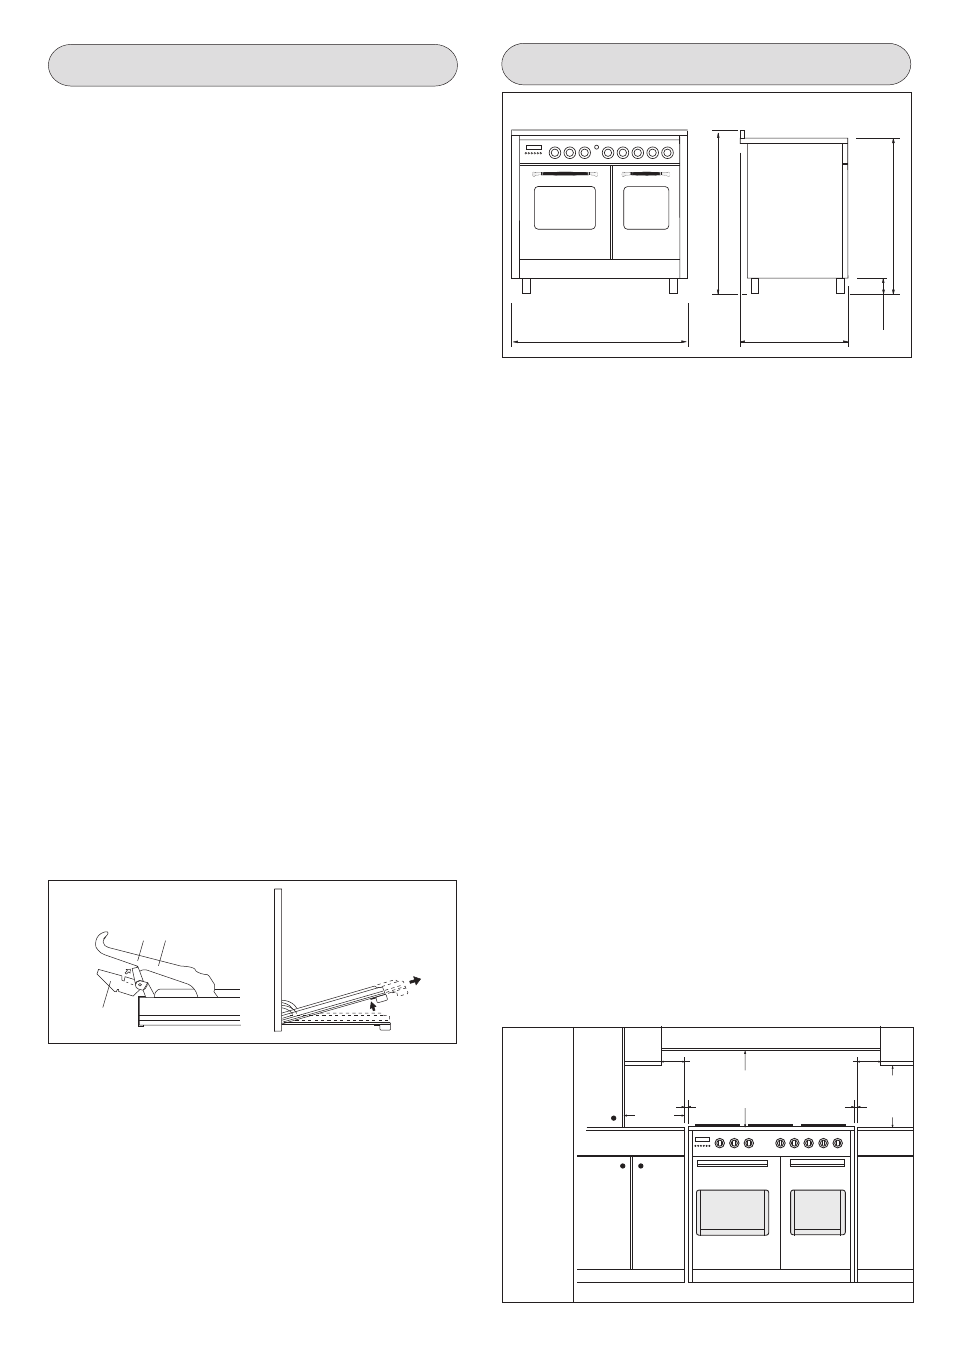
OVERALL DIMENSIONS
INSTRUCTIONS FOR THE USER
1000
935
60
11
87
Location
Your cooker is heavy, so be careful when moving or positioning
it. Do not try to move the cooker by pulling on the doors, handles
or control panel. The cooker is designed to “slot in” between
600mm deep cabinets, spaced approximately 1000mm apart. It
can also be used free-standing, with a cabinet to one side, in a
corner setting or with its back to a wall. However, it must not be
situated with either side closer than 20mm to a combustible wall
or cupboard that is higher than the cooker. It should not be installed
at the end of a run of cabinets if there is a cabinet at immediate
right angles to the cooker door.
In case of installation between kitchen units, their sides must
withstand a temperature of at least 85 degrees C.
The wall behind the cooker and 450mm above and across the
width of the cooker, should be an incombustible material or easy
clean surface such as ceramic tiles.
Any overhanging surface or cooker hood should be at least 750mm
(28”) above the cooker hob. We do not recommend positioning
the cooker below wall cupboards, as the heat and steam from the
cooker may cause damage to the cupboard and its contents.
The cooker may be located in a kitchen, or a bed-sitting room,
but not in a room containing a bath or shower. The cooker must
not be installed in a bed-sitting room of less than 20m3 .
LPG Models must not be installed in a room or internal space
below ground level, e.g. in a basement.
WARNINGS
The technical data is indicated on the data plate placed on the
rear of the appliance. The adjustment conditions are shown on
the label stuck on the packaging and on the appliance. ' Do not
use the oven door handle to move the appliance, such as removing
i from the packaging. The appliance is in class 1 or class 2
subclass 1.
INSTALLATION IMPORTANT:
The adjacent furniture must be able to withstand a minimum
temperature rise of 85deg C during periods of use. If the appliance
is to b installed near units, leave the minimum gaps specified in
the table below.
OVEN DOOR
For some models, the oven door can be disassembled in the
following way: open the oven door fully, hinges A are provided
with two movable jumpers B; rotate the jumpers into the slot C,
After that lift the door outward carring out the two movements
shown in the picture. To do that, grip the sides of the door at the
centre and lift the door out by lifting up slightly and pulling gently
outwards. In order to reassemble the door, introduce the hinges
in their relevant slots. Before closing the door, do not forget to
reset the movable jumpers B.
Attention, do not attempt to move the jumpers while the door
is out of the oven, the hinges are under high spring tension.
OVEN
Clean the enamelled parts with a damp cloth using mild
washing-up liquid and water.
Grease can be easily removed using hot water or a specific
cleansing agent for enamelled surfaces. Do not use abrasive
cleansers.
ALWAYS CHECK SUITABILITY ON THE PACKAGING AND
PERFORM A 'SPOT TEST' ON AN INCONSPICUOUS AREA
Fig. 11
A
B C
Fig. 9
9