Idrive, For torquemaster, Plus – Wayne-Dalton IDRIVE PRO 3790-Z User Manual
Page 15: Inst alla tion, End brackets, Important
9
Please Do Not Return This Product To The Store. Call Us Directly! Our Trained Technicians Will Answer Your Questions and/or Ship Any Parts You May Need.
You can reach us Toll Free at 1-888-827-3667 for Consumer Assistance or online at www.wayne-dalton.com
IDRIVE
®
FOR TORQUEMASTER
®
PLUS
INST
ALLA
TION
Cable Dru
m
No space betwe
e
Pawl and Ca
b
indicates eng
a
Ca
Ratchet Pawl
ENGAGED SIDE VI
EW
No space between
Ratchet Pawl and
Cable Drum
ENG
AGED U
NDE
RNE
ATH
VIEW
Space between
R
and Cable
non-indicates e
Ratchet Pawl
DISENGAGED SIDE VIEW
No space between
Ratchet Pawl and
DISENGAGED U
NDE
RNE
ATH V
IEW
UPPER POSITION
LOWER POSITION
L
UPPER POSITION SIDE VIEW
Ratchet Paw
l in Lower
P
Ratchet Pawl in Upper Position
Use these Illustration,
in conjunction with the Instructions on the o
t
this label.
WARNING
WAR
NING
Rachet Bracket is under
Rac
het
Bra
cke
t is u
nde
r
EXTREME SPRING
EXTR
EME
SPR
ING
TENSION
TEN
SION
.
To avoid possible severe or
To a
void
po
ssib
le s
eve
re o
r
fatal injury
,
fata
l inju
ry, DO NOT
DO N
OT
remove
rem
ove
fasteners from ratchet bracket
fast
ene
rs fr
om
ratc
het
bra
cke
t
until spring(s) are fully
until
sp
ring
(s) a
re fu
lly
wnwound.
wnw
oun
d.
To safely unwind spring(s)
To s
afe
ly u
nw
ind
sp
ring
(s)
read
rea
d
and follow the directions in the
and
follo
w th
e d
irec
tion
s in
the
installation instructions/owners
insta
llatio
n in
stru
ctio
ns/o
wne
rs
manual.
ma
nua
l.
DO NOT REMOVE THIS T
AG.
DO N
OT R
EMO
VE T
HIS T
AG.
Cable
Dru
m
No sp
ace
bet
we
en Ratche
t
Pawl
and
Cable
Drum
indi
cates
engage
me
nt
Cab
le D
rum
Ratc
het Pawl
ENGAG
ED S
IDE V
IEW
No s
pace
betwe
en
Ratch
et Pawl and
Cab
le D
rum
EN
GAG
ED U
NDE
RNE
ATH V
IEW
Spac
e bet
we
en Ratchet
Pawl
and C
able Drum
non-indicates
engage
me
nt
Cable D
rum
Rat
chet Pa
wl
DIS
EN
GA
GED S
IDE VI
EW
No sp
ace
between
Ratchet Pawl and
DISENGAG
ED U
ND
ERNE
ATH V
IEW
UPP
ER POSITION
LOWER POSITI
ON
LOWER POSITION SI
DE
V
UPP
ER P
OSI
TION
SIDE
VIEW
Ratc
het Pawl in Lo
we
r Posi
tion
Ratch
et Pawl in
Upper Posit
ion
Use these Illus
tration,
in conjunction with the Instructions on the other side of
this label.
WARNING
WAR
NING
Rachet Bracket is under
Rac
het
Bra
cke
t is u
nde
r
EXTREME SPRING
EXTR
EME
SPR
ING
TENSION
TEN
SION
.
To avoid possible severe or
To a
void
po
ssib
le s
eve
re o
r
fatal injury
,
fata
l inju
ry, DO NOT
DO N
OT
remove
rem
ove
fasteners from ratchet bracket
fast
ene
rs fr
om
ratc
het
bra
cke
t
until spring(s) are fully
until
sp
ring
(s) a
re fu
lly
wnwound.
wnw
oun
d.
To safely unwind spring(s)
To s
afe
ly u
nw
ind
sp
ring
(s)
read
rea
d
and follow the directions in the
and
follo
w th
e d
irec
tion
s in
the
installation instructions/owners
insta
llatio
n in
stru
ctio
ns/o
wne
rs
manual.
ma
nua
l.
DO NOT REMOVE THIS T
AG.
DO N
OT R
EMO
VE T
HIS T
AG.
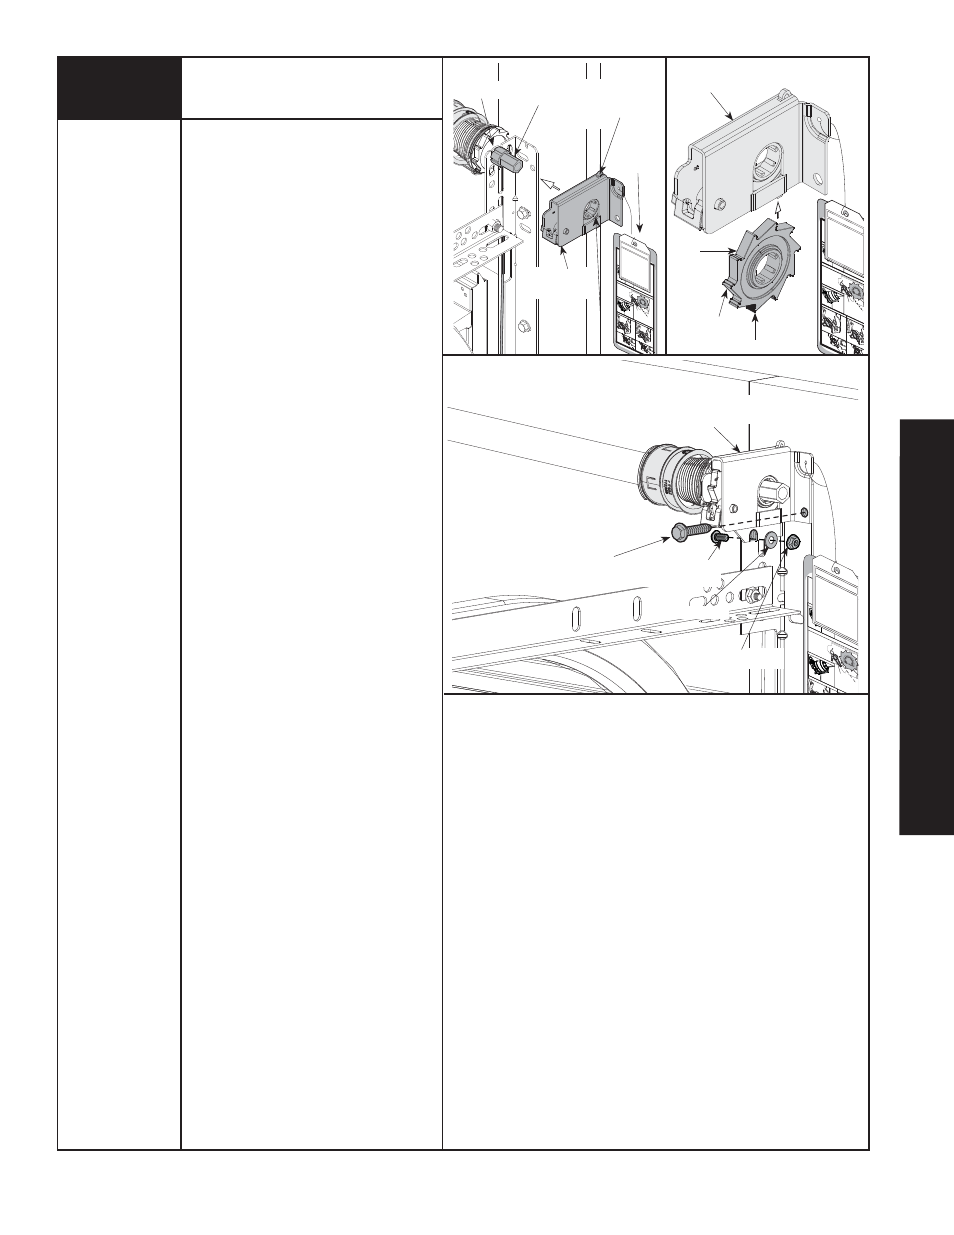
IMPORTANT!
WARNING TAGS MUST BE
SECURELY ATTACHED TO BOTH END
BRACKETS.
End brackets are right and left hand. You
can identify the right hand end bracket by
the disconnect cable guide hole in the top
of the bracket.
Beginning with either side, slide the end
bracket onto the winding shaft so that the
grooves in the ratchet wheel fit onto the
winding shaft splines.
Secure end bracket to the flag angle using
(1) 5/16”-18 x 3/4” carriage bolt,3/4”
washer and hex nut; then secure to the
jamb with 5/16” x 1-5/8” hex head lag
screw.
Repeat for other end bracket.
NOTE:
No ratchet wheel is required on the
left hand side for single spring applications.
Only an end bracket is needed.
After completing this step, continue with
Step 4 on page 12.
Splines
Winding
Shaft
Groove
Disconnect Cable
Guide Hole
Right End
Bracket
Warning Tag
Right End
Bracket
Ratchet Wheel
Teeth Pointing
Upward
3
End Brackets
Cable Drum
No space betwe
e
Pawl and Cabl
indicates eng
a
Ca
Ratchet Pawl
ENGAGED SIDE VIEW
No space between
Ratchet Pawl and
Cable Drum
ENGAGED U
NDE
RN
EAT
H V
IEW
Space between
R
and Cable
non-indicates e
n
Ratchet Pawl
DISENGAGED SIDE VIEW
No space between
Ratchet Pawl and
DISENGAGED U
NDE
RNE
ATH V
IEW
UPPER POSITION
Use these Illustration,
in conjunction with the Instructions on the o
t
this label.
WA
RNIN
G
WAR
NING
Rachet Bracket is under
Rac
het
Bra
cke
t is u
nde
r
EXTREME SPRING
EXTR
EME
SPR
ING
TENSION
TEN
SION
.
To avoid possible severe or
To a
void
po
ssib
le s
eve
re o
r
fatal injury
,
fata
l inju
ry, DO NOT
DO N
OT
remove
rem
ove
fasteners from ratchet bracket
fast
ene
rs fr
om
ratc
het
bra
cke
t
until spring(s) are fully
until
sp
ring
(s) a
re fu
lly
wnwound.
wnw
oun
d.
To safely unwind spring(s)
To s
afe
ly u
nw
ind
sp
ring
(s)
read
rea
d
and follow the directions in the
and
follo
w th
e d
irec
tion
s in
the
installation instructions/owners
insta
llatio
n in
stru
ctio
ns/o
wne
rs
manual.
ma
nua
l.
DO NOT REMOVE THIS T
AG.
DO N
OT R
EMO
VE T
HIS T
AG.
5/16” x 1-5/8”
Hex Head Lag
End Bracket
(Right Hand)
5/16”-18 Hex Nut
5/16” - 18 X 3/4”
Carriage Bolt
Tools Needed:
Power Drill
7/16” Socket
Driver
1/2” Wrench
Step Ladder
3
Black Tooth
3/4” WASHER