Operating instructions, For your safety read before operating, Operating in – Williams 2903512 User Manual
Page 13: Structions
Operating Instructions
Before operating the furnace, read carefully all warnings and safety information in this manual.
A. This appliance does not have a pilot which must
F ollow the gas supplier's instructions.
be lighted by means of the piezo igniter installed
- If you cannot reach your gas supplier, call the fire
on the furnace. Do not try to light the pilot by
epartment.
hand.
C. Use only your hand to push in or turn the gas control
B. BEFORE LIGHTING, smell all around the
nob. Never use tools. If the knob will not push in or
appliance area for gas. Be sure to smell next
turn by hand, do not try to repair it, call a qualified
to the floor because some gas is heav ier than
service technician. Force or attempted repair may result
air and will settle on the floor.
n a fire or explosion.
WHAT T O DO IF YOU SMELL GAS:
D. Do not use this appliance if any part has been under
- Do not try to light any appliance
water. Immediately call a qualified service technician
- Do not touch any electric switch
to inspect the appliance and to replace any part of the
- Do not use any phone in your building
ntrol system and any gas control which has been
- Immediately call your gas supplier from a
nder water.
neighbor's
phone.
FOR YOUR SAFETY READ BEFORE OPERATING
d
k
i
co
u
WARNIN G: If you do not follow these instructions exactly, a fire or explosion
may result causing property damage, pe onal injury or loss of life.
rs
OPERATING IN
ab
STRUCTIONS
1.
2.
completely. Do not force.
3. Turn off all electric power to appliance.
4.
5.
6.
7.
8.
9.
10.
11.
12.
13. If the appliance will not operate, follow the instructio s below "T o Turn Off Gas Of Appliance" and call your
14.
15.
the switch back to the W INTER position (button up)
he appliance will attempt to relight after
approximately 40 seconds. During these 40 second the red lamp will be lit. If the second attempt is
In case of flame fault, the red lamp will light and the green lamp will turn off. If this occurs, set the
SUMMER/WINTER button to the SUMMER position button down) and wait ten (10) seconds; then turn
If you choose the high heat output setting, push the IN/MAX button to MAX position (button up). If you
prefer soft heating and silent operation, keep it on M N position (button down).
This appliance has an automatic flame control system. When the flame is lit, the green lamp is lit also.
unsuccessful, turn off the electric power to the appli
e and call your Service Agency.
Set thermostat to desired setting.
The red lamp will be lit for 40 seconds, then the flam ignite. The red lamp
will then shut off and the green lamp will be lit.
serv ice technician or gas supplier.
Turn on the gas supply to the unit.
Turn on electric power to the appliance.
Push the MIN/MAX button to MIN position (button d
n).
Switch the SUMMER/W INTER button to WINTER p sition (button up).
Turn off gas supply to the unit by turning off the gas hutoff valve.
Wait five minutes to clear out any gas. If you then
ell gas, STOP! Follow
the safety information in section "B" above. If you d not smell gas, go to the
next step.
ST OP! Read the safety information above on this l
el.
Set the thermostat to the lowest setting by turning it ounterclockwise
This appliance is equipped with an ignition device th t automatically lights the
burner. Do not
TO TURN OFF GAS TO APPLIANCE
1.
2. Turn off all electric power to the appliance if service to be performed.
3. Turn the gas tap installed on the gas supply to the C OSED position.
Set the thermostat to the lowest setting by turning it unterclockwise completely. Do not force.
is
co
L
n
. T
(
s
anc
M
I
e
ow
o
s
sm
o
c
a
try to light the burner by hand.
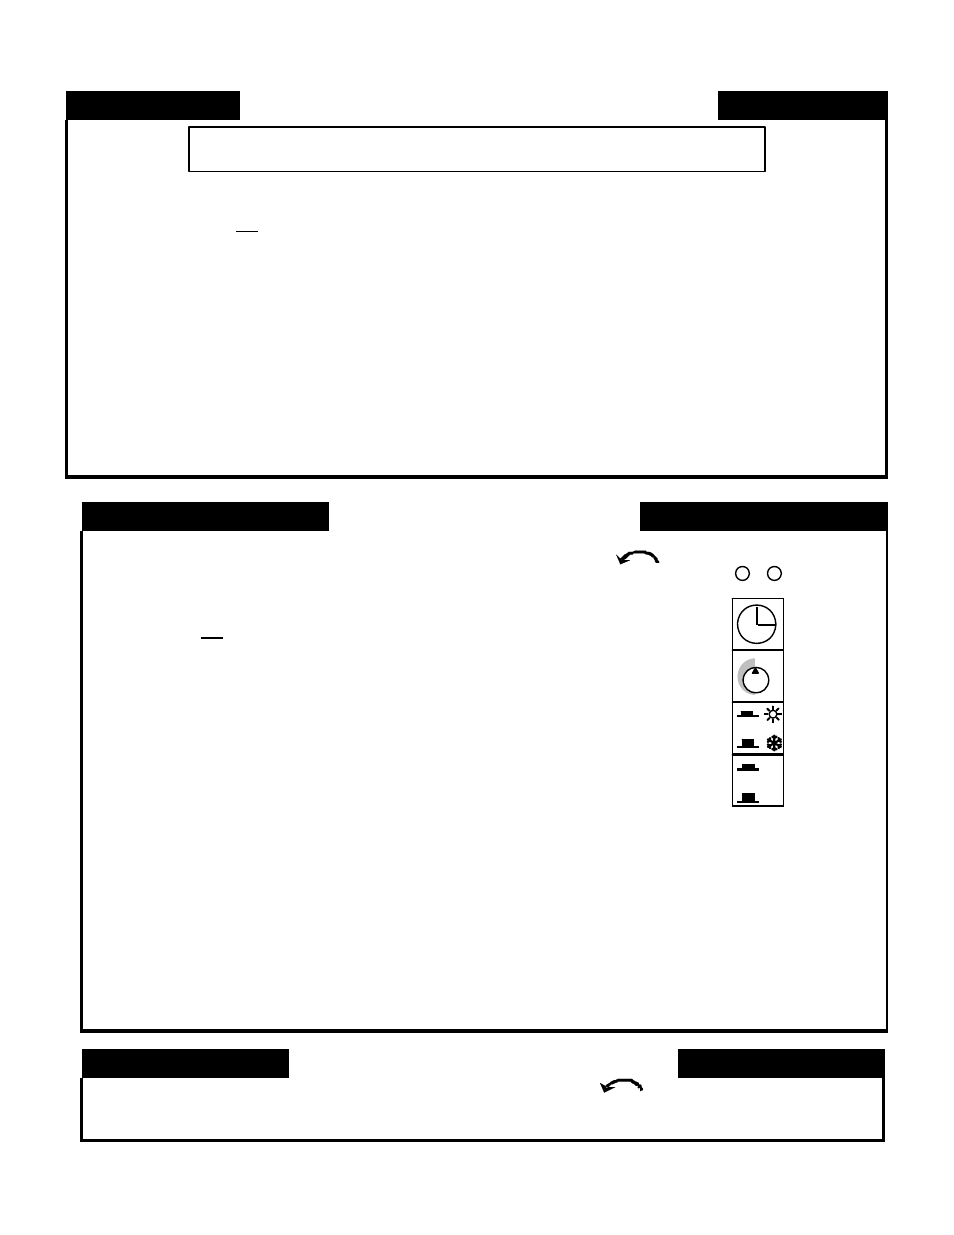
TIMER
RED
LAMP
RESET
THERMOSTAT
GREEN
LAMP
SUMMER/WIN
MIN/
TER
MAX
G
RED
LAMP
MIN
MAX
RESET
R
GREEN
LAMP
MANUAL/PROGRAMMED
BUTTON
THERMOSTAT
SUMMER
/WINTER
BUTTON
MIN
/MAX
BUTTON
12