Universal Laser Systems X2-600 User Manual
Page 113
Troubleshooting
8-3
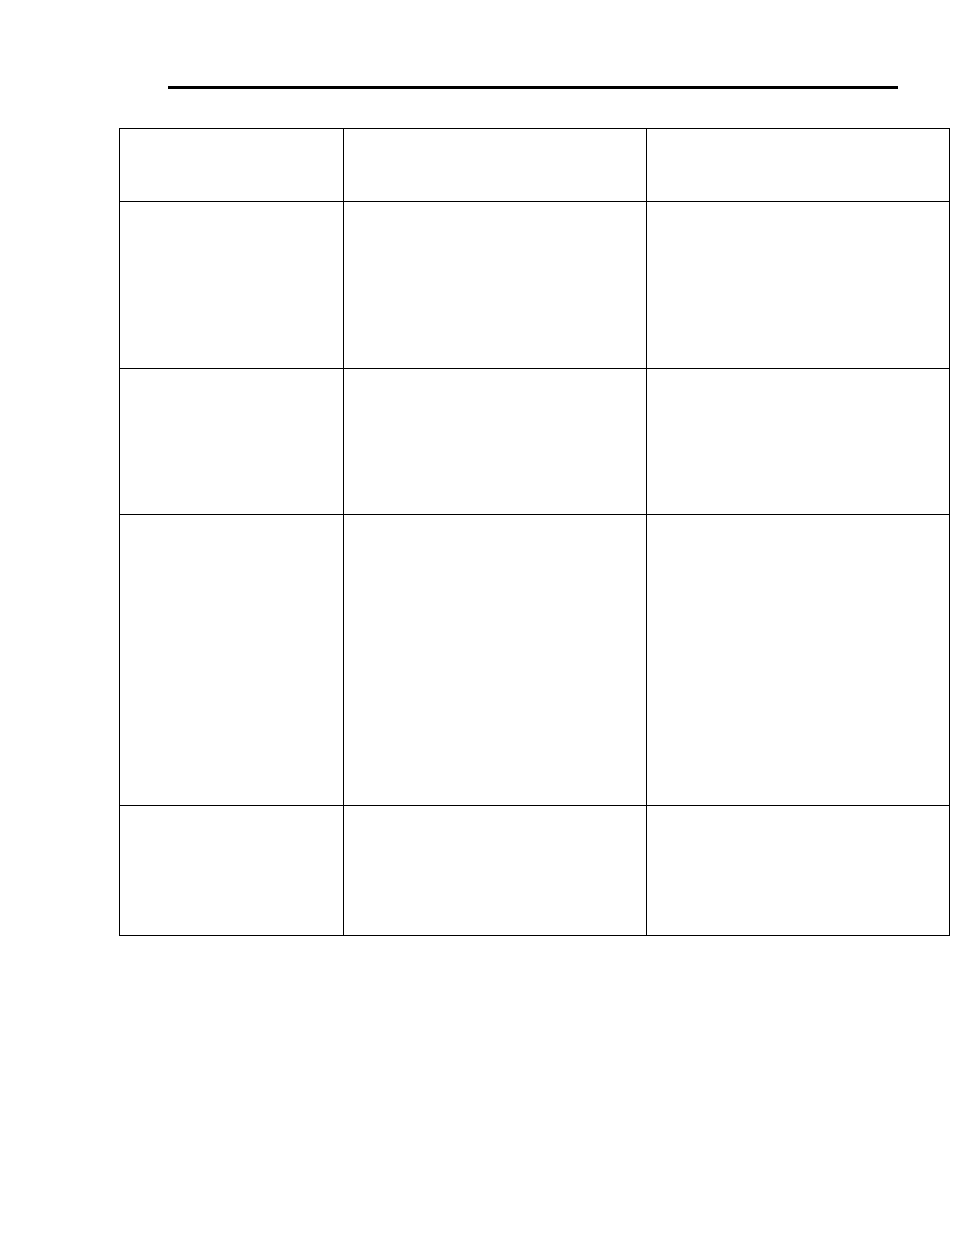
Engraving appears “halftoned” and
not solidly filled when using colors
other than black
•
Graphic, graphic software, graphic software
setup, color palette, monitor display colors, or
driver settings have changed
•
Check to see what has changed. Use
“Software Setup Guide” to properly setup the
graphics software to work correctly with the
laser system. Check driver settings.
Wavy lines when vector engraving
or cutting
•
Running too fast
•
Dirty laser system
•
Worn or faulty bearings
•
Arm is out of square
•
Firmware needs to be updated
•
The highest quality vectors are obtained by
running less than 5% speed
•
Clean all optics, rails, bearings and belts
•
Check and/or replace X and/or Y axis
bearings
•
Square arm re-adjust left side Y-axis
bearings so both are contacting Y-rail equally
•
Firmware advancements have been
improving vector quality
Angled cuts when cutting through
thick materials such as ¼” acrylic
•
Angled cuts are a normal condition if they are
equal on all sides of the object. The front side
of the object will always be slightly smaller
than the backside of the object due to the
material “spreading more” at the focal point.
•
Angled cuts on only one or two sides
indicates a slight beam misalignment at the
#3 mirror or focus lens
•
Cut a square and observe that each side is
slightly tapered inward.
•
Check and adjust the beam alignment at the
#3 mirror position and the focus lens
The start and stop points of circles,
when cutting, do not meet up
•
Slight “notching” when cutting circles is a
normal condition due to the beam starting
and stopping at the same point
If the pattern is excessive:
•
Dirty laser system
•
Mechanical problem
•
The laser beam has width and there is heat
effects from starting and stopping the laser
system at the same point. Try extending the
circle through the end point by adding a small
line segment to reduce the effect. If cutting
the material when elevated off the table,
make sure that the center if the circles are
supported.
•
Try rotating the circle 90 or 180 or 270
degrees. Sometimes this helps reduce the
effect
•
Clean all optics, rails, bearings and belts
•
Turn machine off and check for binding in the
x & y directions. Check for excessive belt
tension.
Flat edges on curves when vector
cutting
•
DPI setting too low
•
PPI setting too low
•
Software limitation
•
1000 DPI produces the smoothest edges
when cutting
•
Higher PPI settings produce smoother edges
but may cause excessive burning or melting
•
The graphic software you are using has
limited vector smoothness capability