Do not – Toastmaster TC2000 User Manual
Page 3
B. Operation Procedure
1.
Adjust the position of the draft curtains at the ends of the cooking
chamber (if necessary). This procedure is described in detail in
Section II, Part D, Draft Curtain Adjustment, in this Manual.
IMPORTANT
When cooking at very high temperatures (a setting of 8 or higher
on either temperature adjustment knob), the oven should be pre-
heated for at least 10 minutes WITH THE DRAFT CURTAINS IN
THE FULLY-LOWERED POSITION. After pre-heating, the curtains
may be repositioned as required.
2.
Restore electrical power to the oven at the circuit breaker/fused
disconnect.
3.
Switch the Power On/Off (I/O) Switch to the ON (I) position.
4.
Adjust the bake time (if necessary) by turning the conveyor speed
control knob. Adjust the upper and lower temperature settings (if
necessary) by turning the temperature adjustment knobs.
5.
Allow the oven to pre-heat for at least 10 minutes.
6.
Load the entrance end of the conveyor with the food product. The
motion of the conveyor will move the food product into the cooking
chamber.
C. Shutdown Procedure
1.
Switch the Power On/Off (I/O) switch to the OFF (O) position.
2.
Wait for the ovens cooling fan to turn off.
2.
Disconnect electrical power to the oven at the circuit breaker/fused
disconnect.
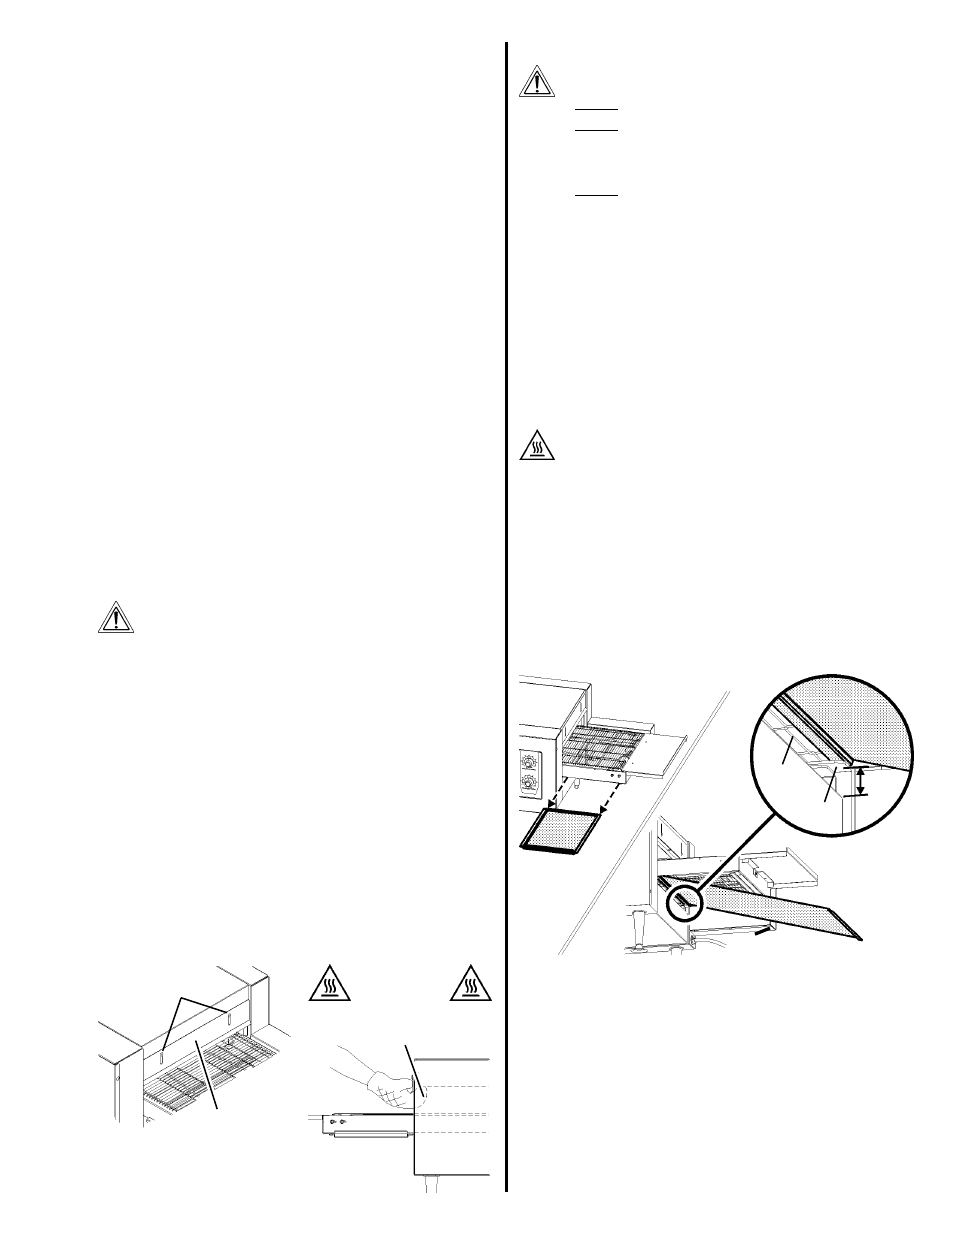
D. Draft Curtain Adjustment
The draft curtains may need to be repositioned to provide adequate
clearance for some food products. The curtains should be positioned to
prevent drafts into the oven, and heat loss into the environment.
The draft curtains can be removed from the oven to permit the maximum
vertical clearance above the conveyor.
WARNING
BEFORE ADJUSTING THE DRAFT CURTAINS, SWITCH THE
POWER ON/OFF SWITCH TO THE OFF (O) POSITION.
WHEN REPOSITIONING THE CURTAINS:
WEAR A HEAVY OVEN MITT.
DO NOT REACH INTO THE OVENS COOKING CHAMBER!
See Figure 6.
1.
To reposition the draft curtains:
a.
Loosen the two screws that hold the draft curtain in place.
b.
Slide the curtain to the desired clearance above the conveyor.
c.
Tighten the two screws to hold the curtain in place.
d.
Repeat these steps for the curtain at the opposite end of the
oven.
2.
To remove the curtains from the oven:
a.
Remove the two screws that hold the draft curtain in place.
b.
Remove the draft curtain.
c.
Repeat these steps for the curtain at the opposite end of the
oven.
E.
Daily Cleaning
WARNING
WHEN CLEANING THE OVEN:
NEVER USE PRESSURIZED WATER.
NEVER USE A CLEANING SOLUTION OTHER THAN SOAP
AND WATER ON PORTIONS OF THE OVEN THAT COME
INTO CONTACT WITH FOOD PRODUCTS. THESE AREAS
INCLUDE THE CONVEYOR BELT AND END TRAYS.
NEVER APPLY ENOUGH LIQUID TO STAND IN PLACE ON
THE OVEN. LIQUID INSIDE THE OVEN WILL CAUSE A
SEVERE ELECTRICAL HAZARD AND MAY OTHERWISE
DAMAGE THE OVEN.
CAUTION
DO NOT clean your oven using abrasive cleaners or pads. Both will
scratch and dull the finish.
1.
With the conveyor running, use a brush to clean any crumbs off the
conveyor into the crumb trays.
2.
Switch the Power On/Off (I/O) switch to the OFF (O) position, and
wait for the cooling fan to turn off.
3.
Disconnect electrical power to the oven at the circuit breaker/fused
disconnect.
4.
Allow the oven to cool.
CAUTION - HOT SURFACES
DO NOT TOUCH HOT SURFACES ON THE OVEN, OR REACH
INTO THE COOKING CHAMBER, UNTIL THE UNIT HAS
COOLED THOROUGHLY.
5.
Clean the fan grill on the front of the oven using a stiff nylon brush.
6.
Clean the end trays USING SOAP AND WATER ONLY and towel
them dry. If necessary, the end trays can be removed for cleaning
by removing the screws that hold them in place. See Figure 3 (in
Section II).
IMPORTANT
If the end trays are removed for cleaning, they must be replaced
prior to operating the oven.
7.
Slide the end crumb trays out from underneath the entrance and
exit ends of the conveyor. See Figure 7.
Figure 6
Screws
Draft curtain
8.
Lift BOTH ends of the center crumb tray; then, slide the tray out of
either end of the oven.
9.
Clean all three of the crumb trays using a commercial oven cleaner.
If necessary, towel them dry.
10. Replace the center crumb tray in the oven as shown in Figure 7.
IMPORTANT
Proper positioning of the center crumb tray is REQUIRED for proper
cooking. Ensure that the tray is replaced inside the conveyor frame,
as shown in Figure 7, and NOT on the floor of the cooking chamber!
11. Replace the two end crumb trays.
12. Clean the outside of the oven using a damp cloth with EITHER
soap and water OR a stainless steel cleaner. Use caution to ensure
that liquids do not enter the oven during cleaning.
Conveyor
Support
tab
End crumb
trays slide
straight out
CAUTION - HOT
DO NOT
REACH INSIDE
COOKING CHAMBER!
Center tray fits BE-
TWEEN conveyor
and support tab.
DO NOT insert
tray on floor of
oven!
Figure 7