Boiler jacket assembly – QHT BIASI B3-B9 User Manual
Page 22
P
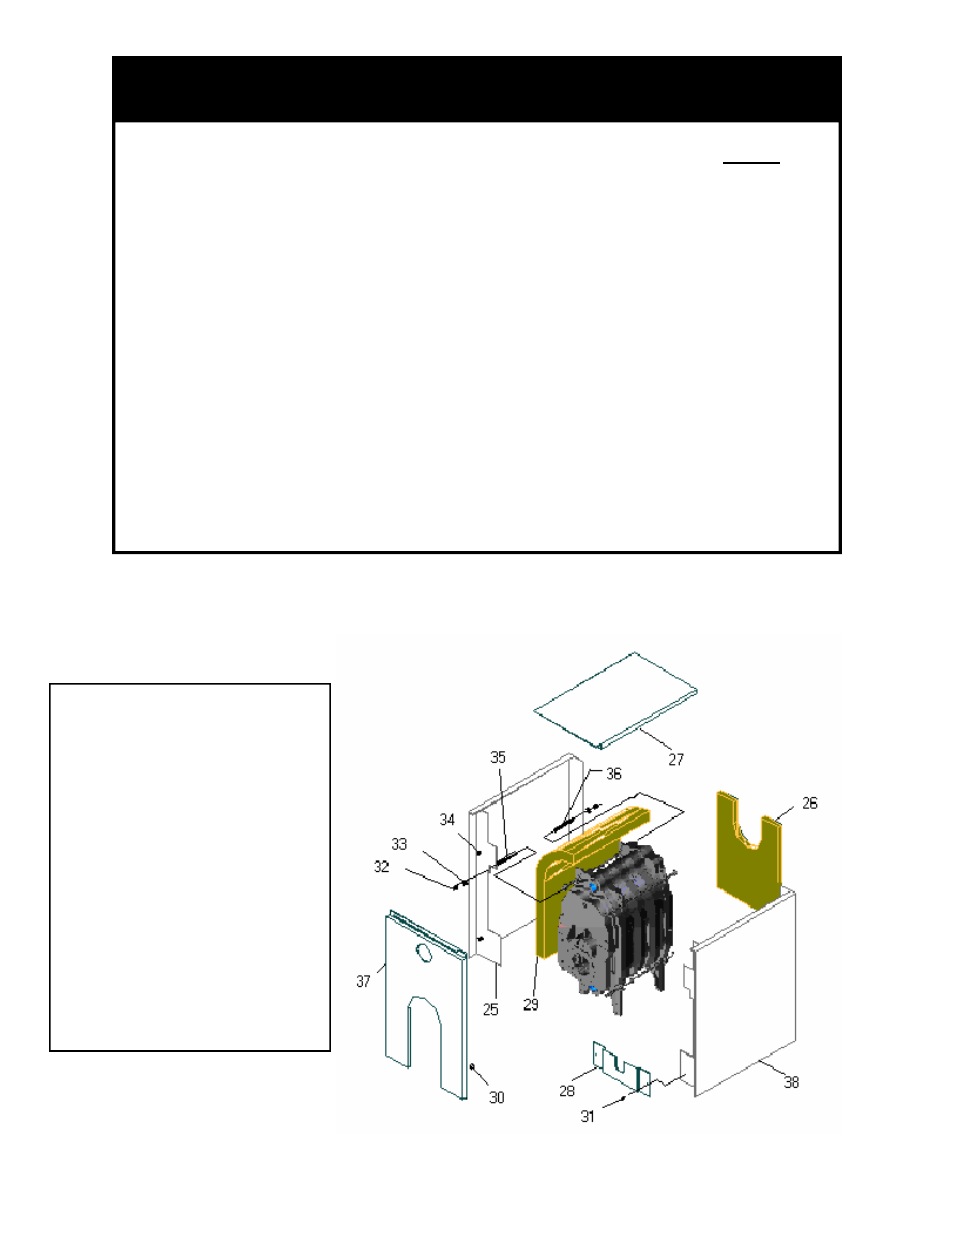
NOTE: All piping, boiler controls, gauges and valves should be installed before the
jacket is assembled on the boiler. Below is an explosion view of the boiler and
jacket assembly to clarify these boiler jacket assembly instructions. Insert the
separate (loose) piece of insulation on top of boiler with the foil side facing in so the
entire top, bottom and sides of boiler are covered. Place tubular jacket spacers (#35
& #36 on exploded view of boiler) on the upper and lower draw rod extensions at the
front(long spacers) and rear(short spacers) of the boiler. Place the rear insulated
jacket panel (#26) at the back of the boiler, also by slipping over the slotted cut-outs.
Position side jacket panels (#38 & #25) by slipping the slotted cut-outs over the
boiler draw rods. Place the lower front jacket panel (#28) in place and secure with
self-tapping screws provided. Fasten the washers and hex nuts to the ends of the
tie-rods to hold the jacket in place. Set the top panel (#27) in place and secure with
two screws in the back of the panel. With the jacket firmly secured, place front panel
(#37) in position on the tabs on the side panels and press firmly to snap spring
connectors in place.
NOTE: Do not attach any electrical wiring or electrical conduit or boiler piping to the
top panel (#27).
Boiler Jacket Assembly:
25 RH Side Jacket Panel
26 Rear Jacket Panel *
27 Top Jacket Panel
28 Lower Front Jacket Panel
29 Top & Side Insulation
30 Front Panel Pin Clips
31 Self Tapping Screws (Qty 2)
32 Jacket Mounting Nut (Qty 8)
33 Jacket Mounting Washer (Qty8)
34 Front Panel Mounting Pins
35 Long Jacket Spacer (Qty 4)
36 Short Jacket Spacer (Qty 4)
37 Front Jacket Panel *
38 LH Side Jacket Panel
* Supplied with attached insulation
10. Boiler Jacket Assembly
Note: For replacement parts, contact your local Biasi Wholesaler.