Orion 5521 User Manual
Page 3
4
5
2. Attaching
the imaging
camera to the
Deluxe Off-
Axis Guider
Once you have estimated what the
approximate spacing configuration
should be, you are ready to attach
the Deluxe Off-Axis Guider to your
imaging camera. Simply thread the
imaging camera’s female T-threads
into the back of the Deluxe Off-Axis
Guider (Figure 3). You can optionally
use the rotate lock ring to fix the
orientation of the Deluxe Off-Axis
Guider in relation to the camera.
This can be particularly useful for
DSLRs because the guider’s radial
adjustment sometimes interferes
with the camera body.
using a starshoot Deep
space imaging camera
Thread the camera to the Deluxe Off-
Axis Guider as shown in Figure 3.
3. Attaching the
Autoguider to
the Deluxe Off-
Axis Guider
Thread the fine focus guiding adapt-
er to the guiding end of the Deluxe
Off-Axis Guider; then tighten the fine
focus lock thumbscrew (Figure 4a).
Next, thread the autoguider camera
body to the Deluxe Off-Axis Guider
(Figure 4b).
StarShoot
AutoGuider,
nosepiece removed
7mm extension
Fine focus
guiding adapter
Deluxe Off-Axis
Guider main body
17mm
extension
2" focuser on
telescope
StarShoot Pro,
nosepiece
removed
Rotation
lock ring
StarShoot Pro/DSCI II
with StarShoot AutoGuider
Configuration
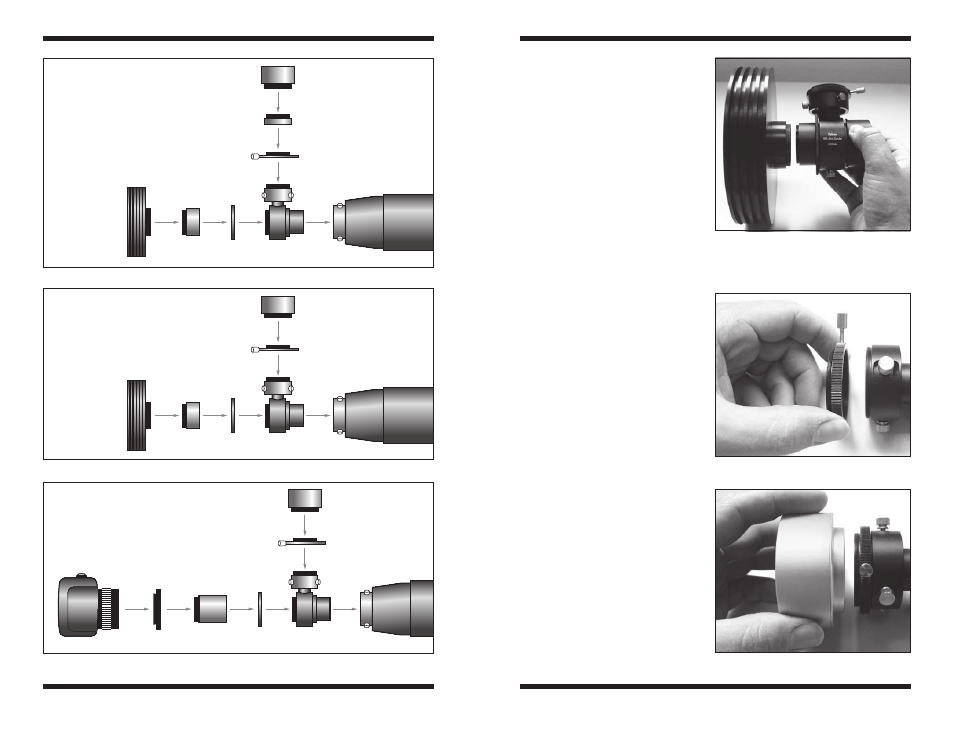
Deluxe Off-Axis
Guider main body
17mm
extension
StarShoot Pro,
nosepiece
removed
Rotation
lock ring
StarShoot
AutoGuider,
nosepiece removed
Fine focus
guiding adapter
2" focuser on
telescope
StarShoot Pro V2.0
with StarShoot AutoGuider
Configuration
Deluxe Off-Axis
Guider main body
30mm
extension
DSLR
camera body
Rotation
lock ring
T-ring
StarShoot
AutoGuider,
nosepiece removed
Fine focus
guiding adapter
2" focuser on
telescope
DSLR Camera
with StarShoot AutoGuider
Configuration
Figure 2a.
Figure 3.
Thread the imaging camera
into the Deluxe Off-Axis Guider. If you are
using a DSLR, the T-ring should already be
attached to the camera body.
Figure 2b.
Figure 2c.
Figure 4a.
Figure 4b.