Orion 5196 User Manual
Page 2
2
3
The 0.85x Reducer-Correctors were designed specifically for use with selected
Orion “ED” refractors. They are intended for photographic use only with digital
single-lens reflex (DSLR) cameras.
#5195 0.85x Reducer-Corrector for ED80 (#9895, not the EON 80 #9927).
Shortens the focal length from 600mm to 510mm (f/7.5 to f/6.38).
#5196 0.85x Reducer-Corrector for ED100 (#9975). Shortens the focal length
from 900mm to 765mm (f/9.0 to f/7.65).
#5198 0.85x Reducer-Corrector for ED120 (#9976 ED120, not #9925 EON
120ED). Shortens the focal length from 900mm to 765mm (f/9.0 to f/7.65).
installing the reducer-corrector
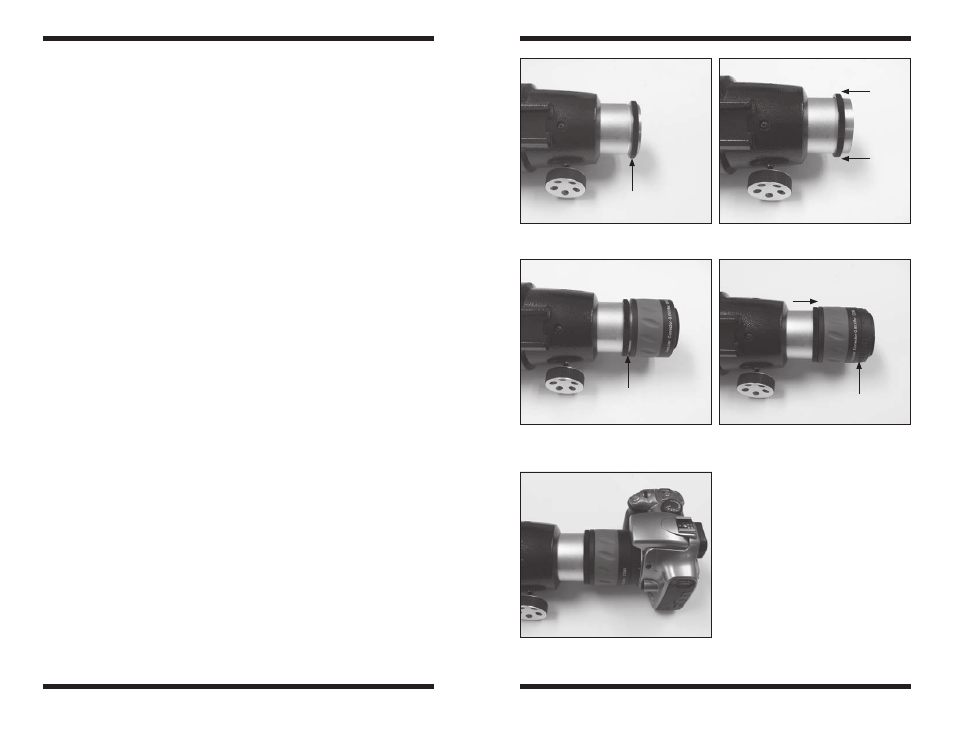
1. Extend the focuser drawtube out, as shown in Fig. 1.
2. Rotate the lock ring inward on the focuser drawtube until it stops (Fig. 2). Do
not tighten.
3. Screw the Reducer-Corrector onto the drawtube until it stops, and tighten
it slightly. There should now be a gap between the edge of the Reducer-
Corrector and the lock ring (Fig. 3).
4. Now rotate the lock ring outward (toward the Reducer-Corrector) until it is
tight against the Reducer-Corrector (Fig. 4). Then attach the appropriate
Wide T-ring (sold separately) for your DSLR camera to the T-threads on the
Reducer-Corrector.
NOTE: The Orion 0.85x Reducer-Corrector requires the use of a “wide” T-ring,
which utilizes 48mm threads. The Reducer-Corrector is not compatible with stan-
dard T-rings. Orion carries Wide T-rings for Canon and Nikon cameras.
5. Now attach your DSLR camera to the Wide T-ring (Fig. 5).
6. To adjust the camera angle to frame the object you want to photograph on
the camera chip, loosen the Reducer-Corrector by turning it counterclockwise
(from camera side) until the camera is in the position you want. Then tighten
the lock ring against the Reducer-Corrector to secure it in place.
You’re now ready to take pictures!
care and cleaning
When not in use, keep both thread-on lens caps on the Reducer-Corrector to
protect the optics, and store it in a dry place. If dust builds up on the lenses,
simply blow it off with a blower bulb or lightly brush it off with a soft camel-hair
brush. Avoid touching optical surfaces with your fingers, as skin oil may mar the
optical multi-coatings.
To remove fingerprints or smudges from the lens, use photographic-type lens
cleaning fluid and lint-free optical lens cleaning tissue. Don’t use household
cleaners or eyeglass-type cleaning cloth or wipes, as they often contain undesir-
able additives like silicone, which don’t work well on precision optics. Place a
few drops of fluid on the tissue (not directly on the lens), wipe gently in a circular
Figure 1.
Lock ring on focuser drawtube.
Figure 2.
Lock ring positioned as far
inward as it will go.
Figure 3.
Gap between the Reducer-
Corrector and lock ring.
Figure 4.
Tighten lock ring against
Reducer-Corrector. Then thread on the
Wide T-ring for your camera model.
Figure 5.
DSLR camera attached to the
Reducer-Corrector.
Lock ring
Gap
Wide T-ring