Appendix b: cleaning the optics – Orion SPACEPROBE 3 ALTAZ 9883 User Manual
Page 10
the primary mirror is as centered in the secondary mirror as
possible. It may not be perfectly centered, but that is OK. Now
tighten the three small alignment screws equally to secure the
secondary mirror in that position.
If the entire primary mirror reflection is not visible in the sec-
ondary mirror, as in Figure 6c, you will need to adjust the tilt of
the secondary mirror. This is done by alternately loosening
one of the three alignment screws while tightening the other
two, as depicted in Figure 8. The goal is to center the primary
mirror reflection in the secondary mirror, as in Figure 6d. Don’t
worry that the reflection of the secondary mirror (the smallest
circle, with the collimation cap “dot” in the center) is off-center.
You will fix that in the next step.
adjusting the Primary Mirror
The final adjustment is made to the primary mirror. It will need
adjustment if, as in Figure 6d, the secondary mirror is cen-
tered under the focuser and the reflection of the primary mir-
ror is centered in the secondary mirror, but the small reflection
of the secondary mirror (with the “dot” of the collimation cap)
is off-center.
The tilt of the primary mirror is adjusted using the three sets of
two collimation screws on the back end of the optical tube.
Adjusting the tilt of the mirror requires a “push-pull” technique
involving adjustment of each set of collimation screws. Loosen
the one of the screws one full turn, and then tighten the adja-
cent screw until it is tight as in Figure 9 (do not overtighten.)
Look into the focuser and see if the secondary mirror reflec-
tion has moved closer to the center of the primary. You can tell
this easily with the collimation cap and mirror center mark by
simply watching to see if the “dot” of the collimation cap is
moving closer or farther away from the ring on the center of
the primary mirror. Repeat this process on the other two sets
of collimation screws, if necessary. It will take a little trial and
error to get a feel for how to tilt the mirror in this way. When
you have the dot centered as much as possible in the ring,
your primary mirror is collimated. The view through the colli-
mation cap should resemble Figure 6e. Make sure all the col-
limation screws are tight (but do not overtighten), to secure
the mirror tilt.
A simple star test will tell you whether the optics are accu-
rately collimated.
star-testing the telescope
When it is dark, point the telescope at a bright star and accu-
rately center it in the eyepiece’s field of view. Slowly de-focus
the image with the focusing knob. If the telescope is correctly
collimated, the expanding disk should be a perfect circle
(Figure 10). If the image is unsymmetrical, the scope is out of
collimation. The dark shadow cast by the secondary mirror
should appear in the very center of the out-of-focus circle, like
the hole in a donut. If the “hole” appears off-center, the tele-
scope is out of collimation.
If you try the star test and the bright star you have selected is
not accurately centered in the eyepiece, the optics will always
appear out of collimation, even though they may be perfectly
aligned. It is critical to keep the star centered, so over time
you will need to make slight corrections to the telescope’s
position in order to account for the sky’s apparent motion.
appendix B:
cleaning the optics
cleaning lenses
Any quality optical lens cleaning tissue and optical lens clean-
ing fluid specifically designed for multi-coated optics can be
used to clean the exposed lenses of your eyepieces or finder-
scope. Never use regular glass cleaner or cleaning fluid
designed for eyeglasses
10
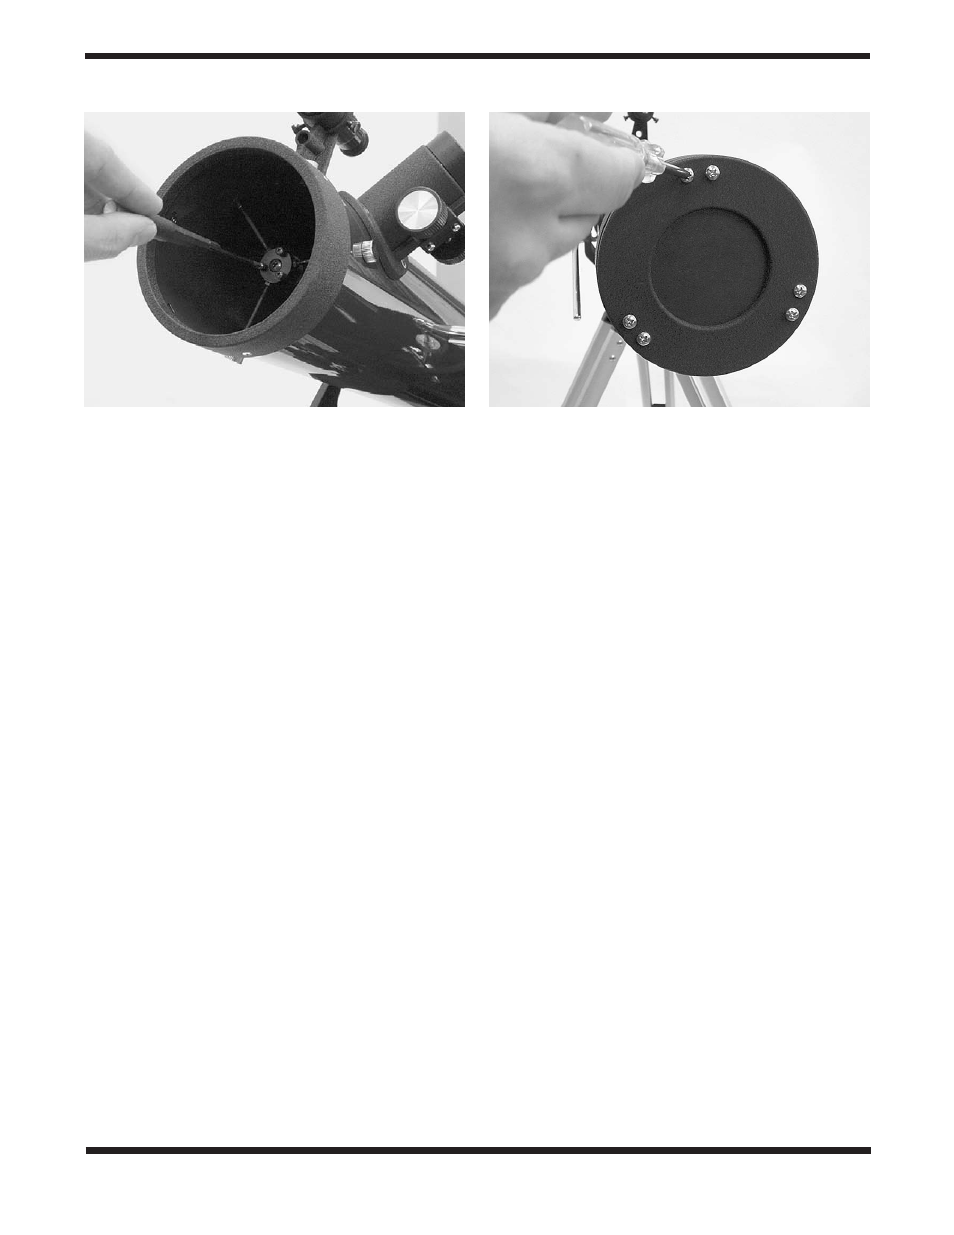
Figure 8.
Adjust the tilt of the secondary mirror by loosening or
tightening the three alignment screws with a small Phillips head
screwdriver.
Figure 9.
Loosen one screw on the back of the optical tube one
full turn and tighten the other screw “in the set” until tight to adjust
the primary mirror.