Using your telescope – Orion OBSERVER 70MM AZ User Manual
Page 12
aligning the EZ Finder ii
When the EZ Finder II is properly aligned with the telescope,
an object that is centered on the EZ Finder II’s red dot should
also appear in the center of the field of view of the telescope’s
eyepiece. Alignment of the EZ Finder II is easiest during day-
light, before observing at night. Aim the telescope at a distant
object at least 1/4 mile away, such as a telephone pole or
chimney and center it in the telescope’s eyepiece. Now, turn
the EZ Finder II on and look through it. The object will appear
in the field of view near the red dot.
Note: The image in the eyepiece of the Observer 70 will
be reversed from left-to-right. This is normal for a refrac-
tor telescope using a mirror star diagonal.
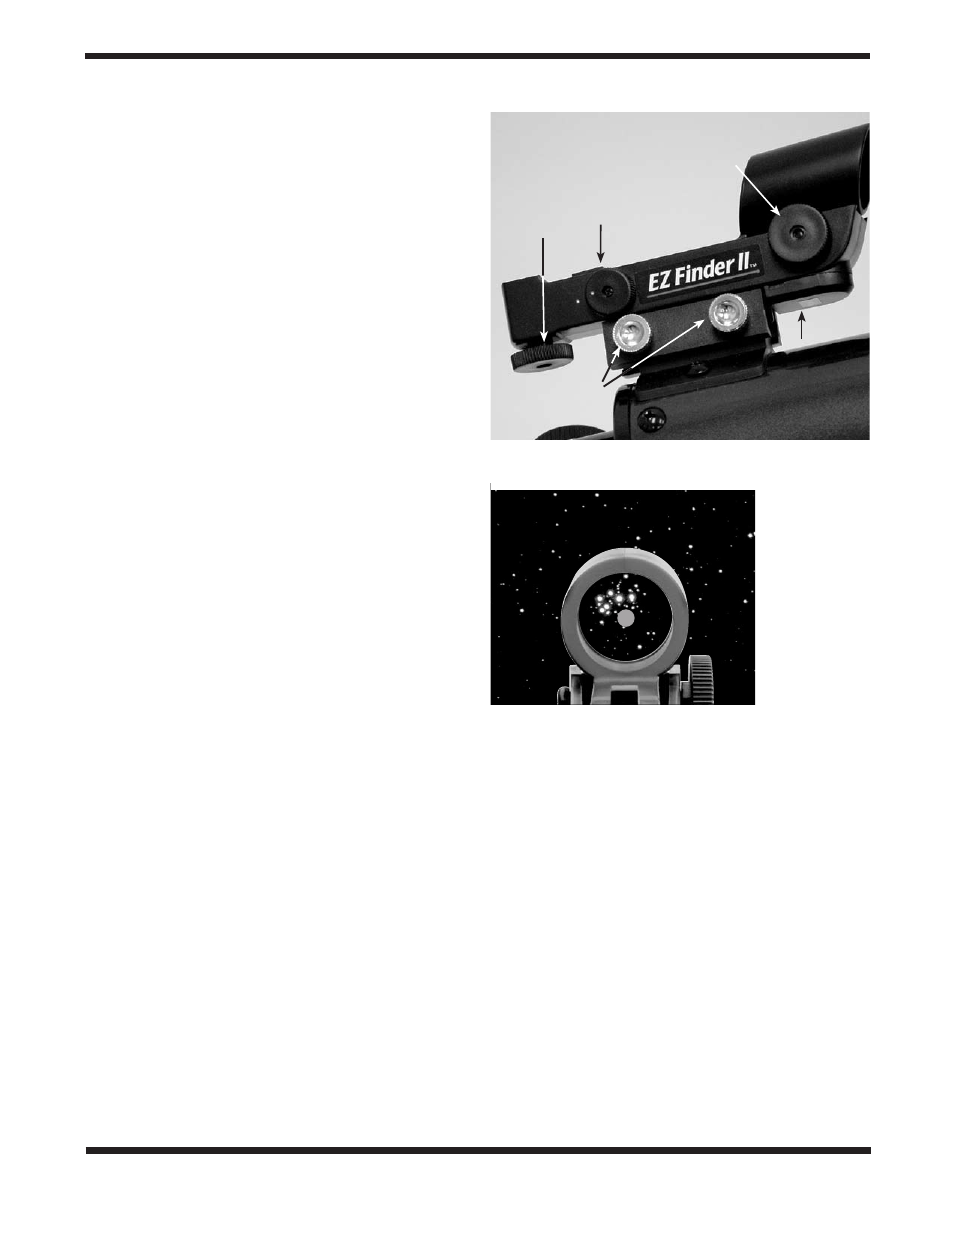
Without moving the telescope, use the EZ Finder II’s azimuth
(left/right) and altitude (up/down) adjustment knobs (Figure 6)
to position the red dot on the object in the eyepiece.
When the red dot is centered on the distant object, check to
make sure that the object is still centered in the telescope’s
field of view. If not, recenter it and adjust the EZ Finder II’s
alignment again. When the object is centered in the tele-
scope’s eyepiece and on the red dot, the EZ Finder II is prop-
erly aligned with the telescope. Figure 7 shows how the view
through the EZ Finder may look while you are aligning it.
Once aligned, EZ Finder II will usually hold its alignment even
after being removed from its bracket. If the EZ Finder II’s
bracket is removed entirely from the optical tube then realign-
ment will be needed.
replacing the EZ Finder ii Battery
Should the battery ever need replacing, 3-volt lithium batter-
ies are available from many retail outlets. Remove the old bat-
tery by inserting a small flat-head screwdriver into the slot on
the battery cover (Figure 3) and gently prying open the cover.
Then carefully pull back on the retaining clip and remove the
old battery. Do not overbend the retaining clip. Slide the new
battery under the battery lead with the positive (+) side facing
down and replace the battery cover.
6. using Your telescope
choosing an observing site
When selecting a location for observing, get as far away as
possible from direct artificial light such as street lights, porch
lights, and automobile headlights. The glare from these lights
will greatly impair your dark-adapted night vision. Set up on a
grass or dirt surface, not asphalt, because asphalt radiates
more heat, which disturbs the surrounding air and degrades
the images seen through the telescope. Avoid viewing over
rooftops and chimneys, as they often have warm air currents
rising from them. Similarly, avoid observing from indoors
through an open (or closed) window, because the tempera-
ture difference between the indoor and outdoor air will cause
image blurring and distortion.
If at all possible, escape the light-polluted city sky and head
for darker country skies. You’ll be amazed at how many more
stars and deep-sky objects are visible in a dark sky!
“seeing” and transparency
Atmospheric conditions vary significantly from night to night.
“Seeing” refers to the steadiness of the Earth’s atmosphere at
a given time. In conditions of poor seeing, atmospheric turbu-
lence causes objects viewed through the telescope to “boil”.
If, when you look up at the sky with your naked eyes, the stars
are twinkling noticeably, the seeing is bad and you will be lim-
ited to viewing with low powers (bad seeing affects images at
high powers more severely). Planetary observing may also be
poor.
In conditions of good seeing, star twinkling is minimal and
images appear steady in the eyepiece. Seeing is best over-
head, worst at the horizon. Also, seeing generally gets better
after midnight, when much of the heat absorbed by the Earth
during the day has radiated off into space.
Especially important for observing faint objects is good
“transparency”—air free of moisture, smoke, and dust. All
12
Figure 7.
EZ Finder II
superimposes a
tiny red dot on the
sky, showing right
where the
telescope is
pointed.
Figure 6.
The EZ Finder II reflex sight.
Power knob
Azimuth adjust-
ment wheel
Altitude
adjustment
wheel
Thumbscrews
Battery
cover