Orion 8891 User Manual
Page 3
4
5
Once you’ve achieved the best
focus you can get, lightly re-tighten
the lock ring by turning it clockwise
while holding the objective lens cell
steady. You’re done!
Of course, if you turn the objective lens
cell until it can rotate inward no further,
or you rotate it outward so far that it
unthreads completely and comes off,
you should reset it to about the mid-
point of its thread travel and re-adjust
the coarse focus, i.e., the position of
the autoguider nosepiece in the 1.25"
holder. Then, you can attempt to fine-
focus again using the objective lens cell.
Setting the Parfocal ring
Once the guiding camera’s nosepiece has been set at the optimal focus position
following the above procedure, you can lock the parfocal ring on the camera’s
nosepiece. This will enable you to return the camera to the same position in the
guide scope’s holder on subsequent imaging sessions (assuming you remove
the camera from the guide scope after each session), obviating the need to go
through the coarse focusing procedure (steps 2 and 3 above) again. You should
still, of course check the guide scope’s focus at each imaging session. But if any
adjustment is needed, it will probably be minor and can be done using the fine
focus of the objective lens cell (step 4 above).
To set the parfocal ring, which you inserted on the guide camera’s nosepiece in
step 1 above, simply slide it forward until it lies flush against the guide scope’s 1.25"
holder
(Figure 5). Then carefully tighten each of the three setscrews in the ring.
Focusing
Focusing can be done in daylight on
a distant object, or at night under the
stars. For best results we recommend
doing final, fine focusing at night at
the beginning of your imaging session,
following the focusing procedures in
the imaging software you use for astro-
photography, such as MaxIm DL, PHD
Guiding, or Images Plus.
1. Slide the 1.25" parfocal ring onto
the nosepiece of your autoguiding
camera
(Figure 2). If it doesn’t
slip on easily, make sure the three
setscrews in the ring are backed
off enough to provide clearance
for the nosepiece. A 1.5mm Allen
wrench is provided for adjusting the
setscrews. Leave the ring loose on
the nosepiece; do not tighten the
setscrews yet.
2. Next, insert the nosepiece of your
guide camera about halfway into
the 1.25" holder of the guide scope,
then lightly tighten the three thumb-
screws on the holder to temporarily
secure the autoguiding camera in
place
(Figure 3).
3. Make sure your autoguider camera
is powered on and connected to
your laptop computer, and that the
software you will use for autoguid-
ing is up and running. With the
imaging software set to take continuous exposures, slightly loosen just one of
the thumbscrews holding the autoguider nosepiece – just enough to be able
to move it very gradually forward or back, while you watch the stars or refer-
ence numbers (e.g., FWHM) on your laptop screen. When the stars are pretty
sharp, or you’ve reached approximately the lowest FWHM, tighten the loose
thumbscrew so that the camera is secure in the guide scope.
4. Final, fine focusing can be done by rotating the objective lens cell on the
front of the guide scope. First, back off the objective cell lock ring a couple of
turns by rotating it counterclockwise
(Figure 4). This frees up the objective
cell to be turned either clockwise or counterclockwise. Turn it one way or the
other by a quarter turn or so and see what effect that has on the star focus.
Figure 5.
Once
focus is achieved,
set the parfocal ring
by first sliding it up
against the 1.25"
holder. Then, using
the provided Allen
wrench, secure the
ring to the camera
nosepiece with the
three setscrews.
Figure 3.
Insert the autoguider
nosepiece about halfway into the 1.25"
holder of the Mini Guide Scope, then lightly
tighten the three thumbscrews on the
holder to secure the camera in place for the
moment.
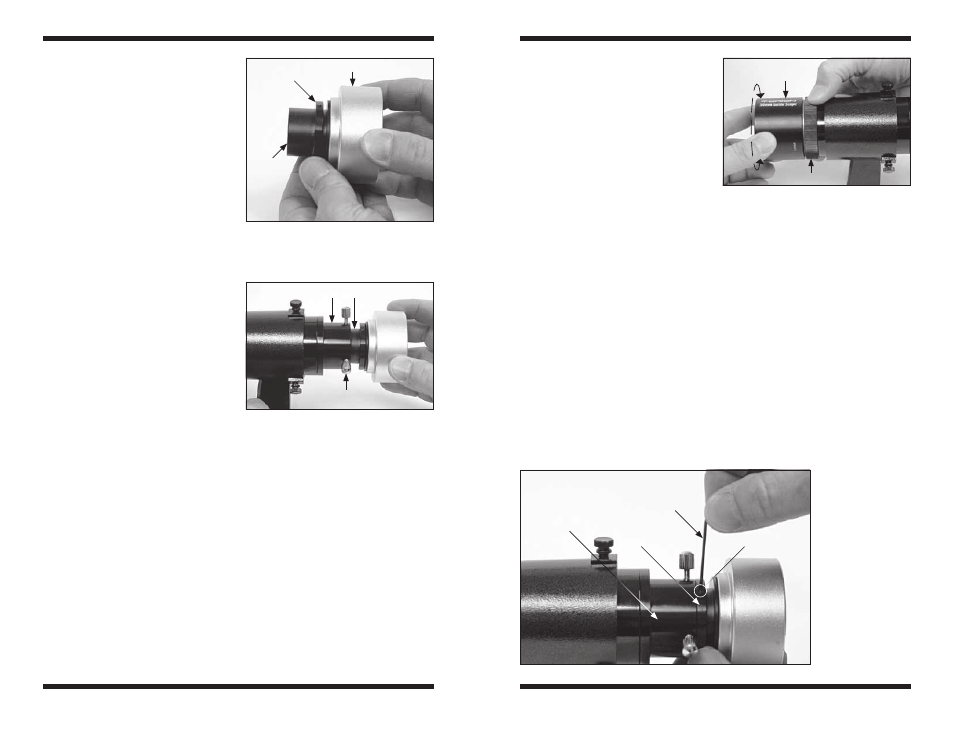
Figure 4.
After setting the coarse focus
with the camera in the guide scope holder,
fine focusing can be done by rotating the
scope’s objective lens cell. First, you’ll
need to loosen the lock ring by rotating it
counterclockwise a couple of turns.
Holder thumbscrew (x3)
Lock ring
Camera nosepiece
Objective
lens cell
rotate to
focus
1.25" Holder
1.25" Holder
Setscrew (x3)
Parfocal
ring
1.5mm Allen
wrench
Figure 2.
Slide the parfocal ring onto
the 1.25" nosepiece of the Orion StarShoot
AutoGuider or other autoguiding camera.
Do not tighten the setscrews yet.
1.25"
Nosepiece
Parfocal
ring
Autoguiding camera