Terrestrial observing, Photography – Orion ASTROVIEW 9862 User Manual
Page 14
14
as with any new task, that starhopping may seem challenging at
first, but will become easier over time and with practice.
To starhop, only a minimal amount of additional equipment is
necessary. A star chart or atlas that shows stars to at least mag-
nitude 5 is required. Select one that shows the positions of many
deep-sky objects, so you will have lots of options to choose from.
If you do not know the positions of the constellations in the night
sky, you will need to get a planisphere to identify them.
Start by choosing bright objects to view. The brightness of an
object is measured by its visual magnitude; the brighter an
object, the lower its magnitude. Choose an object with a visual
magnitude of 9 or lower. Many beginners start with the Messier
objects, which represent some of the best and brightest deep-
sky objects.
Determine in which constellation the object lies. Now, find the
constellation in the sky. If you do not recognize the constellations
on sight, consult a planisphere. The planisphere gives an all-sky
view and shows which constellations are visible on a given night
at a given time.
Now, look at your star chart and find the brightest star in the con-
stellation that is near the object you are trying to find. Using the
finder scope, point the telescope at this star and center it in the
crosshairs. Next, look again at the star chart and find another
suitably bright star near the bright star currently centered in the
finder. Keep in mind that the field of view of the finder scope is
7°, so you should choose another star that is no more that 7°
from the first star, if possible. Move the telescope slightly, until it is
centered on the new star.
Continue using the stars as guideposts until you are at the
approximate position of the object you are trying to find (Figure
12). Look in the telescope’s eyepiece, and the object should be
somewhere in the field of view. If it’s not, sweep the telescope
carefully around the immediate vicinity until the object is found.
If you have trouble finding the object, start the starhop again from
the brightest star near the object you wish to view. This time, be
sure the stars indicated on the star chart are in fact the stars you
are centering in the eyepiece.
6. terrestrial observing
The AstroView 100 optical tube can be used for long-distance
viewing over land. We recommend using a 45° correct-image
diagonal instead of the included 90° mirror star diagonal. The
correct-image diagonal will yield upright, non-reversed images
and provides a more comfortable viewing angle. An optional
altazimuth mount or a sturdy camera tripod, as opposed to
the AstroView equatorial mount, is recommended for terres-
trial viewing. This is because the equatorial mount is designed
for tracking the motion of stars, and is not very easy to aim at
terrestrial objects. The AstroView 100 EQ’s optical tube has a
mounting block that will accept the 1/4"-20 threaded stud used
on most camera tripods.
For terrestrial viewing, it’s best to stick with low power eyepiec-
es that yield a magnification of under 100x. At higher powers,
images rapidly lose sharpness and clarity due to “heat waves”
caused by Sun-heated air.
Remember to aim well clear of the Sun, unless the front of the
telescope is fitted with a professionally made solar filter and
the finder scope is covered by an opaque material or removed
altogether.
7. Photography
When coupled to a 35mm single-lens reflex camera, the
AstroView100 EQ becomes a telephoto lens. To attach a cam-
era, you need only a T-ring for your specific camera model.
The T-ring attaches to your camera and threads onto the
AstroView 100 EQ’s 1.25" eyepiece adapter (see Figure 3).
Use the camera’s viewfinder to frame the picture. Use the
telescope’s focuser to focus the image. Tighten the focus lock
thumbscrew in order to keep the telescope in focus. You may
want to consider using a remote shutter release instead of
the shutter release on the camera; touching the camera can
vibrate the system and blur the resulting photographic image
on the film.
If you would like to change the orientation of the camera rela-
tive to the telescope, do so by first loosening the thumbscrews
on the 2" adapter. You can then rotate the camera (and 1.25"
eyepiece adapter) to the desired orientation. Retighten the
thumbscrews when done.
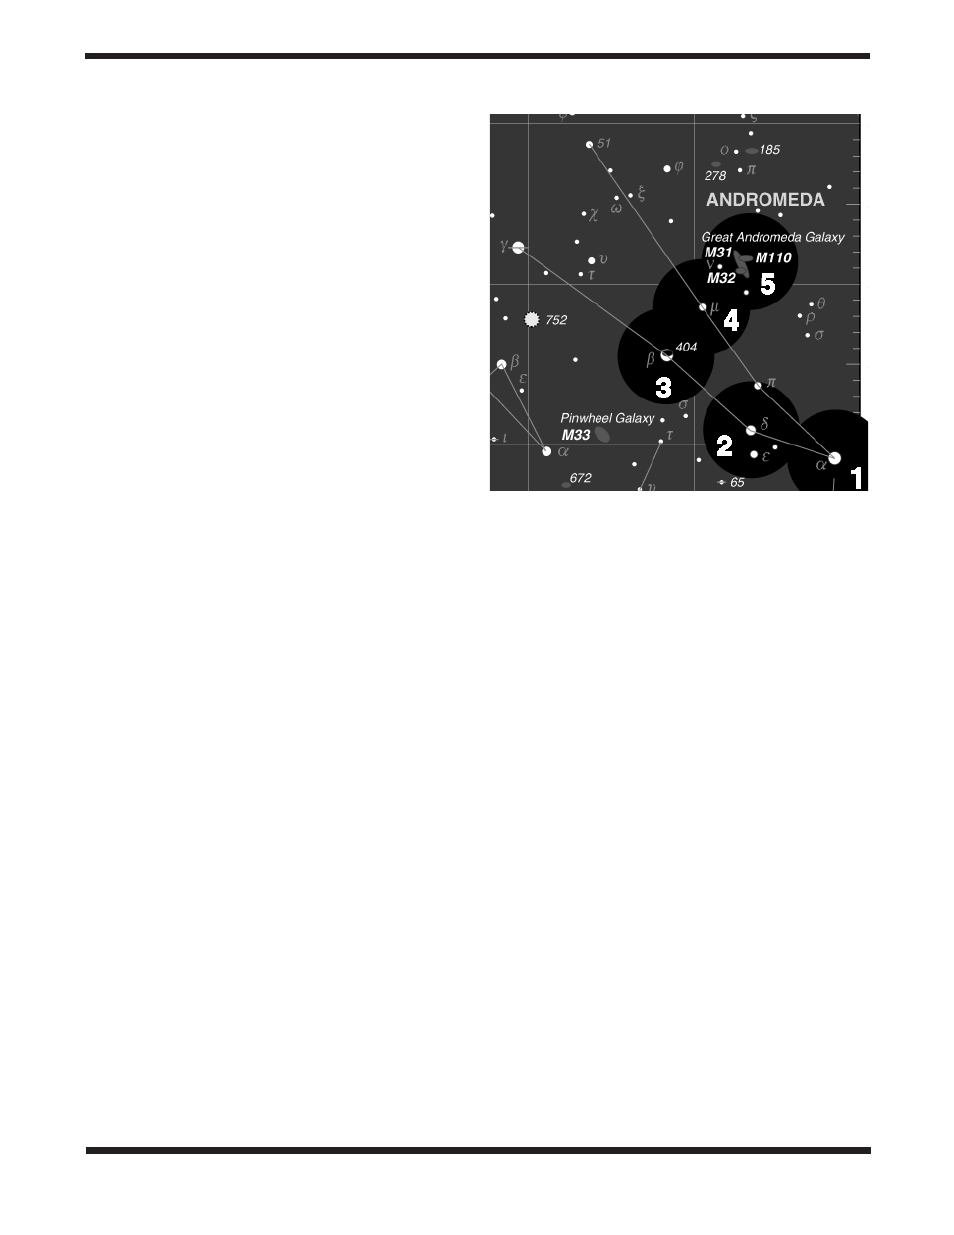
Figure 12.
Starhopping is a good way to locate hard-to-find objects.
Refer to a star chart to map a route to the object that uses bright stars
as guideposts. Center the first star you’ve chosen in the finder scope
and telescope eyepiece (1). Now move the scope carefully in the
direction of the next bright star (2), until it is centered. Repeat (3 and
4). The last hop (5) should place the desired object in the eyepiece.