English – Vitek VT-1666 User Manual
Page 9
eration the remaining cooking time is dis-
played and the indication (31) is displayed.
Auto cooking mode
In the Auto cooking mode you do not need
to set power and cooking time, you should
only select the type of a product and set its
weight.
You may need to turn over the product at
the middle of its cooking to cook the prod-
uct evenly.
9
ENGLISH
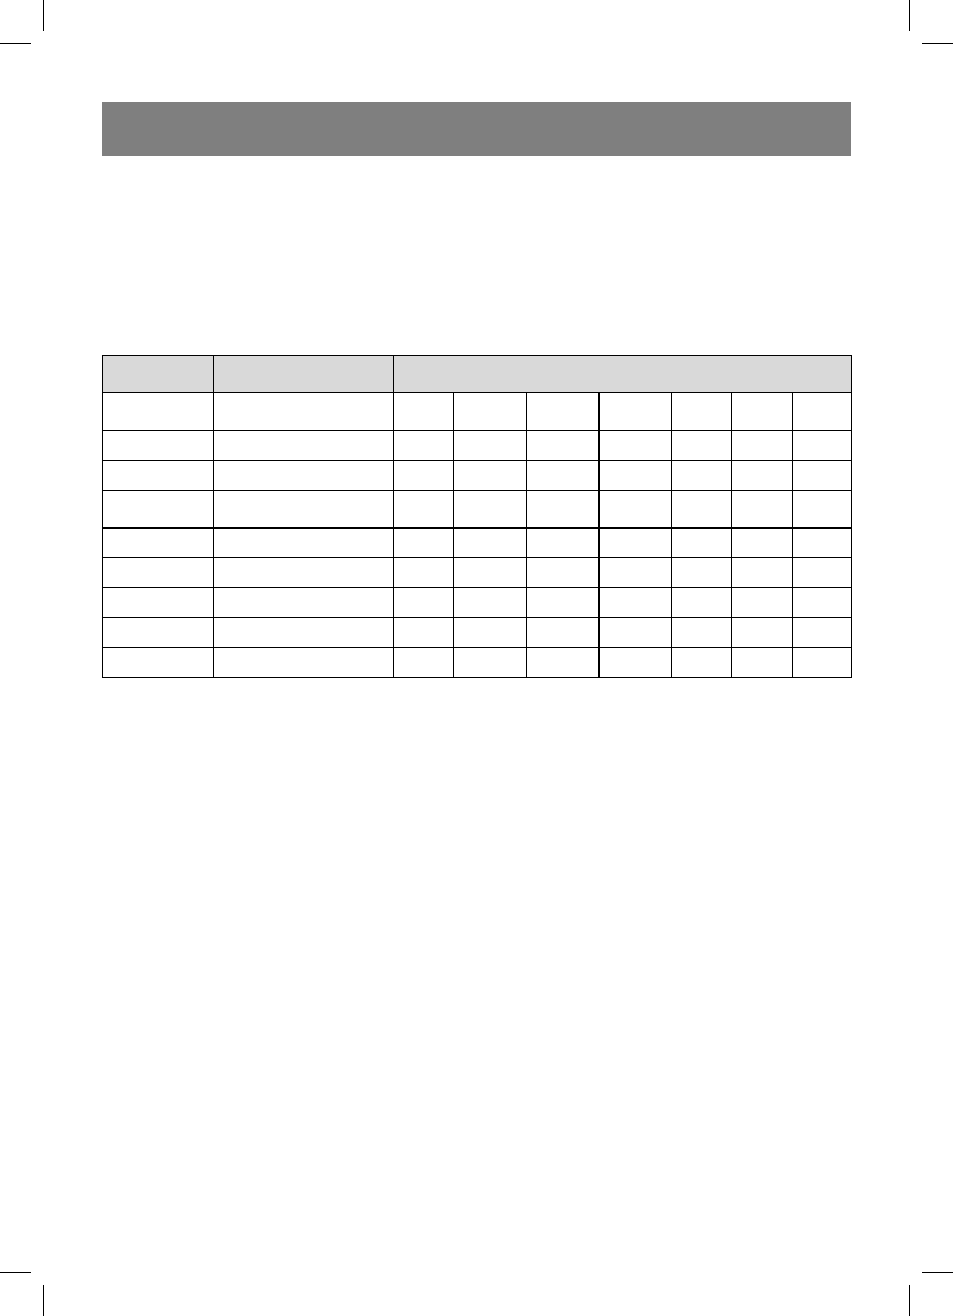
Auto cooking menu
Program
number
Products
Quantity/Weight (g)
1
Milk/Coffee
(cup, 200 ml)
1
2
3
2
Rice 150
300
450
600
3
Spaghetti
100
200
300
4
Potatoes (230 g
each)
1
2
3
5
Auto heating
200
300
400
500
600
700
800
6
Fish 200
300
400
500
600
7
Poultry
800
1000
1200
1400
8
Meat
200
300
400
500
600
9
Shashlik
100
200
300
400
500
For example you need to cook 400 g of
fish.
1. Open the door of the oven, put the prod-
ucts into the chamber and close the
door.
2.
Turn the “time/menu” knob clock-
wise and select the corresponding auto
mode, the indication (21) and the pro-
gram number will light up.
3. Pres the “weight сooking” button to set
the product weight, the indication (21)
will be lighting and the indication (23) will
be flashing.
4. Press the “start” button to start cooking
the (21) indication will be lighting, and
the indication (23) will go out.
During the combination cooking mode
operation the remaining cooking time is
displayed and the indication (21) is dis-
played.
Attention: The result of the cooking in the
auto cooking mode depends on the size
and shape of the product, as well as on the
placement of the product on the glass tray.
In any case, if you consider the result un-
satisfied, please, increase or decrease the
product weight.
Auto defrost of products
The unit supports the auto defrost function.
Defrost time and power levels are set auto-
matically, you should set only the product
weight.
For example you want to defrost 600 g of
shrimps:
1. Put the shrimps in the working chamber.
2. Turn the “time/menu” knob clockwise
and set “600g”, the indication (21) and
(35) will be lighting and the indication
(23) will be flashing.
3. Press the “start” button to start defrost
the (21) and (35) indications will be light-
ing, and the indication (23) will go out.
During the defrost mode the remaining de-
frost time is displayed and the indication
(35) is displayed.
1666.indd 9
1666.indd 9
24.06.2008 12:46:29
24.06.2008 12:46:29