Getting started – Orion ARISTOCRAT 9800 User Manual
Page 4
4
3. Tighten the acorn nuts with the wrench. Be very careful
when doing this so as not to scrape or strip the nuts. Do
not overtighten the nuts.
4. Attach the finder scope brackets to the optical tube with
the brass thumbscrews (Figure 4).
5. Unthread the six thumbscrews on the finder scope brack-
ets until they are flush with the inside of the bracket. Then
insert the brass finder scope into the brackets so the large
end (objective lens) is facing the front of the telescope, as
shown in Figure 1. The grooves on the body of the finder
scope should line up with the thumbscrews on the brack-
ets. Thread the six finder scope bracket thumbscrews
equally until the finder scope is secure in the brackets.
6. Remove the brass cover on the end of the focuser draw-
tube. Insert the chrome barrel of the correct-image diago-
nal into the focuser of the telescope and tighten it with the
thumbscrew.
7. Insert the chrome barrel of the 25mm eyepiece into the
open end of the correct image diagonal and secure it with
the thumbscrew.
Your telescope is now fully assembled and should resemble
Figure 1. Leave the dust cover on the front of the telescope
when it is not in use.
4. Getting started
aiming the telescope
The Aristocrat 60mm mount permits movement along two
axes: altitude (up/down) and azimuth (left/right). See Figure 5.
Moving the telescope up/down and left/right is the “natural”
way people aim objects and this makes pointing the telescope
intuitive and easy.
aiming in azimuth (left/right)
To move the telescope in azimuth, loosen the azimuth lock
knob, take hold of the telescope and gently rotate the tele-
scope to the desired position. Then re-tighten the azimuth
lock knob.
aiming in altitude (up/Down)
With your hand firmly supporting the focuser end of the tele-
scope, loosen the altitude lock lever and lift or lower the tele-
scope close to the desired position. As you get close to where
you want the telescope to be aimed, tighten the lock lever
slightly to increase the tension and make slower, more stable
movements. When you are in the desired position, completely
tighten the lock lever.
If the altitude movement seems too loose or too tight when
the altitude lock lever is completely loosened, you will want to
increase the tension on the altitude cradle. Turn the altitude
tension discs clockwise or counter clockwise to increase or
decrease altitude tension on the mount, using the discs on
both sides of the mount. Adjust until the altitude motion feels
comfortable for you. Once set, this adjustment will rarely need
to be made again.
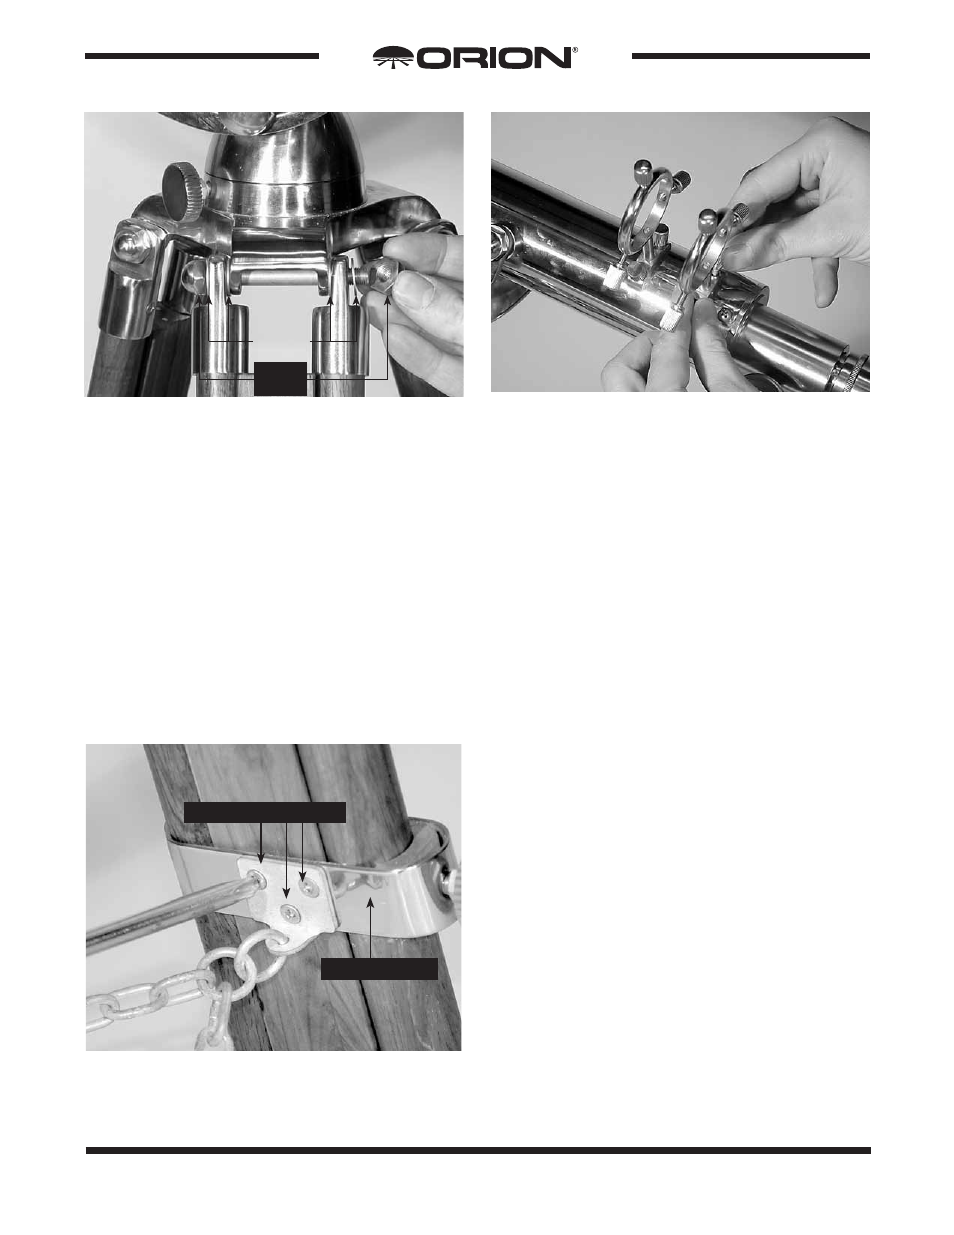
Figure 2.
Attaching the tripod legs to the mount.
Figure 4.
Attaching the finder scope brackets to the optical tube.
Figure 3.
Use a phillips-head screwdriver to attach the brass
chain plates to the tripod leg locks.
Phillips head screws
Tripod leg lock
Washers
Acorn
nuts