Orion SKYWATCHER 9086 User Manual
Page 16
During recent production of our Skywatcher 90 EQ (#9024),
Explorer 90 AZ (#9025), and ShortTube 80 (#9086) tele-
scopes, we developed an improved design for the finder
scope bracket. The new design makes aiming the finder
scope much easier, since it requires adjustment to only two
alignment screws instead of three. As a result of this improve-
ment, there are some discrepancies with the provided
instruction manuals. These discrepancies will be clarified in
this addendum.
#9024 Skywatcher 90 EQ
In the assembly section of the manual on page 4, line item
12 should now read:
12.To place the finder scope in the finder scope bracket, first
unthread the two adjustment screws until the screw ends
are flush with the inside diameter of the bracket. Place the
O-ring that comes on the base of the bracket over the
body of the finder scope until it seats into the slot on the
middle of the finder scope. Slide the eyepiece end (nar-
row end) of the finder scope into the end of the bracket’s
cylinder that does not have the adjustment screws while
pulling the spring-loaded tensioner on the bracket with
your fingers. Push the finder scope through the bracket
until the O-ring seats just inside the front opening of the
bracket’s cylinder. Now, release the tensioner and tighten
the adjustment screws a couple of turns each to secure
the finder scope in place.
Page 5 explains how to align the finder scope. The instruc-
tions are still valid, but to aim the finder scope, only
adjustments to the two alignment screws are needed. The
new finder scope bracket design also eliminates the need for
knurled lock nuts on the alignment screws.
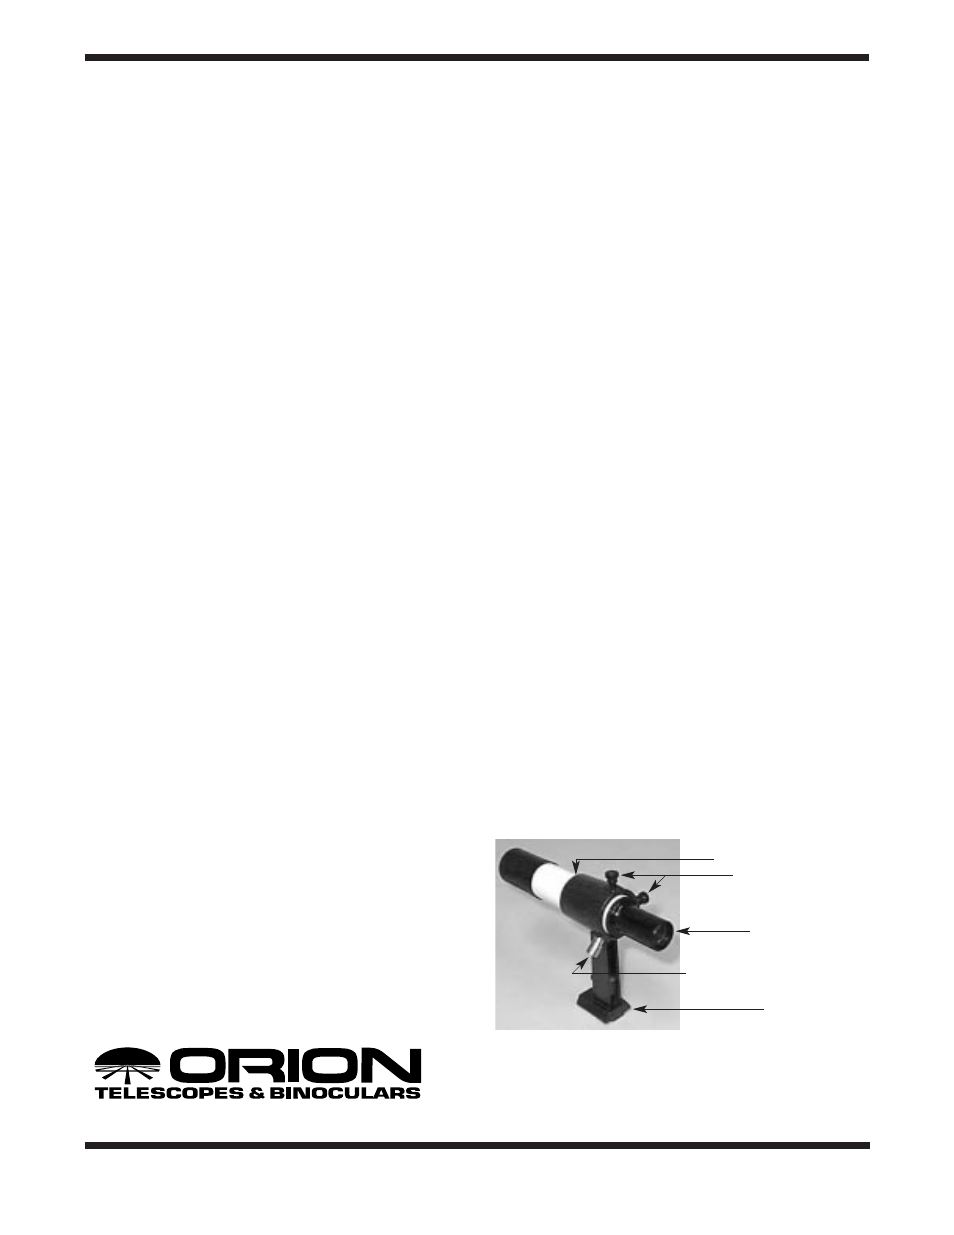
Refer to Figure 1 to identify the parts of the new finder scope
bracket.
#9025 Explorer 90 AZ
In the assembly section of the manual on page 4, line item 9
should now read:
9. To place the finder scope in the finder scope bracket, first
unthread the two adjustment screws until the screw ends
are flush with the inside diameter of the bracket. Place the
O-ring that comes on the base of the bracket over the
body of the finder scope until it seats into the slot on the
middle of the finder scope. Slide the eyepiece end (nar-
row end) of the finder scope into the end of the bracket’s
cylinder that does not have the adjustment screws while
pulling the spring-loaded tensioner on the bracket with
your fingers. Push the finder scope through the bracket
until the O-ring seats just inside the front opening of the
bracket’s cylinder. Now, release the tensioner and tighten
the adjustment screws a couple of turns each to secure
the finder scope in place.
Pages 4 and 5 explain how to align the finder scope. The
instructions are still valid, but to aim the finder scope, only
adjustments to the two alignment screws are needed. The
new finder scope bracket design also eliminates the need for
knurled lock nuts on the alignment screws.
Refer to Figure 1 to identify the parts of the new finder scope
bracket.
#9086 ShortTube 80
The second paragraph in the section of the instructions enti-
tled “Getting Started” should now read:
The optics have been installed and collimated at the factory,
so you should not have to make any adjustments to them. To
place the finder scope in the finder scope bracket, first
unthread the two adjustment screws until the screw ends are
flush with the inside diameter of the bracket. Place the O-ring
that comes on the base of the bracket over the body of the
finder scope until it seats into the slot on the middle of the
finder scope. Slide the eyepiece end (narrow end) of the find-
er scope into the end of the bracket’s cylinder that does not
have the adjustment screws while pulling the spring-loaded
tensioner on the bracket with your fingers. Push the finder
scope through the bracket until the O-ring seats just inside
the front opening of the bracket’s cylinder. Now, release the
tensioner and tighten the adjustment screws a couple of
turns each to secure the finder scope in place. Secure the
bracket to the “dovetail” mount on the optical tube with the
knurled set screw provided. Insert the 45° diagonal into the
focuser tube and secure with the knurled set screw. Slide an
eyepiece into the diagonal and gently tighten the set screw.
The section in the manual entitled “Aligning the Finder
Scope” is still valid, but to aim the finder scope, only adjust-
ments to the two alignment screws are needed.
Refer to Figure 1 to identify the parts of the finder scope bracket.
Providing Exceptional Consumer Optical Products Since 1975
Customer Support (800) 676-1343
E-mail: [email protected]
Corporate Offices (831) 763-7000
P.O. Box 1815, Santa Cruz, CA 95061
IN 135 Rev. A 1199
Improved Finder Scope Bracket
Addendum to the Instructions
#9024, 9025, 9086
Figure 1
O-ring (not pictured)
Alignment screws
Eyepiece end of
finder scope
Spring-loaded tensioner
Dovetail base