Assembly – RIDGID MS1250LZ User Manual
Page 15
14
15
ASSEMBLY
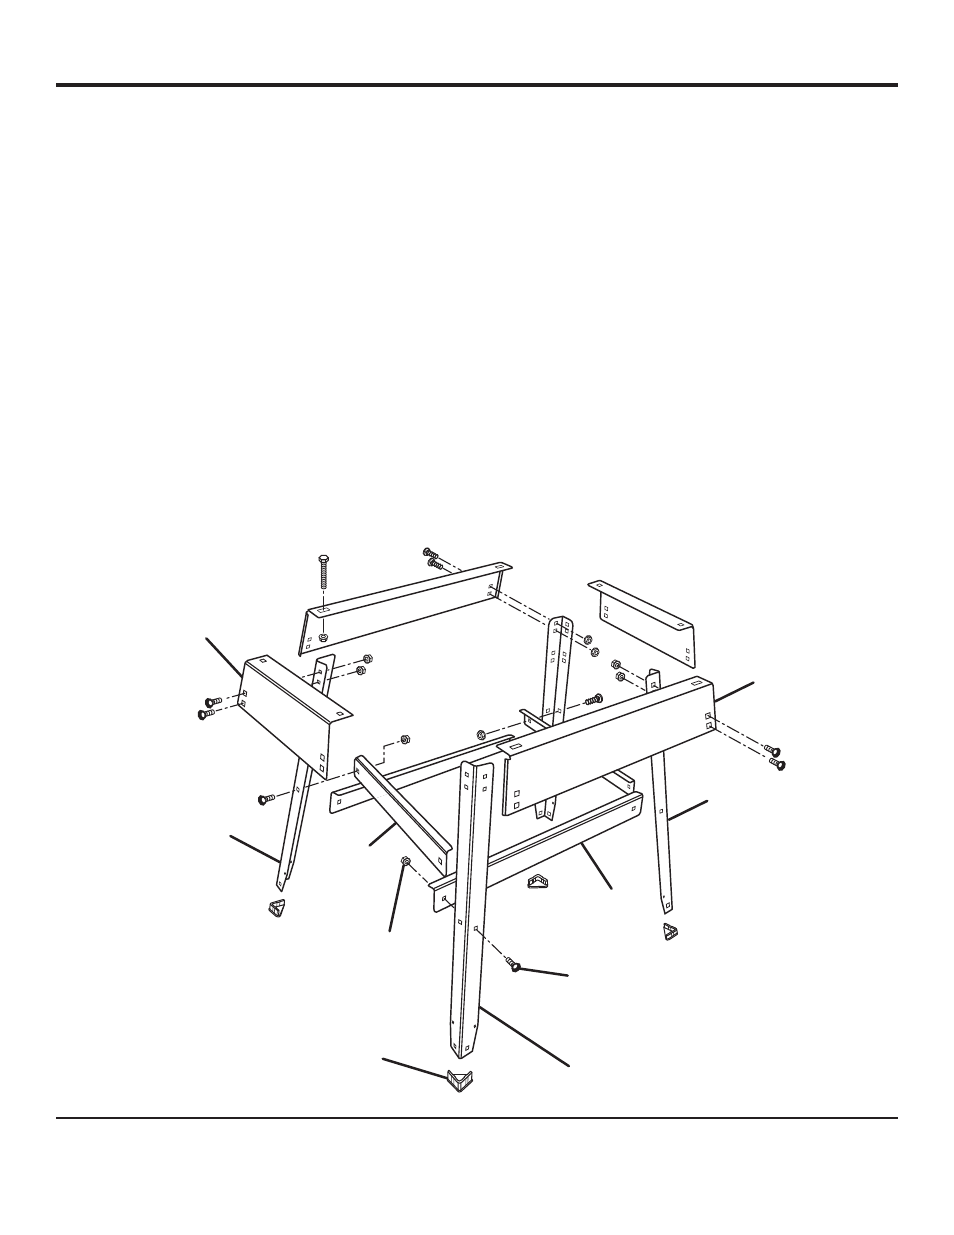
ASSEMBLING LEG STAND
See Figures 9 - 10.
n
Separate brace pieces (letters A, C, D, and E) from leg
pieces (letter E). There are a total of 12 pieces: 8 brace
pieces and 4 leg pieces.
n
Remove the following hardware from the leg stand hard-
ware bag:
24 carriage bolts (5/16-18 x 5/8 in.)
4 rubber feet
4 hex bolts (5/16-18 x 2-1/2 in.)
4 flat washers
28 hex nuts (5/16-18)
n
Place leg (B) inside upper side brace (C).
n
Align holes on brace (C) with the holes on leg (B). Insert
two carriage bolts and hand tighten using hex nuts.
n
Place lower side brace (D) inside leg (B).
n
Align holes on lower side brace (D) with the holes on leg
(B). Insert carriage bolt and hand tighten using hex nut.
Fig. 9
n
Attach a second leg (B) to the other side of upper side
brace (C) using two carriage bolts and hex nuts.
n
Next, align holes on lower side brace (D) with the holes on
the second leg (B). Insert carriage bolt and hand tighten
using hex nut.
n
Repeat the above steps once.
This completes two of the four sides of the leg stand.
n
Place upper brace (A) on top of upper side brace (C).
n
Align holes on upper brace (A) with the holes on leg (B).
Insert carriage bolt and hand tighten using hex nut.
n
Place lower brace (E) inside leg (B).
n
Align holes on lower brace (E) with the holes on leg (B).
Insert carriage bolt and hand tighten using hex nut.
n
Repeat the above steps for the other side of the upper
brace then repeat the steps for the opposite side of the
leg stand.
n
Place one rubber foot on the bottom of each leg (B).
n
Using a wrench, securely tighten all hex nuts.
This completes the leg stand.
CARRIAGE
BOLT
HEX NUT
LOWER
SIDE
BRACE (D)
LOWER
BRACE (E)
UPPER SIDE
BRACE (C)
UPPER
BRACE (A)
RUBBER
FOOT
LEG (B)
LEG (B)
LEG (B)