Assembly, Installing/removing cutters, Warning – Ryobi TR45K User Manual
Page 10
Page 10
Page 11
ASSEMBLY
Fig. 2
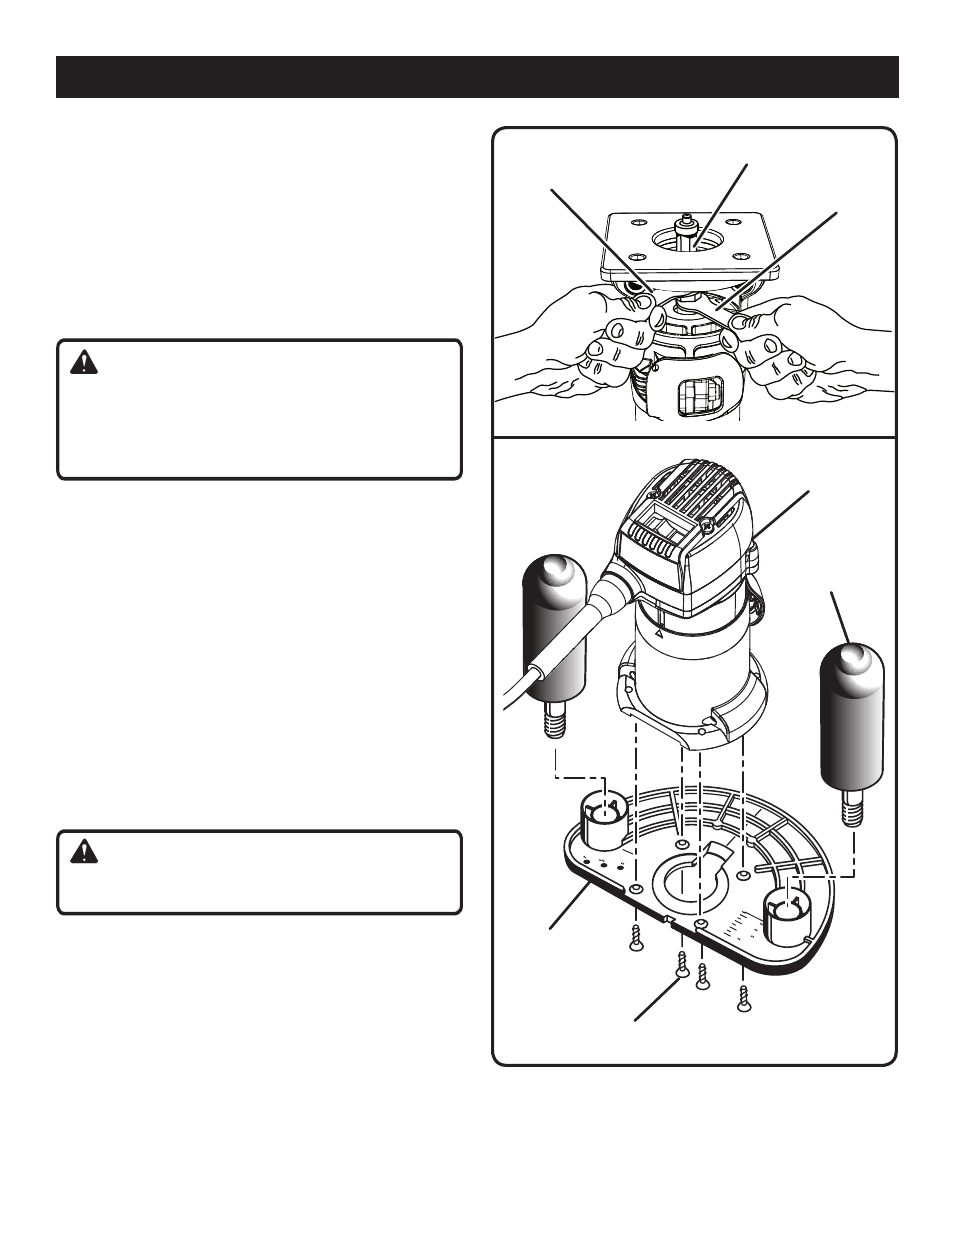
INSTALLING/REMOVING CUTTERS
See Figure 2.
n
Unplug the trimmer.
n
Place the trimmer upside down on a workbench to gain
easy access to the spindle and collet nut.
n
Place the small end of one of the wrenches provided on
the spindle flats. This will hold the spindle stationary.
n
Place the larger end of the other wrench provided onto
the collet nut. Rotate the wrench counterclockwise to
loosen the collet nut as shown in figure 2.
WARNING:
If you are changing a cutter immediately after use, be
careful not to touch the collet nut, cutter, or collet with
your hands or fingers. They will get burned because of
the heat buildup from cutting. Always use the wrench
provided.
n
If installing the cutter for the first time, it can be installed
once the collet nut is loose. If changing cutters, the cutter
will easily slip from the collet after loosening the collet
nut.
NOTE: The tip of the cutter has a protective wax coating
that must be removed before first-time use. Simply peel
off the wax coating and be sure that all traces of wax are
removed before using the trimmer.
n
The collet is machined to precision tolerances to fit cut-
ters with 1/4 in. (6.4 mm) diameter shanks.
n
With the trimmer still upside down on a workbench, insert
the shank of the cutter into the collet. The shank of the
cutter should be close to but not touching the bottom of
the collet. This allows for expansion when the cutter gets
hot. A clearance of 1/16 in. is adequate.
n
Tighten the collet nut securely by turning clockwise with
the wrench provided as shown in figure 2.
WARNING:
If the collet nut is not tightened securely, the cutter may
come out during use, causing serious personal injury.
TO ATTACH THE WOODWORKING SUB-BASE
AND HANDLES
See Figure 3.
n
Unplug the trimmer.
n
Turn the trimmer upside down to remove the four sub-
base screws and laminate sub-base.
n
Attach the woodworking sub-base using the same four
screws.
n
Tighten the screws securely. Do not overtighten.
Fig. 3
R2
R2
R3
1
2
1/4
1/2
3/4
1
WRENCH ON
SPINDLE FLATS
WRENCH ON
COLLET NUT
CUTTER
SUB-BASE
SCREW(S)
WOODWORKING
SUB-BASE
HANDLE(S)
LAMINATE
TRIMMER
n
Turn the trimmer upright and thread the handles provided
into the threaded holes in the woodworking sub-base.
n
Tighten the handles securely. Check often to assure the
handles remain securely tightened.