Nady Systems IRW-2PA User Manual
Page 8
9
8
IRW-2PA WIRELESS RECEIVER PA
1. Powering the IRW-2PA
Turn on the IRW-2PA using the Power Switch (17) located inside the lockbox on
the lower right panel. When powered on, the Ch A and Ch B IR Reception LED In-
dicators (6) will light green if the corresponding transmitters are on and red when
the transmitters are off. Turn off the IRW-2PA when not charging or in use.
2. Inputs
The IRW-2PA has two additional inputs allowing for up to four audio signals to be
heard simultaneously when used with the wireless transmitters. An external line-level
device such as a CD/MP3-player, VCR audio, tape deck, or keyboard can be added
to the mix using the Aux Input (4) 1⁄4” jack. A hardwired microphone can be
plugged into the Mic Input (5) 1⁄4” unbalanced jack. This input can also be used
for other low-level audio signals, however, be careful to avoid input distortion by
turning down the volume of the external device.
3. Adjusting the Audio
The Channel A and B mix is dependent on the separate Channel A and B Volume
Controls (7). These should be adjusted to balance the audio from the channel A
and B microphones. The Aux Volume (8) and Mic Volume (9) can also be ad-
justed to balance the levels from those sources. Turn all volume controls down before
turning on the transmitters, or connecting any audio devices, to avoid loud noise or
feedback that can damage your speakers.
4. EQ
The Bass (10) and Treble (11) controls can be adjusted to cut or boost up to 12dB
of gain at 100Hz and 8KHz respectively. These controls affect the master mix. Add
warmth to vocals by turning the bass control to the right. Turn to the left to reduce
boomy vocals or to improve a mushy sound. Increase the treble control to boost high
frequencies, adding crispness too the audio. Turn to the left to cut these frequencies,
reducing sibilance and possible feedback.
5. Charger
The IRW-2PA can recharge the NiMH batteries for two transmitters simultaneously.
Simply turn on the battery charger by switching on the Battery Charging Power
Switch (14) and select the types of transmitters that are to be recharged using the
Battery Charging Selector Switch (16).
Transmitters
Selector Switch
2x Bodypack Transmitters
2x LT
2x Handheld Transmitters
2x HT
1x Bodypack and 1x Handheld
HT & LT
Place the handheld microphones directly into the Handheld Microphone Hold-
ers (12) and/or connect the bodypack transmitters using the Bodypack Charging
Connector (13). When the charger is connected, the corresponding IRW-2PA Bat-
tery Charging LED Indicator (15) will light brightly red. The LED indicator will
light green when the batteries are fully charged. Turn the battery charger off when
the transmitters are fully charged, being stored, or being used.
Note: The IRW-2PA is equipped with unique charger protection circuitry which
detects and shuts down if you attempt to charge alkaline or other non rechargeable
batteries. This is important because charging non rechargeable batteries can result
in fire or explosion and should never be attempted.
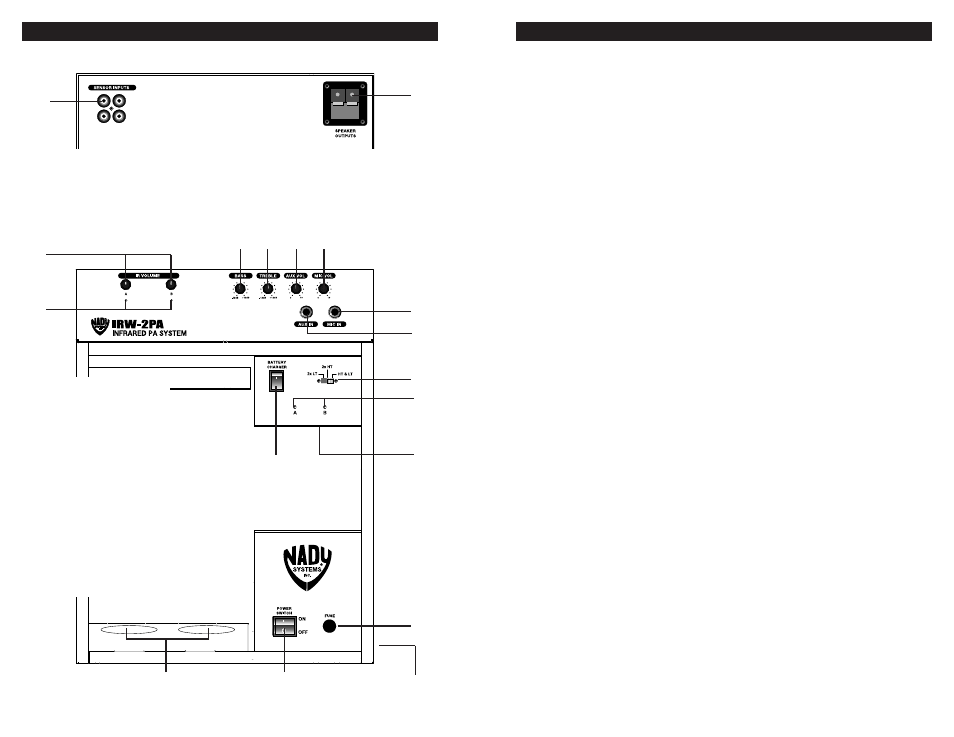
IRW-2PA WIRELESS RECEIVER PA
FRONT
TOP
(1) Infrared Sensor Inputs
(2) Speaker Outputs
(1)
(7)
(2)
(5)
(16)
(18)
(3)
(14)
(15)
(4)
(10) (11)
(8)
(9)
(6)
(12)
(3) AC Power Inputs
(4) Aux Input
(5) Mic Input
(6) IR Reception LED Indicators
(7) Channel A and B Volume Controls
(8) Aux Volume
(9) Mic Volume
(10) Bass
(11) Treble
(12) Handheld Microphone Holders
(13) Bodyjack Charging Connectors
(14) Battery Charging Power Switch
(15) Battery Charging LED Indicators
(16) Battery Charging Selector Switch
(17) Power Switch
(18) Fuse
(13)
(17)