Connect wir es: iso connectors, Attach the fr ont panel 1, Mount in the dashboar d – Philips CED320 User Manual
Page 2: Detach the fr ont panel, Turn on 1, Set clock 1, Tune to a radio station 1, Pla y discs 1, Inser t usb de vice 1, Inser t sd/mmc car d 1
English
Connect wir
es:
ISO connectors
Caution
Ensure that all loose leads are insulated with
•
electr
ical tape
.
1
Pull out the ISO connector
s from the car
dashboard and connect them to the bigger
end of the supplied standard connector
.
2
Connect the other end of supplied standard
connector to the unit.
3
Do the other connections,
if applicab
le
.
Attach the fr
ont panel
1
Attach the tr
im plate
.
2
Inser
t the left side of the panel in the chassis
until it is cor
rectl
y engaged.
3
Press the r
ight side of the panel until the
mechanism locks it into place
.
4
Close the front panel.
Mount in the dashboar
d
Note
For proper oper
ation of the D
VD pla
ye
r, the
•
chassis m
ust be mounted within 20 degree
hor
iz
ontal.
Ensure that the unit is mounted
within this limitation.
1
If the car does not ha
ve
an on-board dr
iv
e or
na
vigation computer
, disconnect the negativ
e
ter
minal of the car atter
y.
If y
ou disconnect the car batter
y in
•
a car that has an on-board dr
iv
e or
na
vigation computer
, the computer ma
y
lost its memor
y.
If the car batter
y is not disconnected,
•
to a
void shor
t-circuit,
ensure that bare
wires do not touch each other
.
2
Ensure that car dashboard opening is within
these measurements:
3
Remo
ve
the tw
o tr
anspor
t screws on the
top of the unit.
4
Remo
ve
the mounting sleev
e with the re-
mo
val k
eys.
5
Install the sleev
e into the dashboard and
bend the tabs outward to fi
x the sleev
e
.
If the unit is not fi
x
ed b
y sleev
e b
ut b
y
•
the supplied screws,
skip this step
.
6
Place the r
u
b
ber cushion o
ver the end of the
bolt.
7
Slide the unit into the dashboard until a click
sound is heard.
8
Reconnect the negativ
e ter
minal of the car
batter
y.
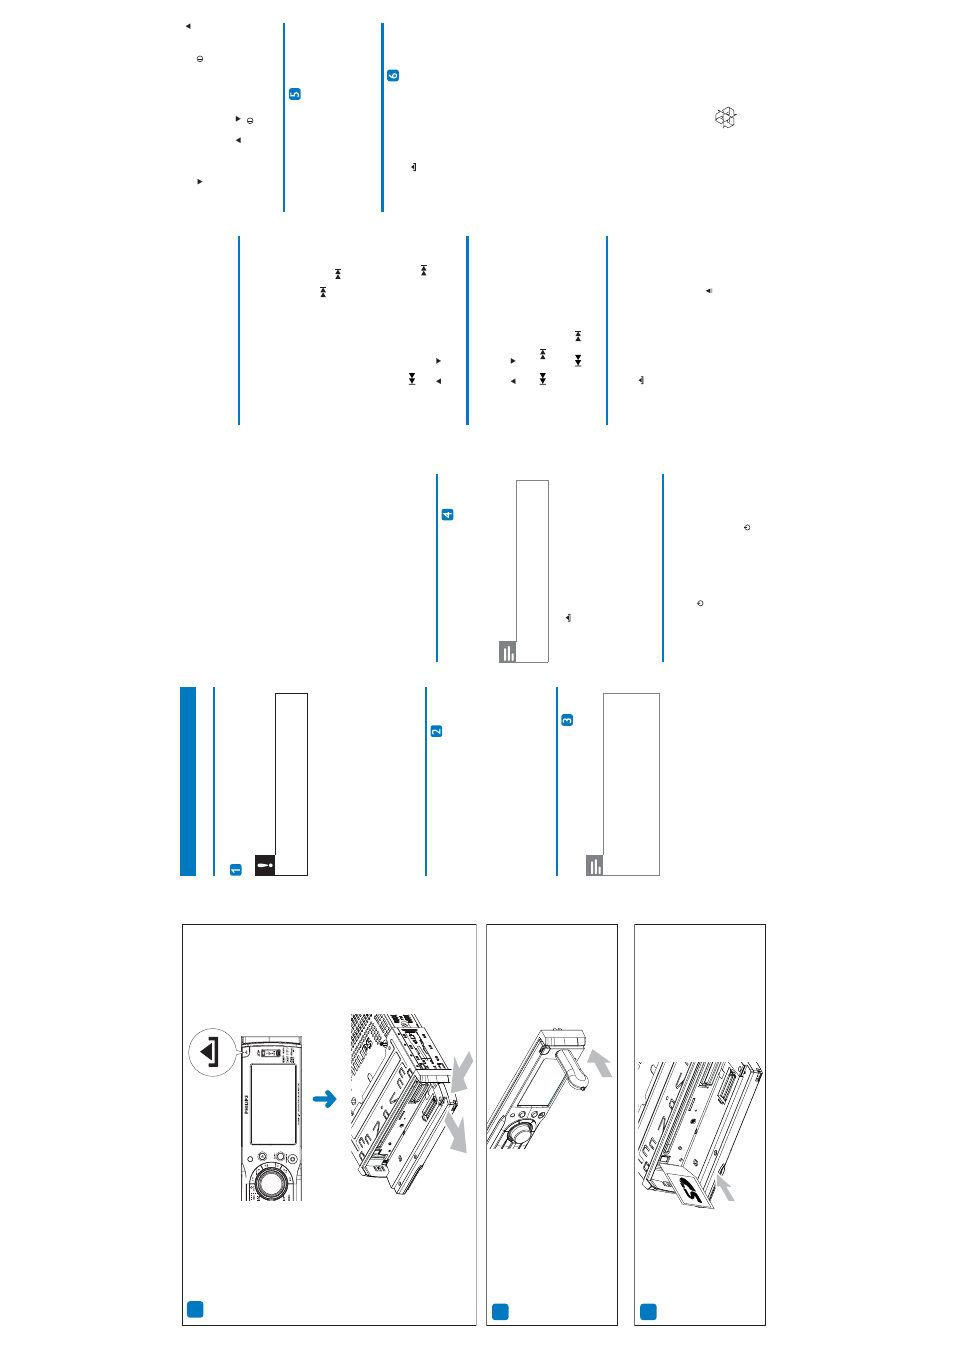
Detach the fr
ont panel
The front panel can be detached and tak
en with
you to deter theft.
Note
Bef
ore installing the unit,
detach the front
•
panel.
1
Press
to release the panel.
2
Open the panel,
then push the r
ight side
panel to
ward the left side to disengage it
from the chassis.
3
Ta
ke
off the panel and store it in the supplied
car
ry
case to protect it from dir
t or damage
.
T
urn on
1
Press the
knob to tur
n on the unit.
The unit pla
ys the last listened progr
am:
» D
V
D
, T
uner
, USB or SD/MMC Card (if there is
USB device or SD/MMC card connected).
To
tur
n off the unit,
press the
•
knob f
or
more than 2 seconds.
When the unit is idle f
or o
ver 5 min
utes,
it
•
goes to standb
y mode and displa
ys screen
sa
ve
r.
Set clock
1
Press
MENU
.
2
Press the na
vigation b
uttons to select
[SET
-
TINGS]
, then press
SEL
on the remote
control.
3
Select
[SY
STEM]
, then press
.
4
Select
[TIME MODE]
, then press
.
The time mode options are displa
yed:
»
»
[1
2 HOUR MODE]
»
[24 HOUR MODE]
5
Sselect a mode
, then press
SEL
.
6
Press
to retur
n to previous men
u and
select
[TIME ADJUST]
, then press
.
7
Press
or
to enter clock,
then press
SEL
.
T
une to a radio station
1
Press
SOURCE
to select
Tuner
.
2
Press
or
to select band.
»
[FM]
or
[AM]
is displa
yed.
3
Press
or
to tune to a r
adio station
man
uall
y.
To
search f
or r
adio station automaticall
y,
•
press
or
f
or 3 seconds.
Pla
y discs
1
Press
to open the front panel.
2
Inser
t the disc into the disc slot with label
side facing up
.
Pla
y resumes from the point where it was
» last stopped.
3
To
remo
ve
the disc
, press the
b
utton.
When the disc is ejected,
the unit switches
» to
TUNER mode automaticall
y.
4
Close the front panel.
After a f
ew seconds,
the screen tur
ns on.
»
For video discs,
if a men
u appear
s: press
» or
to select an item,
then press
to star
t
pla
y.
For discs that contain MP3s,
WMAs,
or
» JPEGs:
, press
or
to select a f
older/tr
ack/
picture
, then press
to star
t pla
y.
Inser
t USB de
vice
1
Slide do
wn the USB sock
et co
ve
r.
2
Inser
t the USB device into the USB sock
et.
The unit star
ts pla
ying from the USB
» device automaticall
y.
Inser
t SD/MMC car
d
1
Press
to open the front panel.
2
Inser
t the SD or MMC card into the card
slot.
The unit star
ts pla
ying from the SD/MMC
» card automaticall
y.
© 2008 K
oninklijk
e Philips Electr
onics N.V
.
All rights r
e
ser
ved.
4
5
6