Philips VR220/55 User Manual
Page 14
RF OUT
ANT.IN
IN
OUT
AUDIO
VIDEO
RF OUT
ANT.IN
IN
OUT
AUDIO
VIDEO
●
13
14
• Tape speed can be selected by pressing the ALT/SPEED
button anytime during steps 1 through 4.
The speed appears on the display for about 5 seconds.
When two programs overlap
The Program Review screen will
appear with a magenta line
blinking on the newly set timer
recording while the other
overlapped program blinking.
1 Press
PLAY
5 or
STOP
∞ to move the magenta
line among the two overlapping programs.
2 Press
OK/STATUS
to view
the detail information of the
program you want to change.
3 Go to step 4 through 8 to
modify the selected program.
To cancel any timer recording,
press
CLEAR
.
• If you do not modify the overlapping programs,
the VCR will record the earlier program com-
pletely. Only the remaining part of the later
program will be recorded.
• If the START time for the two programs are the
same, the lower program number will be re-
corded.
Useful function for Timer Recording:
Auto Tape Speed
With this function activated, the VCR can change
the tape speed and record the programme in LP or
SLP mode if not enough tape remains for recording
in SP mode.
1 Press
VCR
.
2 Press
MENU
.
3 Press
PLAY
5 or
STOP
∞ to select “VCR SET
UP” then press
OK/STATUS
.
4 Press
PLAY
5 or
STOP
∞ to select “TIMER
REC SPEED.”
5 Press
FF
3. Each time you press the button, the
setting changes.
AUTO:
Select this to allow the VCR to change the tape speed
from SP to LP (or SLP) when there is not enough
tape length remaining.
MANUAL:
Select this not to allow the VCR to change the tape
speed.
6 Press
MENU
to exit from the menu operations.
Tape Duplication
To check, edit or erase the programmes
1 Press
VCR
.
2 Press
TIMER
.
3 Press
PLAY
5 or
STOP
∞ to select
“PROGRAM REVIEW”, then press
OK/
STATUS
.
4 Press
OK/STATUS
repeatedly to view the more
detailed programme information.
• When you press the button for the first time, the
detailed programme information for Programme 1
appears. By pressing this button repeatedly, you can
review the detailed information of all other
programmes.
5 If you want to change the programme setting
shown on the TV screen, press the following
buttons:
CH
5/∞
: Changes the channel.
START +/–
:Changes the start time.
STOP +/–
:Changes the stop time.
SPEED
:Changes the tape speed.
DATE +/–
:Changes the date.
If you want to erase the programme setting
shown on the TV screen, press
CLEAR
. The
detailed information of the next programme
appears.
6 If necessary, press
TIMER
to exit from the menu
operations.
Note:
• This function does not work for OTR (One Touch
Recording).
How to see the programme list
1 Programme numbers
2 Preset channel numbers
3 Start time
4 Stop time
5 Start date
“D” stands for “DAILY,” and
“W” stands for “WEEKLY.”
• If the programme has worked once for the Daily
recording, “DAILY” will be shown instead of the
start date.
• If the programme has worked once for the
Weekly recording, the day of the week (in this
example, “MON”) will be shown instead of the
start date.
Note:
• Even if a power failure occurs, the VCR keeps your
timer programs. However, the clock time and other
menu settings are lost if it lasts for more than 3
minutes. As a result, when the power is supplied
again to this VCR after the power failure, set the
clock time and turn off the VCR.
Each timer program you have made will start unless
its start time already passes.
1 Insert a source tape in the playing VCR and a
blank tape in the recording VCR.
• If a tape without the record tab is inserted in the play
ing VCR, playback automatically starts. In this case,
press the
STOP
button.
2 Turn the channel on the TV to your video
channel.
3 Press
CH
5 or ∞, pointing the remote
control at this VCR, to select the external line
input.
• For rear jacks, select “L-1” on the display or “A/V IN”
on the TV screen.
• For front jacks, select “L-F” on the display or “F-A/V
IN” on the TV screen.
4 Press
ALT/SPEED
, pointing the remote control at
this VCR, until the desired tape speed (SP, LP or
SLP) appears on the display.
SP, LP: For PAL signal.
SP, SLP: For NTSC signal.
5 Press the
PLAY
3 button on the playing VCR.
6 Press
REC/OTR
●
at this VCR.
Remember: press the buttons in steps 5 and 6 simultane-
ously to avoid missing any of the recording.
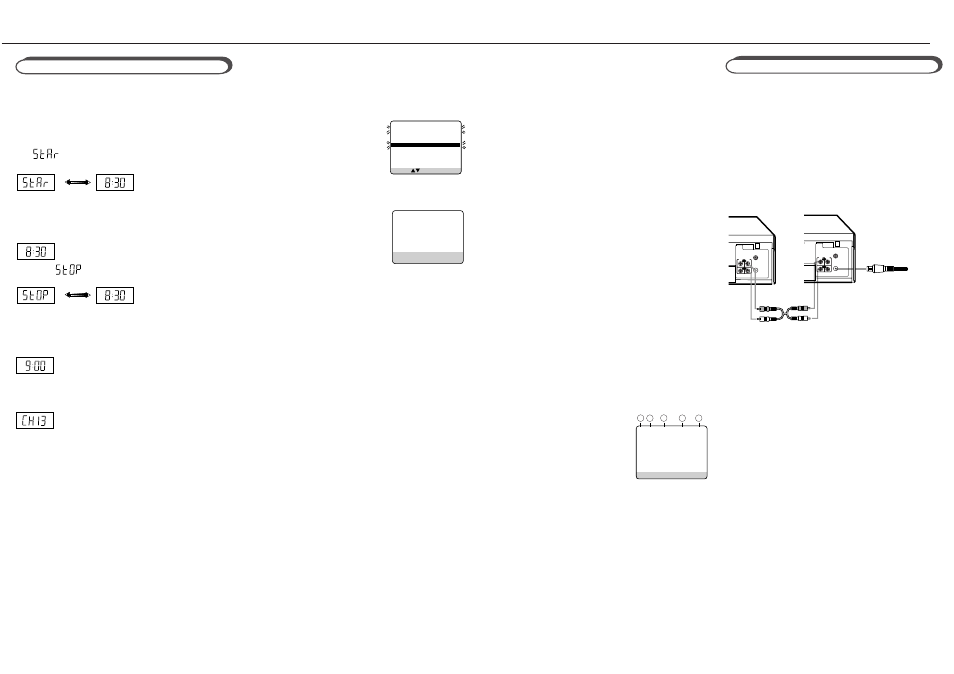
Dubbing from any VCR (or camcorder) to another is
simple.
Explanations on this page uses this VCR as the
recording VCR.
Refer also the manual supplied with the other VCR
(for playback)
1
Connect the recording VCR (this VCR) and
the playing VCR.
2
Connect the recording VCR (this VCR) to the
TV.
Recording VCR (this VCR)
Playing VCR
To RF OUT
From Audio output to AUDIO IN
From Video output to VIDEO IN
This function allows you to set the timer recording
program without going through the regular set up
with the on screen. The extent of programming is
24 hours from the current time.
1 Insert a tape into the VCR and press the
“TURBO TIMER” button on the remote control.
“ ” (start time Prompt) and the current
time appears alternately on the display.
2 To change the START time, press the
PLAY
5 or
STOP
∞ button (if you press and hold either
button, the time changes in 30-minutes incre-
ments), then press
OK/STATUS
.
Then,“
” (stop time prompt) and the set
start time appears alternately on the display.
3 To change the STOP time, press the
PLAY
5 or
STOP
∞ button (if you press and hold either
button, the time changes in 30-minutes incre-
ments), then press
OK/STATUS
.
Channel number will appear on the display.
4 To change the CHANNEL number, press the
PLAY
5 or
STOP
∞, then press
OK/STATUS
.
5 The data input will be memorized and the Turbo
Timer mode will be finished so that normal
display appears.
6 Turn off the VCR.
Notes:
• To exit Turbo Timer mode at any step, press the TURBO
TIMER button.
• If “Err” appears on the display panel, all eight
programs have been set and Turbo Timer will not
proceed. To remove the error message, press the
TURBO TIMER button again.
• Settings of Turbo Timer will appear on the display panel
only and not on the screen.
• Programs Overlap Warning does not function with
Turbo Timer.
• DAILY or WEEKLY programming are not available on
Turbo Timer.
Turbo Timer
PR CH START STOP DATE
1 12 20:00 22:00 20/07
2 20 11:00 11:30 15/10
3 24 15:00 16:00 10/08
4 45 21:00 23:00 FRI
5
6
7
8
SELECT: CONFIRM: OK
ONE TIME PROGRAM
PROGRAM 1
CHANNEL+/–
START +/– 20 : 00
STOP +/– 22 : 00
REC SPEED SP
DATE +/– 20/07/01
FRIDAY
ERASE: CLEAR
NEXT: OK
END: TIMER
12
PR CH START STOP DATE
1 12 20:00 22:00 W10/06
2 25 10:00 10:45 MON
3 03 15:00 15:15 D16/10
4 45 23:30 23:00 DAILY
5
6
7
8
NEXT: OK END: TIMER
1
2
3
4
5