Precor Multi-Hip Option S3.15 User Manual
Page 7
S3.15 Multi-Hip Option Assembly Instructions
page 7
1
2
3
4
5
6
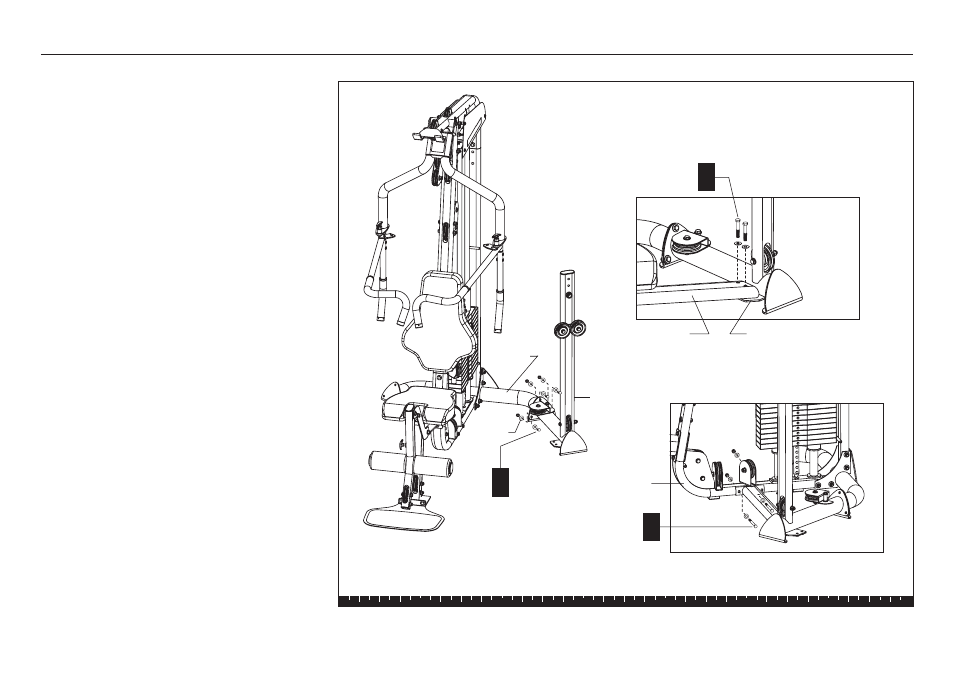
Step 1. Attach the Multi-Hip to the S3.15
1. Attach the Multi-Hip to
the S3.15
Important: Most fasteners are fitted to the frame
or pulley, you will need to disassemble the
fasteners before proceeding with each step.
A. Attach the Multi-Hip Base to the S3.15 Rear
Crossbar using
three
1¼-inch hex head bolts
three flat washers
three spring washers
three locknuts
B. Position the Crossbrace against the S3.15 Main
Base and place it on top of the Multi-Hip flange.
Attach the Crossbrace to the Multi-Hip using
two
2¹⁄₄-inch hex head bolts
two flat washers
C. Attach the Crossbrace to the S3.15 Main Base
using
two 4
¹⁄₄-inch hex head bolts
four radius washers
two locknuts
Note: If you plan to install the S3.15 Leg Press
Option immediately after you complete the Multi-
Hip Option assembly, place two washers and two
locknuts on the fastener ends finger tight so they
provide stability, but can easily be removed.
B
A
3 - 1¼" bolts
3 - flat washers
3 - spring washers
3 - locknuts
2 - 4
¹⁄₄" bolts
4 - radius washers
2 - locknuts
C
2 - 2
¹⁄₄" bolts
2 - washers
Multi-Hip
Upright
Rear
Crossbar
Main Base
Crossbrace
Multi-Hip Flange
Spring
Washer