Tractor hook-up, Point category 0 hitch, Point category i-limited hitch – Land Pride RTR0542 User Manual
Page 12: Danger, Caution, Table of contents tractor hook-up
10
RTR0542 and RTR0550 Rotary Tillers 311-464M
5/21/13
Section 1: Assembly& Set-Up
Tractor Hook-Up
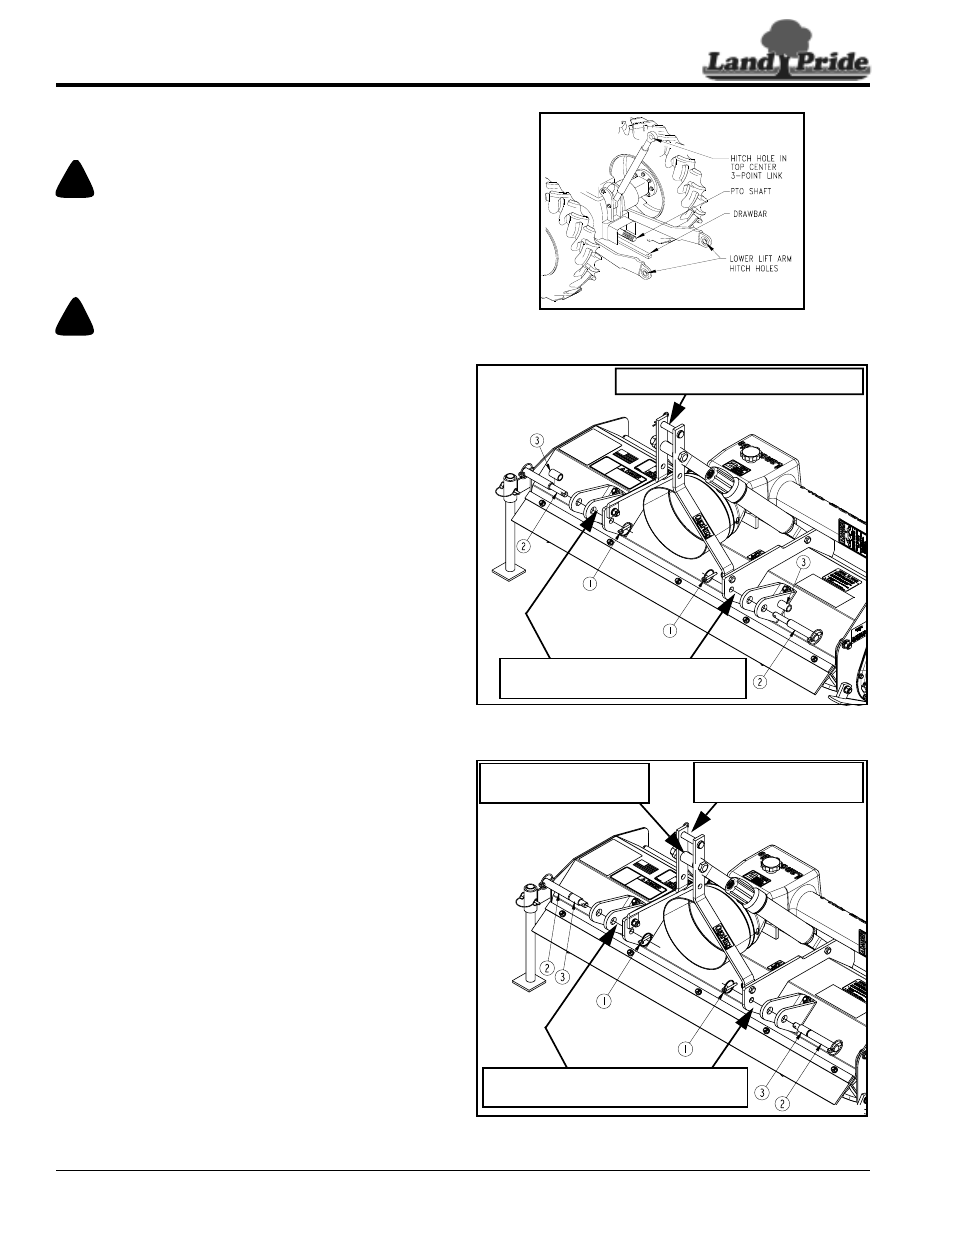
Refer to Figure 1-2:
!
DANGER
A Crushing Hazard exists when hooking-up equipment to a
tractor. Do not allow anyone to stand between tractor and
implement while backing-up to implement. Do not operate
hydraulic 3-Point lift controls while someone is directly
behind the tractor or near the implement.
!
CAUTION
To avoid bodily injury caused by accidental falling of tiller,
stabilize unit with parking stand and support blocks!
1.
Stabilized lower 3-Point arms to prevent side-to-side
movement. Most tractors have sway blocks or
adjustable chains for this purpose.
2.
Determine which hitch category the tractor hooking-
up to the tiller is equipped with.
a. Category 0 tractors have 5/8
"
diameter hitch link
holes in the center and lower hitch arms.
b. Category I-Limited tractors have a 7/8
"
diameter
lower hitch link holes and either 5/8
"
or 3/4
"
diameter top center link hole. The lower arms are
spaced closer together than a Category I hitch.
c. Category I tractors have a 7/8
"
diameter lower
hitch link holes and 3/4
"
diameter top center link
hole.
3-Point Category 0 Hitch
Refer to Figure 1-3:
1.
Remove the two inside 1/4
"
linch pins (#1) and hitch
pins (#2). Remove hitch pin bushings (#3) and keep
for future use with Category I-Limited and Category I
tractor hook-ups.
2.
Slowly back the tractor up to tiller until the lower
3-Point arms are aligned with the inside hitch
clevises on the tiller as shown.
3.
Replace the lower hitch pins and replace the two 1/4
"
linch pins.
4.
Attach the tractor’s top center ink to the tiller’s lower
5/8
"
hitch holes using a 5/8" diameter hitch pin.
Properly secure hitch pin with a linch pin.(Center
hitch pin and linch pin are supplied by the customer).
3-Point Category I-Limited Hitch
Refer to Figure 1-4:
1.
Remove the two inside 1/4
"
linch pins (#1) and hitch
pins (#2). Do not remove the hitch pin bushings (#3)
from the hitch pins (#2).
2.
Slowly back the tractor up to tiller until the lower
3-Point arms are aligned with the inside hitch
clevises on the tiller as shown.
3.
Replace the lower hitch pins (#2) and bushings (#3).
Secure with two 1/4
"
linch pins (#1).
Tractor 3-Point Hitch
Figure 1-2
3-Point Category 0 Hitch
Figure 1-3
3-Point Category I-Limited Hitch
Figure 1-4
23998
Hitch Point For 3-Point Center Arm
Inside Hitch Clevises For Hitching
to the Tractor’s Lower 3-Point
23792
Hitch Location For 5/8"
3-Point Center Hitch Pin
Hitch Location For 3/4"
3-Point Center Hitch Pin
23775
Inside Hitch Clevises For Hitching to
the Tractor’s Lower 3-Point Arms.