Ir sensor installation, Troubleshooting guide – LightSpeed Technologies 850IR User Manual
Page 8
1. Lift
the ceiling tile nearest the
grid rail in your desired sensor
location. Guide one side of the
C-clip over one edge of the grid
rail. Providing firm support to the
back of the grid rail with one hand
(to prevent bending), firmly and
carefully snap the second side of
the C-clip over the edge of the rail.
2. Uncoil
sensor wire. Connect one
end of the sensor cable to the plug
on the sensor. Loosely secure wire
overhead and route it back to the
850iR.
3. Connect
the other end of the
sensor cable into one of the sensor
inputs on the back of the 850iR.
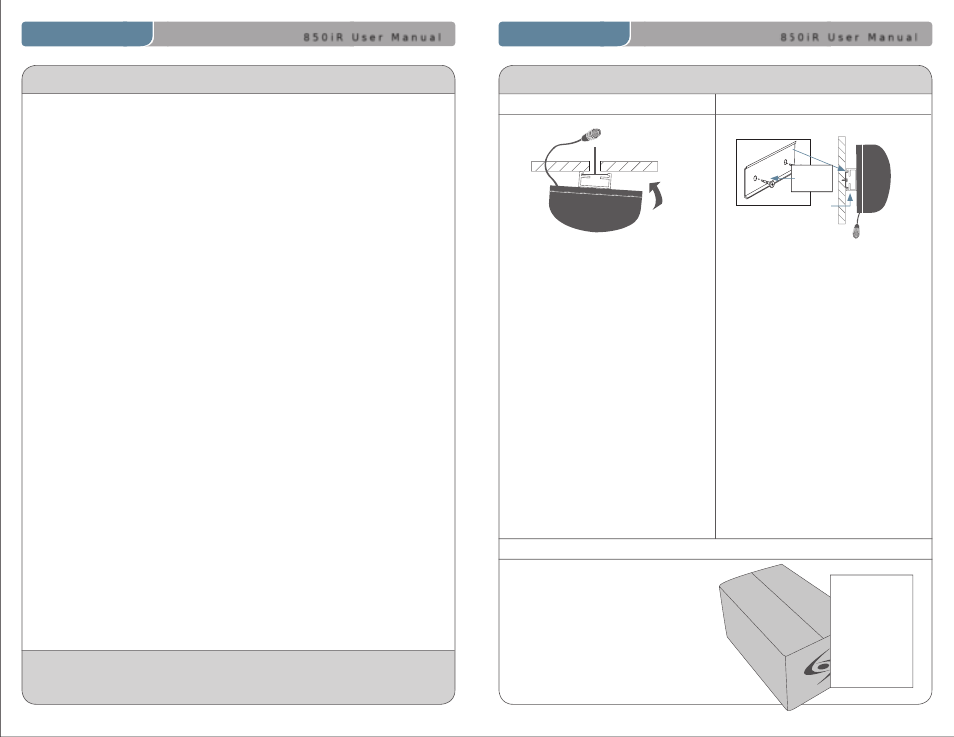
IR SENSOR INSTALLATION
1. Screw
the plastic mounting
strip to a place high on the
wall or in the middle of the solid
ceiling. Mount the strip horizon-
tally as shown above.
2. Firmly snap the C-clip on the back
of the IR sensor onto the plastic
mounting strip with the sensor
plug hanging down (if a wall
mount) or toward the receiver
location (if ceiling mount).
3. Uncoil the sensor wire. Screw one
end of the sensor cable to the
plug on the sensor. Route the
wire back to the 850iR,
securing it along the way.
4. Connect the other end of the
sensor cable to one of the sensor
inputs on the back of the 850iR.
wall
mounting
strip
c-clip
sensor jack
850iR User Manual | 4
19 | 850iR User Manual
8 5 0 i R U s e r M a n u a l
8 5 0 i R U s e r M a n u a l
Speaker Installation
1. Locate
the speaker installation
instructions packed with your
speaker(s).
2. Follow
instructions and mount
speaker(s).
3. Return
to this manual to complete
the set up of your system.
Speaker Install
Instructions
Suspended Ceiling Mount
Wall/Solid Ceiling Mount
TROUBLESHOOTING GUIDE
Battery Check
• Confirm
batteries are charged
each night.
• Make
sure the LT-71 is turned off
while charging so that it will attain
a full charge. Full charge will last
eight hours.
• Make
sure the charge cord is
connected to the cradle charger.
• Inspect
the battery contacts. Clean
and adjust if necessary.
Hearing Static
• Ensure
sensor is in optimum
location (refer to sensor placement
in manual). A single sensor will
cover a 1600 sq. ft. enclosed
classroom.
• Ensure
that no other LT71/HM70 is
operating on the same channel.
• If
an external microphone is in use,
try another LightMic that is known
to be working (if available) to isolate
the problem. If static persists with
“known good” microphone, the
LT-71 input jack has damage and
will need service.
Low Volume or Feedback
•
Ensure
microphone is positioned
appropriately, just below the collar
bone. If a headset microphone is in
use, the end of the mic boom
should be positioned at the corner
of the mouth.
• Check
volume level on the ampli-
fier. If the volume is too high, feed-
back WILL occur—adjust accordingly.
No Sound From Speaker
• Turn
the 850iR on. Confirm that
the POWER light located on the
front panel switch is on.
• Confirm
signal is being received
at the amplifier. The IR signal
light will be lit (red) indicating a
signal is being received.
• Confirm
microphone is function-
ing. Next to the IR signal light is
the AF signal light. This light will
flicker (green) as audio is picked
up by the microphone indicating
activity.
• Ensure
speaker switch on the
amplifier is in the “ON” position
for each speaker that is connect-
ed to the amplifier. Check con-
nections on both the amplifier
and speaker.
• Confirm
that the speaker wires
are connected correctly to the
back of the 850iR (refer to
speaker install guide) and make
sure that the speaker switch for
that output jack is in the ON
position
.
If you review these instructions and still have questions, write down the serial
number and model number of your system and call LightSPEED Technical Services
at 800.732.8999, 6:30 a.m. – 5 p.m. PST.
Note: Most problems are directly related to low battery power. Please run
through the “Battery Check” items first. For remaining troubleshooting,
use known good, fully-charged batteries.