Smart system control module – Lochinvar Outdoor Knight XL 801 User Manual
Page 10
4
SMART SYSTEM control module
10
Outdoor Knight XL User’s Information Manual
Outdoor Knight XL control module
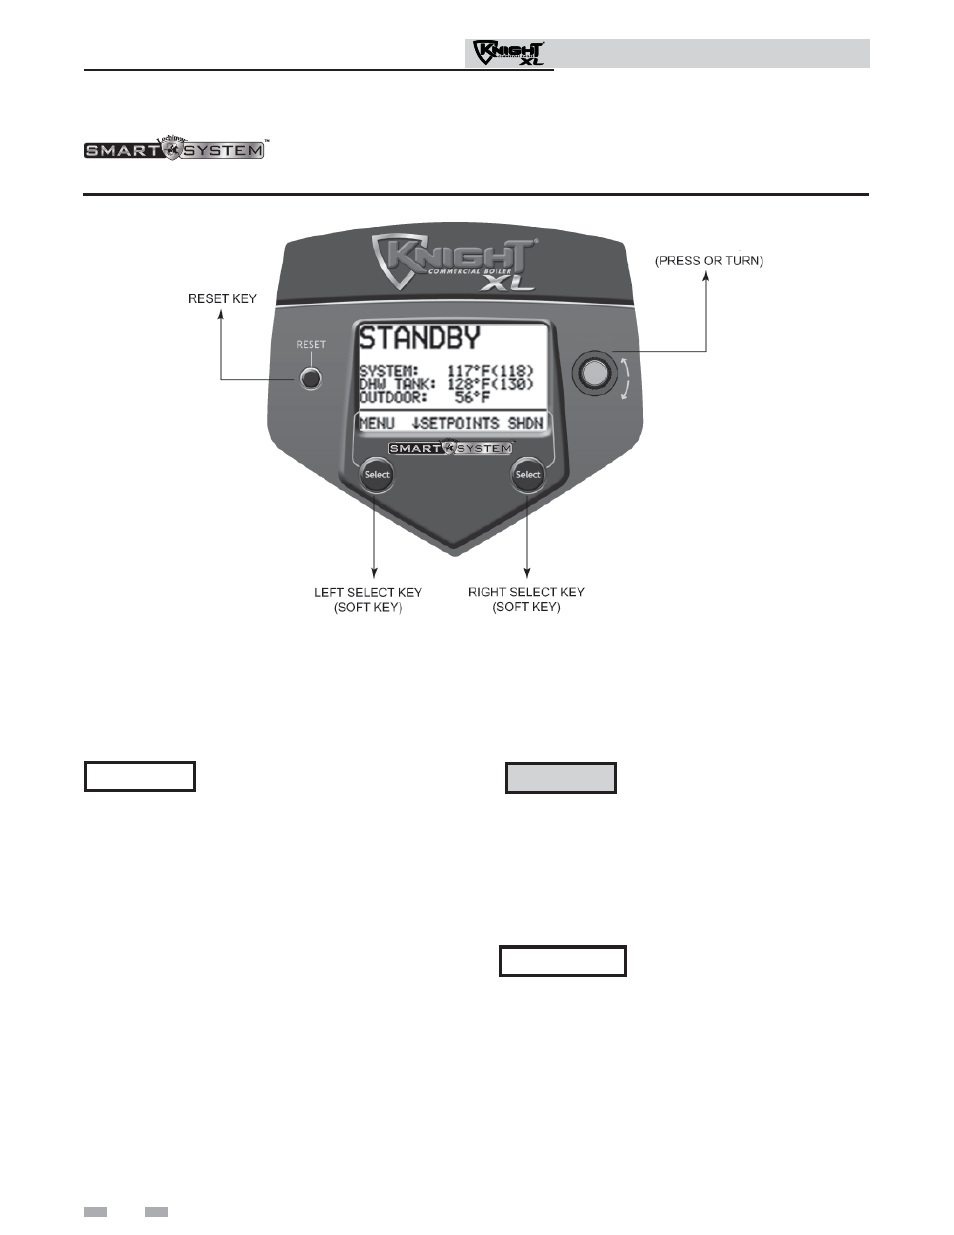
NAVIGATION DIAL
Figure 4-1 Control Panel
Use the control panel (FIG. 4-1) to set temperatures, operating conditions, and monitor boiler operation.
The information on the bottom of the display shows the functions of the two SELECT keys (on either corner), and the
NAVIGATION dial (in the center):
MENU = Left SELECT Key
SETPOINTS = NAVIGATION Dial - Pressing Down
SHDN = Right SELECT Key
Access modes
User
The user can adjust space heating and tank target temperatures
by pressing the NAVIGATION dial when “SETPOINTS” is
flashing at the bottom of the display. The user can adjust the
date and time, temperature units, and night setback override
(if active) by pressing the LEFT SELECT [MENU] key for
5 seconds. When the user password “0000” appears, then
press the RIGHT SELECT [SAVE] key (do not change the
password).
Installer
Most parameters are available only to the installer, accessible
only by entering the installer password, see the Knight XL
Service Manual.
Saving parameters
Press the RIGHT SELECT [SAVE] key one time to return to
the parameter listing. Press the RIGHT SELECT [HOME]
key again to store the new settings and return to the Status
Screen.
Adjusting parameters
CAUTION
Before changing parameters, note the
settings so that the unit can be returned
to its original operating parameters.
The control uses an internal clock for the night setback
feature and for logging of events. For these features to
work properly, the clock must be set when the boiler is first
installed or any time the boiler has been powered off for
more than four (4) hours. This parameter must be accessed
to set the clock.
NOTICE
The internal clock does not adjust for
Daylight Savings Time and therefore,
will require a manual adjustment.
To set the clock, access the clock menu as described in the
User section. Rotate the NAVIGATION dial (if needed)
until the arrow (>) is pointing to “TIME & DATE”. Press the
NAVIGATION dial once. If the date and time are incorrect,
press the NAVIGATION dial again. The hours value will
begin flashing. Rotate the NAVIGATION dial until the hour
and AM/PM values are correct. Press the NAVIGATION
dial again. The minutes value will begin flashing. Rotate
the NAVIGATION dial to adjust the minutes. Repeat this
procedure to adjust the month, date and year. Save the
new settings as described in the Saving Parameters section
(this page).
Please note that the brackets ([]) denote
screen status.
NOTICE