Kawasaki 840329 User Manual
Page 8
M
MA
AIIN
NT
TE
EN
NA
AN
NC
CE
E A
AN
ND
D C
CL
LE
EA
AN
NIIN
NG
G
A
Allw
wa
ayyss U
UN
NP
PL
LU
UG
G tth
he
e tto
oo
oll ffrro
om
m tth
he
e p
po
ow
we
err sso
ou
urrcce
e b
be
effo
orre
e
cclle
ea
an
niin
ng
g o
orr m
ma
aiin
ntte
en
na
an
ncce
e..
• U
Usse
e cco
om
mp
prre
esssse
ed
d a
aiirr tto
o b
bllo
ow
w o
ou
utt a
an
nyy a
accccu
um
mu
ulla
atte
ed
d d
du
usstt o
orr g
grriitt.. Tiny
particles from metal grinding often accumulate inside your tool and could
create an electrical shock hazard.
• N
Ne
evve
err u
usse
e sso
ollvve
en
nttss o
orr h
ha
arrssh
h cch
he
em
miicca
allss.. Use only mild soap and a damp cloth
to clean the tool. Never let any liquid get inside the casing. Never immerse any
part of the tool in a liquid. Always keep the ventilation openings clear.
• R
Re
eg
gu
ulla
arrllyy cclle
ea
an
n tth
he
e vve
en
nttiilla
attiio
on
n ssllo
ottss iin
n yyo
ou
urr tto
oo
oll u
ussiin
ng
g a
a sso
offtt b
brru
ussh
h o
orr d
drryy
ccllo
otth
h..
A
AC
CC
CE
ES
SS
SO
OR
RIIE
ES
S
U
Usse
e o
on
nllyy a
acccce
esssso
orriie
ess tth
ha
att a
arre
e rre
ecco
om
mm
me
en
nd
de
ed
d b
byy tth
he
e m
ma
an
nu
uffa
accttu
urre
err ffo
orr yyo
ou
urr m
mo
od
de
ell..
Accessories that may be suitable for one tool may become hazardous when used on
another tool.
A
Allw
wa
ayyss a
atttta
acch
h g
grro
ou
un
nd
de
ed
d ((3
3--p
prro
on
ng
g)) e
exxtte
en
nssiio
on
n cco
orrd
dss tto
o g
grro
ou
un
nd
de
ed
d ((3
3--h
ho
olle
e)) o
ou
uttlle
ettss..
IIff yyo
ou
u m
mu
usstt u
usse
e a
an
n e
exxtte
en
nssiio
on
n cco
orrd
d,, b
be
e ssu
urre
e tth
ha
att tth
he
e g
ga
au
ug
ge
e iiss lla
arrg
ge
e e
en
no
ou
ug
gh
h tto
o cca
arrrryy
tth
he
e a
am
mo
ou
un
ntt o
off ccu
urrrre
en
ntt n
ne
ecce
essssa
arryy ffo
orr yyo
ou
urr p
po
ow
we
err tto
oo
oll.. If not, your tool may experi-
ence a loss of power, excessive voltage drop or overheating. The smaller the gauge
number, the heavier the cord (see table below).
R
RE
EC
CO
OM
MM
ME
EN
ND
DE
ED
D S
SIIZ
ZE
ES
S O
OF
F E
EX
XT
TE
EN
NS
SIIO
ON
N C
CO
OR
RD
DS
S 1
12
20
0 V
VO
OL
LT
T A
AC
C 6
60
0 H
HZ
Z T
TO
OO
OL
LS
S
T
TO
OO
OL
L C
CU
UR
RR
RE
EN
NT
T R
RA
AT
TIIN
NG
G
C
CO
ON
ND
DU
UC
CT
TO
OR
R S
SIIZ
ZE
E IIN
N A
A..W
W..G
G
AMPERE
10FT.
25FT.
50FT.
100FT.
3-6
18
18
18
18
6-8
18
18
18
16
8-10
18
18
18
14
10-12
16
16
14
14
12-16
14
12
12
-
16-20
12
12
12
-
14
O
OP
PE
ER
RA
AT
TIIN
NG
G T
TH
HE
E O
ON
N//O
OF
FF
F S
SW
WIIT
TC
CH
H
N
Ne
evve
err ssw
wiittcch
h tth
he
e A
An
ng
glle
e G
Grriin
nd
de
err “
“O
ON
N”
” o
orr “
“O
OF
FF
F”
” w
wh
hiille
e
u
un
nd
de
err llo
oa
ad
d cco
on
nd
diittiio
on
nss..
A
Allw
wa
ayyss a
allllo
ow
w tth
he
e A
An
ng
glle
e G
Grriin
nd
de
err tto
o cco
om
me
e u
up
p tto
o ffu
ullll ssp
pe
ee
ed
d b
be
effo
orre
e tto
ou
ucch
hiin
ng
g a
an
nyy
ssu
urrffa
acce
e..
A
Allw
wa
ayyss tta
akke
e tth
he
e tto
oo
oll a
aw
wa
ayy ffrro
om
m tth
he
e w
wo
orrkkp
piie
ecce
e b
be
effo
orre
e ttu
urrn
niin
ng
g tth
he
e tto
oo
oll “
“O
OF
FF
F”
”..
Let the tool come to a complete stop before setting it down.
T
Th
hiiss tto
oo
oll o
op
pe
erra
atte
ess b
be
esstt u
un
nd
de
err lliig
gh
htt p
prre
essssu
urre
e.. Exerting heavy pressure will not
speed up the work and may cause damage to the motor.
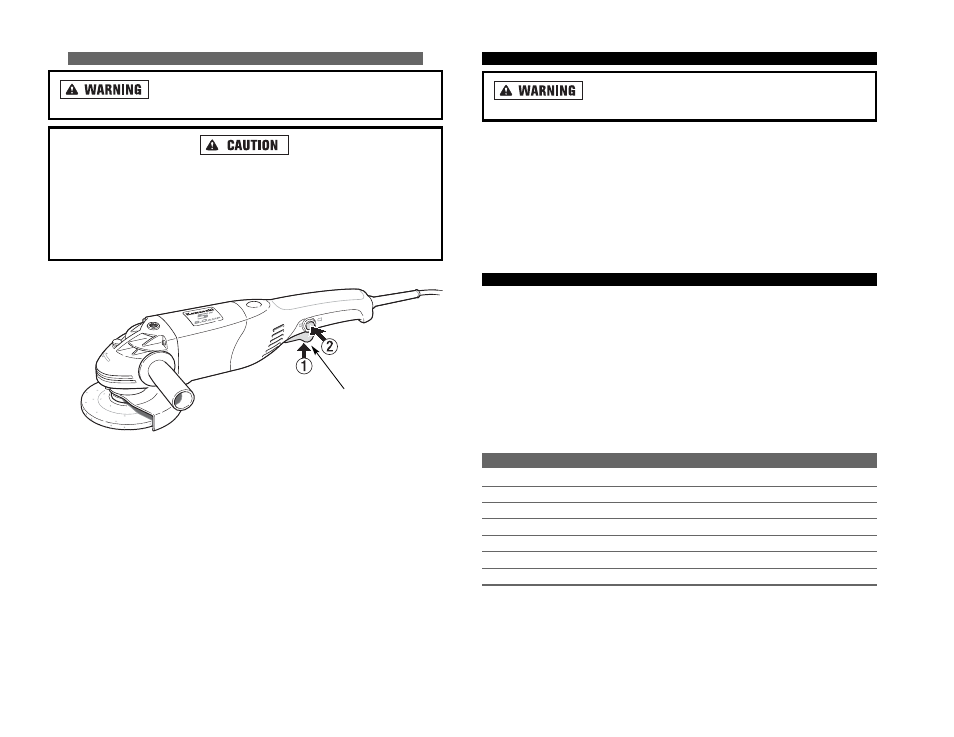
Press the “ON/OFF” switch to start the tool.
To stop, release the “ON/OFF” switch.
When continuous operation is desired, press the “ON/OFF” switch forward and
depress the lock-on button. This locks the switch “ON” until the
lock-on button is released.
13
ON/OFF
SWITCH