Kawasaki 840329 User Manual
Page 6
A
AT
TT
TA
AC
CH
HIIN
NG
G A
AU
UX
XIIL
LIIA
AR
RY
Y H
HA
AN
ND
DL
LE
E
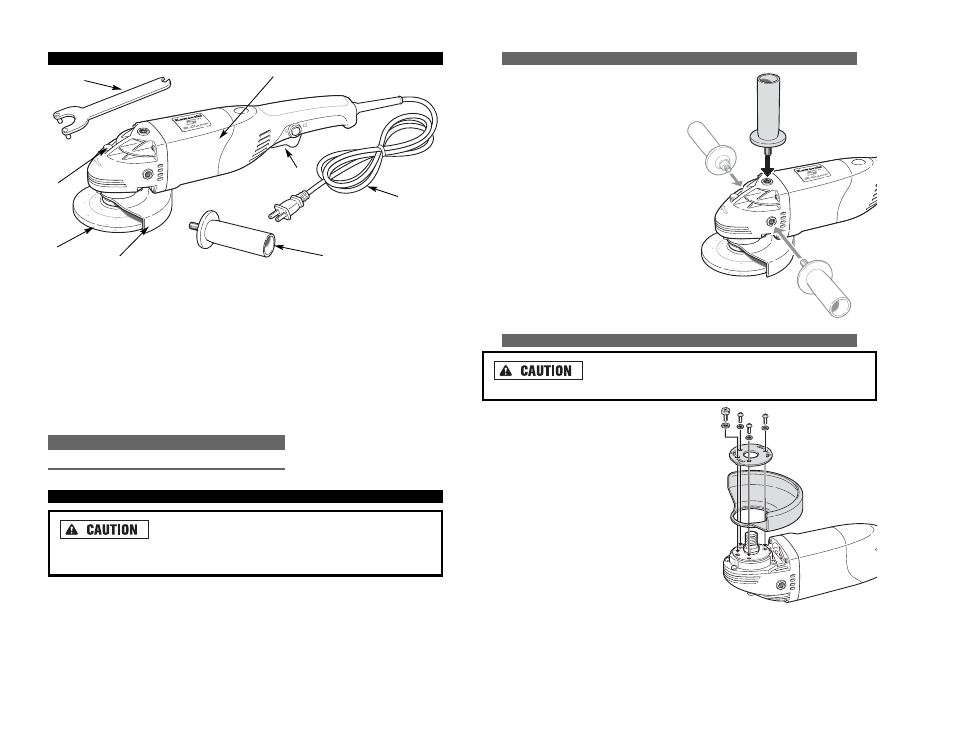
This tool comes with an auxiliary handle
which can be attached to different sides
of the Angle Grinder, depending on the
preference of the operator. This handle
is necessary to maintain complete con-
trol of the tool and should be used at all
times. Make sure this handle is always
fastened securely.
A
AT
TT
TA
AC
CH
HIIN
NG
G W
WH
HE
EE
EL
L G
GU
UA
AR
RD
D
N
Ne
evve
err b
brru
ussh
h o
orr g
grriin
nd
d w
wiitth
ho
ou
utt tth
he
e g
gu
ua
arrd
d iin
n p
plla
acce
e.. Brushes
are considered to be grinding wheels and must also be used with guards.
• Always unplug the tool before attempt-
ing to change the guard or accessories.
• Set the Angle Grinder on a flat surface
with the spindle facing up.
• Place the spring washer of the guard
over the spindle.
• Tighten the screw of the spring washer.
• Make sure that the guard is securely
tightened in place.
F
FU
UN
NC
CT
TIIO
ON
NA
AL
L D
DE
ES
SC
CR
RIIP
PT
TIIO
ON
N
C
CO
ON
NT
TR
RO
OL
LS
S A
AN
ND
D C
CO
OM
MP
PO
ON
NE
EN
NT
TS
S::
1. ON/OFF Switch with Locking Tab
2. Tool Body
3. Protective Guard
4. Grinding Wheel
5. Spindle Lock Button
6. Power Cord
C
CO
OM
MP
PO
ON
NE
EN
NT
T
M
MO
OD
DE
EL
L N
NU
UM
MB
BE
ER
R
Pin Spanner
690157
A
AS
SS
SE
EM
MB
BL
LY
Y
M
Ma
akke
e ssu
urre
e yyo
ou
u h
ha
avve
e ffu
ullll cco
on
nttrro
oll o
off tth
he
e tto
oo
oll w
wh
he
en
n g
grriin
nd
diin
ng
g
iin
ntto
o a
a cco
orrn
ne
err a
ass a
a ssh
ha
arrp
p,, ssu
ud
dd
de
en
n m
mo
ovve
em
me
en
ntt m
ma
ayy o
occccu
urr w
wh
he
en
n tth
he
e w
wh
he
ee
ell
cco
on
ntta
accttss a
a sse
ecco
on
nd
da
arryy ssu
urrffa
acce
e..
9
10
A
AC
CC
CE
ES
SS
SO
OR
RIIE
ES
S::
7. Side Handle
8. Pin Spanner
8
5
4
3
6
7
1
2