Kawasaki 840067 User Manual
Page 6
JIGSAW OPERATION
ADJUSTING SPEED
The operating speed of the jigsaw can
be varied by using the Speed Control
Switch located on the top of the
jigsaw. Turn the speed control from
0 to 6 to set the speed. On most cuts,
such as wood and metal, the faster
speed works best. On other materials,
such as plastic or laminants, a slower
speed might be necessary to reduce
vibration and make smoother cuts.
TRIGGER "ON-OFF" SWITCH
Plug the jigsaw into an approved 115 V AC outlet. This tool is double insulated
and equipped with a polarized plug (one blade is wider than the other). Double
insulation eliminates the need for a special three-wire grounded power supply.
Holding the jigsaw by the insulated handle, squeeze the trigger to turn the jigsaw
ON and release the trigger to turn the jigsaw OFF. Allow the blade to reach the
maximum set speed before bringing it in contact with the workpiece.
CUTTING TIPS
Place the finish side of the
workpiece down and clamp it
to a workbench or table. Draw
cutting lines on the back side.
Place the front edge of the saw
baseplate on the workpiece
and line up the blade with the
line to be cut. Press the jigsaw
down firmly on the workpiece
and cut slowly along the
guidelines. Build up cutting
speed as you progress. If you
want to leave room for finish
sanding, cut slightly to the out-
side of the drawn guidelines.
10
ASSEMBLY
Disconnect plug from AC power source before
assembling parts, making adjustments, or changing blades. Failure to
remove electrical power could cause accidental starting of the jigsaw resulting
in serious injury to the operator and/or damage to the tool.
ATTACHING THE BLADE
1. Firmly grip the plastic blade guard
and slide it up to expose the blade
clamp.
2. Using a hex wrench (provided in a
slot beneath the motor), loosen the
two hex socket-head screws on the
blade clamp until it slides forward
enough to open a slot for the blade.
3. Insert the blade into the blade
clamp with the cutting edge
facing to the front of the jigsaw.
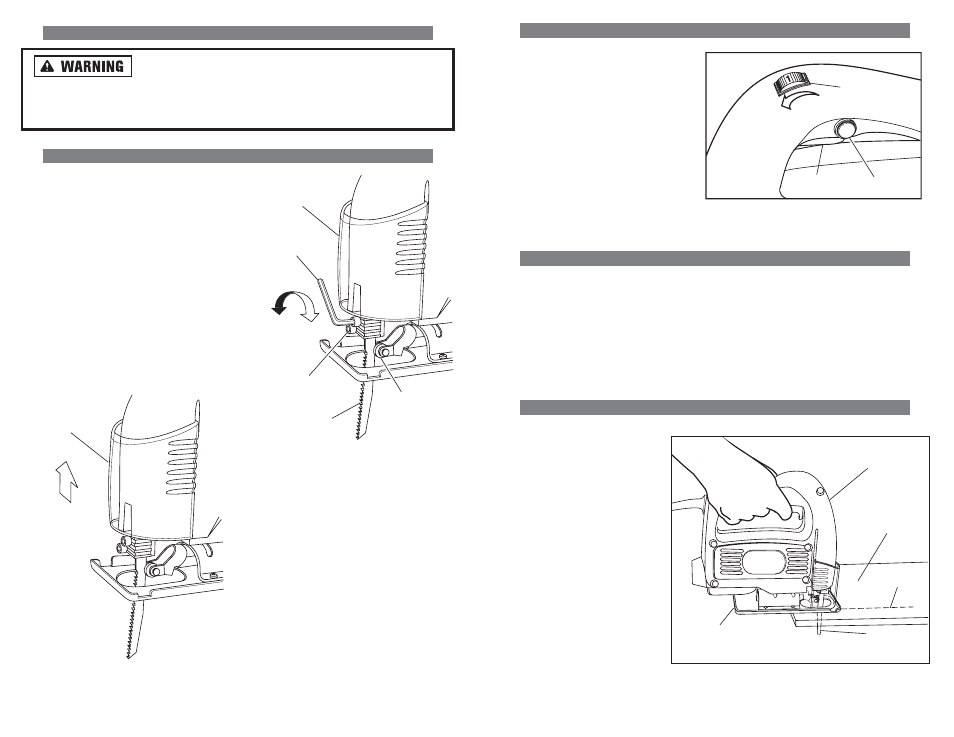
Speed Control
Switch
0
6
Trigger Lock
Trigger
FIGURE 4.
ADJUSTING THE SPEED CONTROL SWITCH
Baseplate
Guideline
Blade
Jigsaw
Workpiece
(Finish Side
Facing DOWN)
FIGURE 5.
MAKING THE INITIAL CUT
FIGURE 2.
MOVING THE CLEAR PLASTIC BLADE
GUARD TO LOOSEN THE BLADE CLAMP
Hex Socket-head
Screws
Hex Wrench
Tighten
Loosen
Roller Guide
Blade
Blade Guard
Blade Guard
Grip Blade Guard at
bottom-rear and
press inward to
slide upward.
FIGURE 3.
INSERTING THE BLADE
INTO THE BLADE CLAMP
4. Using a hex wrench, securely tighten
the two hex socket-head screws on
the blade clamp.
5. Using a hex wrench, loosen the two
hex socket-head screws holding the
bottom board and the guide roller
on the saw housing.
6. Slide the guide roller forward until the
back of the blade fits loosely in the
center groove. Using a hex wrench,
securely tighten the two hex socket-
head screws holding the guide roller
and bottom board to the saw housing.