Kustom KAA16 User Manual
Page 3
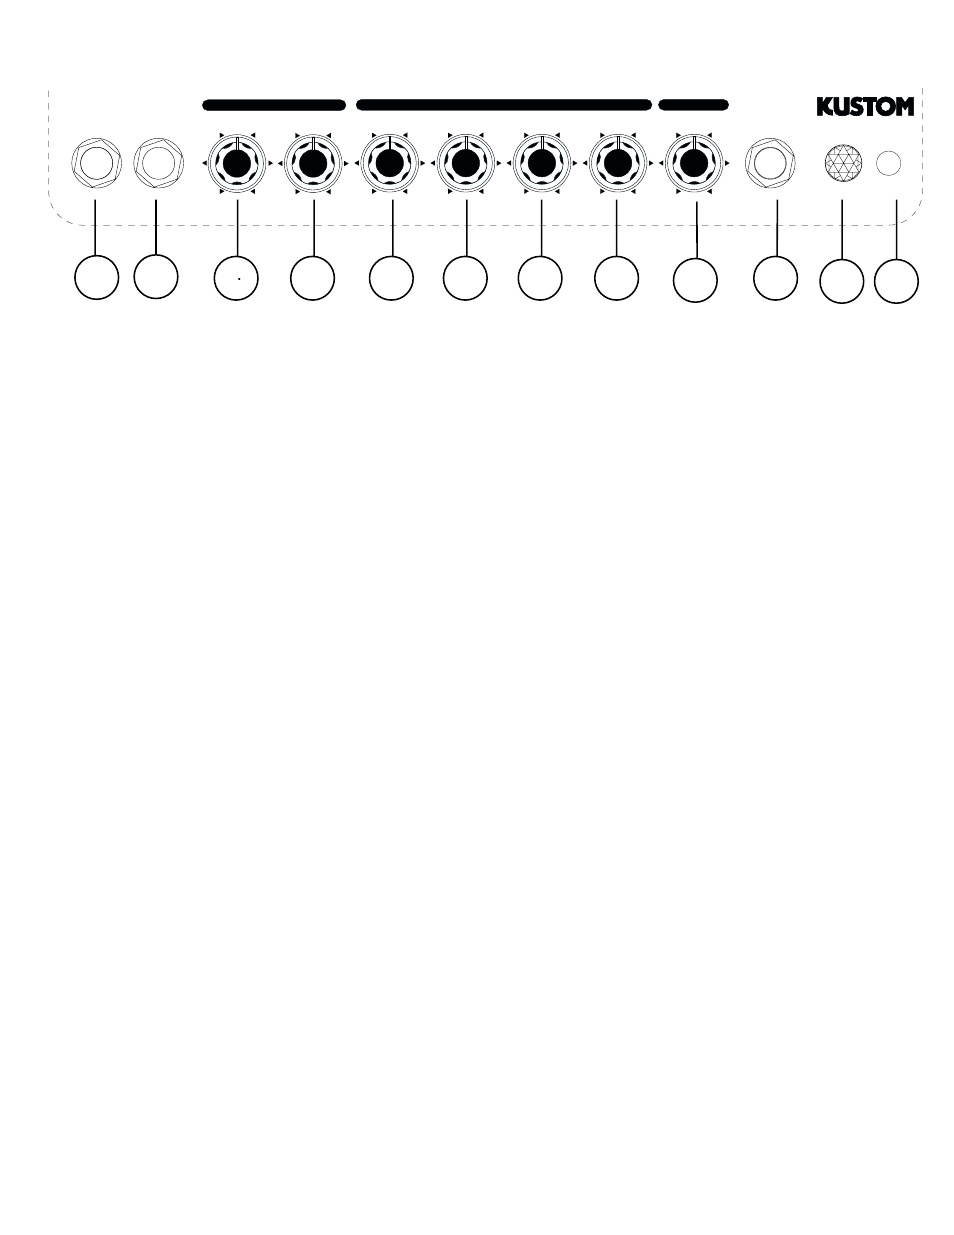
1.) Mic/Line Input - this is a 1/4 2 conductor input jack for plugging in Hi-Z microphones. It is intended
for microphones but will accept other instruments as well.
2.) Guitar Input - this is a 1/4 2 conductor input jack for plugging in your instrument. It is intended for
guitar or Hi-Z microphones but will accept other instruments as well.
3.) Mic/Line Volume - this control is the input volume control for the mic/line input. Slowly increase the
control to increase the volume. If you are using a high impedance microphone, be careful when increasing
the volume. Depending on mic position, it may feedback if mic is in front of speaker.
4.) Guitar Volume - this control is the input volume control for the guitar input. Slowly increase the
control to increase the volume. If you are using a guitar with an on-board preamp, set its level for a
mid position before increasing this control otherwise distortion may occur.
5.) Low - this control is the bass control. It is active and set to boost or cut frequencies at 60 Hz. This
will effect the low frequency signals. Turning it counterclockwise, the low will be rolled off -18db.
Clockwise, increases those frequencies up to +18db.
6.) Lo Mid - this control is the Low Midrange control. It is active set to boost or cut frequencies at 350
Hz. This will effect the mid-low frequency signals. Turning it counterclockwise, the low-mids will be
rolled off -12db. Clockwise, increases those frequencies up to +12db.
7.) Hi Mid - this control is the High Midrange control. It is active and set to boost or cut frequencies
at 2.5KHz. This will effect the mid-high frequency signals. Turning it counterclockwise, the low-mids
will be rolled off -12db. Clockwise, increases those frequencies up to +12db.
8.) High - this is the high frequency tone control. It is active and set to boost or cut frequencies at 8KHz.
This will effect the high frequency signals. Turning it counterclockwise, the highs will be rolled off -18db.
Clockwise, increases those frequencies up to +18db.
9.) Reverb Level - this control adds the spring reverb and mixes it into the main signal buss. Reverberation
creates a trail like effect with the sound. It lets the notes hang in the air longer, extending the sound.
10.) Headphone Jack - this is a 1/4 3 conductor jack for plugging headphones. It will sum the signal
and put the sound in both ears, thereby creating a pseudo-stereo sound. Volume will be determined
by the volume control on the channel you are on. It will disconnect the internal speaker when plugged
in. This will allow quiet practicing.
11.
)
Jewel Light - this jewel light lets you know that the amplifier is on.
12.
)
Power - this switch turns on and off the AC power to the amp.
Back Panel - this is a 2 conductor 1/4 speaker output jack. This will disconnect the internal speaker
and allow an external speaker cabinet to be employed. Rating is 8 ohms.
3
11
12
1
2
5
9
10
8
4
6
7
1 6 W A T T
A C O U S T I C G U I T A R A M P L I F I E R
LO-MID
LOW
HI-MID
HIGH
MIC/LINE
INPUT
POWER
GUITAR
MIC/LINE
GUITAR
INPUT
LEVEL
HEADPHONE
VOLUME
REVERB
KAA16
EQUALIZER