Kustom Quad 100 DFX User Manual
Page 3
VOLUME
MID
HIGH
LOW
BASS
GAIN
VOLUME
CD/TAPE
INPUT
LINE OUT
GUITAR
INPUT
POWER
LEAD CHANNEL
RHYTHM CHANNEL
DIGITAL EFFECTS
LEVEL
PROGRAM
Quad 100 DFX
5
6
7
8
2
3
4
1
BOOST
CHANNEL
SELECT
EFFECTS
ON
OFF
ON
OFF
LEAD
RHYTHM
1. HALL REVERB
2. SPRING REVERB
3. SLAP BACK
4. DELAY
6. CHORUS/REVERB
7. FLANGE/REVERB
5. CHORUS
8. TREMOLO
MIDDLE
TREBLE
PREAMP
NEUTRAL
BRILLIANT
PREAMP
USA
UK
1
3
5
6
7
8
9
16
4
2
10 11 12 13
14 15
17
19
18
20
21
22
23
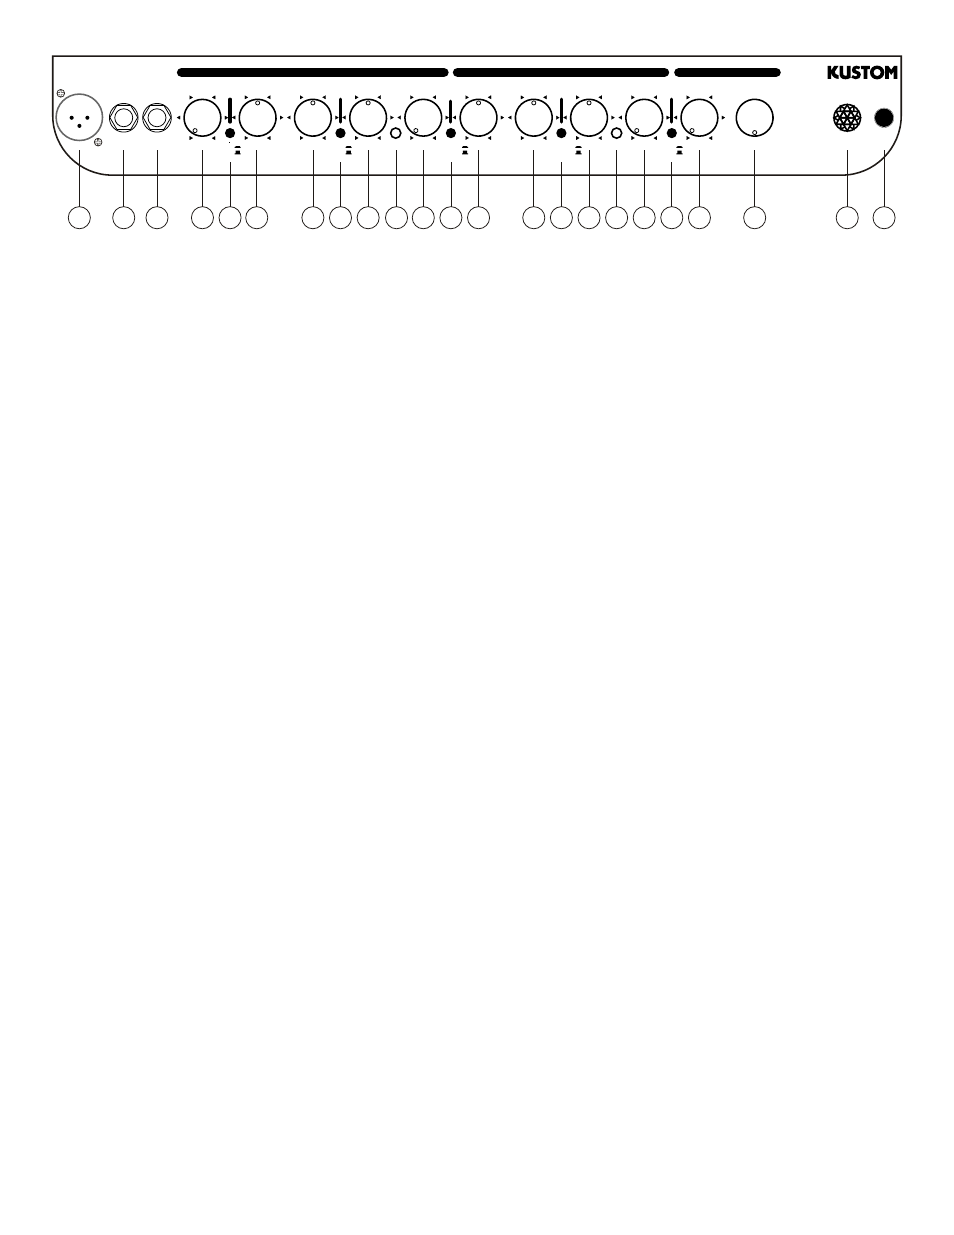
1.)
Line Output - this is a 3 cond. XLR output jack for plugging into Lo-Z microphone inputs as found on PA or
recording mixers. It is intended in place of external mics or used as a built in direct box.
2.)
CD/Tape Input - this 1/4" 3 conductor jack will allow you to plug in a CD player, tape or any other source to practice
along with. It sums the left and right signals into a mono signal. To control the volume of the source, adjust the output
volume of the device.
3.)
Guitar Input Jack - this is a 1/4" 2 conductor input jack for plugging in your instrument. It is intended for guitars but
will accept other instruments as well.
4.)
Lead Gain - adjust this clockwise to increase the amount of distortion you add to the overdrive signal. Used in the
lower ranges of the control, you get a less distorted sound, a "bluesy" tone. As you increase the gain, you add
tremendous amounts of distortion to the signal for a harder edged "crunch" tone.
5.)
Boost- this switch will add more distortion to the lead channel.
6.)
Low - this control is the bass control for the lead channel. It is passive and set to shelve frequencies at 100 Hz.
Turning it fully clockwise, the signal is unaltered. Turning it counterclockwise, the low will be rolled off -12db.
7.)
Mid - this control is the midrange control for the instrument channel and is passive and set to shelve frequencies at
800Hz.Turning it fully clockwise, the signal is unaltered. Turning it counterclockwise, the low will be rolled off -12db.
8.)
Preamp Switch- this switch selects which preamp style you are using. It will switch between the classic USA warm
sound or Brighter sound famous in the UK.
9.)
High - this is the high frequency tone control for the microphone channel. It is passive and set to shelve frequencies
at 3KHz. Turning it fully clockwise, the signal is unaltered Turning it counterclockwise, the highs will be rolled off -
12db.
10.) Lead Channel On LED - when this LED light is on, it indicates that the Lead Channel is on.
11.) Volume - this is a volume control for the Lead Channel ONLY.
12.) Channel Select Switch - this switch selects between the Lead or Rhythm Channel.
13.) Bass - this control is the bass control. It is passive and set to shelve frequencies at 100Hz. Turning it fully clockwise,
the signal is unaltered Turning it counterclockwise, the low will be rolled off -12db.
14.) Middle - this control is the midrange control for the instrument channel, and is passive and set to shelve frequencies
at 1KHz.Turning it fully clockwise, the signal is unaltered. Turning it counterclockwise, the low will be rolled off -12db.
15.) Preamp Switch - when engaged, this switch will boost the treble sound of the Rhythm channel. It boosts 3 KHz by
+6 db.
16.) Treble - this is the high frequency tone control. It is passive and set to shelve frequencies at 3KHz on the instrument
channel. Turning it fully clockwise, the signal is unaltered. Turning it counterclockwise, the highs will be rolled off -
12db.
17.) Rhythm Channel On LED - when this LED light is on, it indicates that the Rhythm Channel is on.
18.) Volume - this is a volume control for the Rhythm Channel ONLY.
19.) Effects On/Off - this switch engages the digital effects section.
20.) Effects Level - this control adds the digital effects section and mixes it into the main signal buss. Several different
effects are available.
21.) Program Select - this switch will select any of eight different effects. 2- Reverbs, 2- Echos, Chorus, Chorus/Reverb,
Flange/Reverb and Tremolo.
22.) Jewel Light - this jewel light lets you know that the amplifier is on.
23.) Power - this switch turns on and off the AC power to the amp.
Back Panel - (not pictured)
Speaker Out - this is a 2 conductor 1/4" speaker output jack. This will disconnect the internal speaker and allow an
external speaker cabinet to be employed. Rating is 8 ohms.
Line Output - this is a 2 conductor 1/4" line output jack. This will allow an external amplifier or mixing board to be
supplied with the signal from this amp.
Effects Loop I/O - these are 2-2 conductor 1/4" jacks. This will allow an external effects device or equalizer to be
patched back in before the power amp section in this amp. One is send and the other is return.
Footswitch Jack - this is a 3 conductor 1/4" jack. This is for hooking up a footswitch to switch channels and to turn
on/off the effects section.